MD + MM Editor

MD

Machinedrum Editor

User guide · version 0.9.0

Future Native Audio · mdmm.dev
The chapters follow the Machinedrum manual's order. Every sentence is our own.

ContentsMachinedrum Editor

Contents

  1. 1Introduction, front panel and connectorsThe editor's page in place of the front panel: workspaces, the LCD, the transport, the track rail and the connections to your audio and MIDI.
  2. 2LCD user interface and quick startWhat each field of the LCD shows, how windows open and close, and a first session: load a kit, place trigs, play and tweak.
  3. 3Sound synthesis: kitsThe kit and its sixteen machines: load, save, name, copy and clear kits, choose machines, relate tracks and edit machine parameters.
  4. 4Track effectsThe amplitude modulator, EQ, filter and sample rate reducer that every track has, and how to set and lock them.
  5. 5Routing pageDistortion, volume, pan, the delay and reverb sends and the LFO controls of each track, on the Kit and Mix workspaces.
  6. 6Stereo master effectsThe Rhythm Echo delay, Gate Box reverb, master EQ and Dynamix compressor on the Mix workspace, and how to lock them with control machines.
  7. 7LFOsThe sixteen LFOs of a kit: choose a target, a shape, a speed and a depth, and layer them to move a sound.
  8. 8Pattern sequencerChoose, record, edit, copy and clear patterns of 16 tracks, with mutes, accents, swing, parameter locks and slides.
  9. 9Song modeArrange patterns into songs of up to 256 rows, with repeats, parts, mutes, tempo changes, loops, jumps and halts.
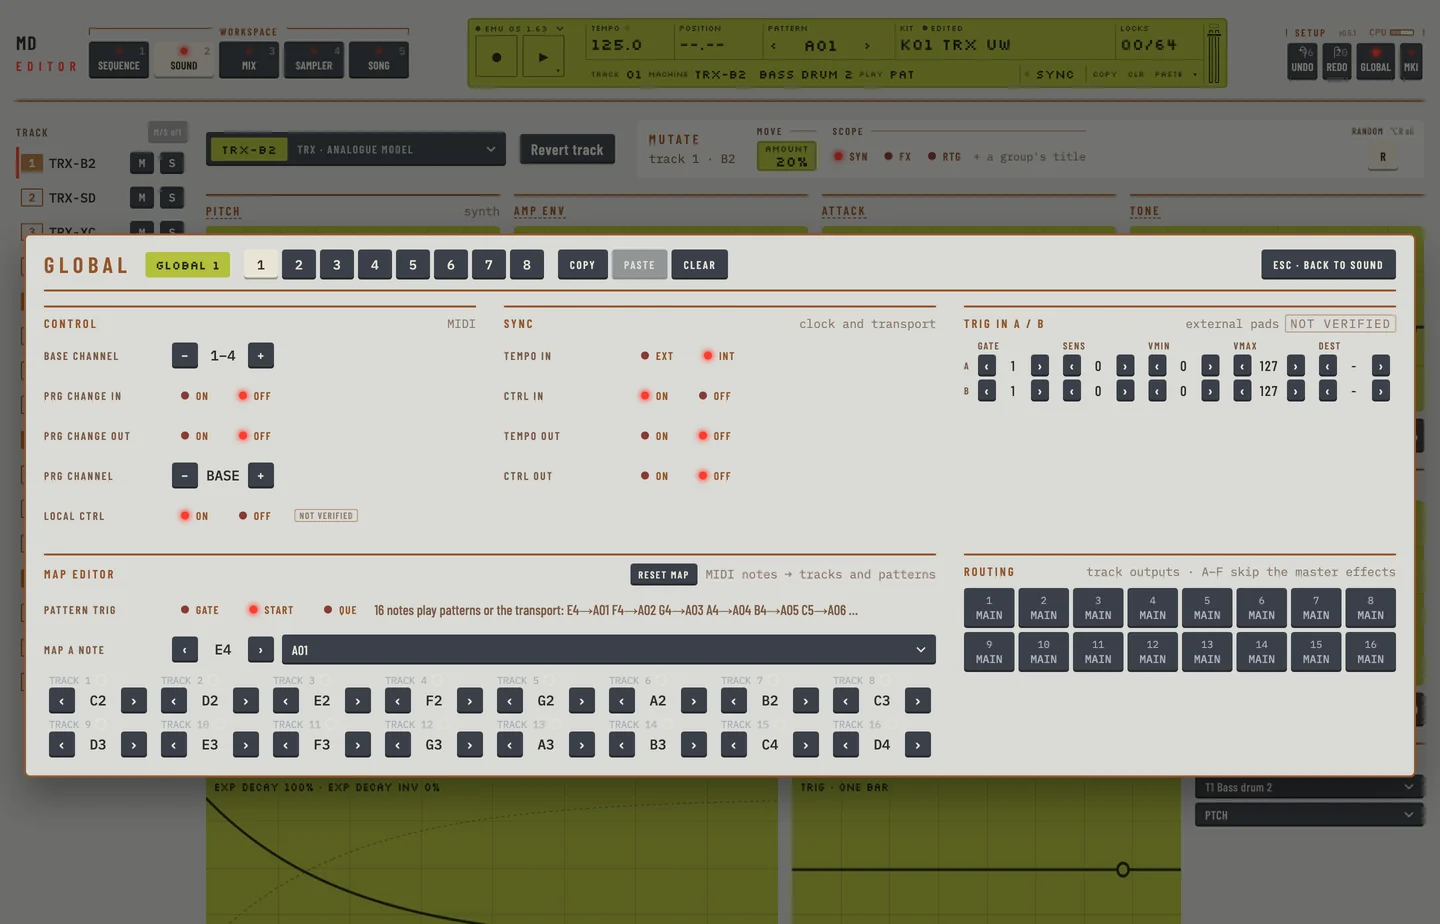
  10. 10Global settingsThe machine's own settings: MIDI channels, the note map, program change, outputs, sync, and the SysEx send and receive.
  11. 11Sample manager, UW onlyLoad, name, hear and place samples in the ROM slots, and record into the RAM slots, on the UW machine.
  12. 12Early start-up menuWhat the machine's start-up menu does, and what to do in the editor instead.
  13. 13Technical information, MKI vs MKIIThe limits of the machine as the editor keeps them, and where the editor differs for the MKI and MKII models.
  14. 14Appendix A: machine referenceEvery machine the Machinedrum can load into a track, by family, and where the editor shows it.
  15. 15Appendix B: MIDI control referenceThe note map and the control change numbers the Machinedrum answers to, and where the editor sets them.
  16. 16Appendix C: sysex referenceThe system exclusive messages of the Machinedrum, and the part of the editor that sends or reads each.
  17. 17Beyond the hardwareWhat the editor does that the Machinedrum itself does not have, or does in its own way.
1. Introduction, front panel and connectorsMachinedrum Editor

1

Introduction, front panel and connectors

MD manual pp.1-8

The Machinedrum Editor runs the Elektron Machinedrum firmware (OS 1.63) behind one web page. You work on the page. It has no picture of the machine's front panel and no LCD with menus to step through: every function is a control on the page. The firmware does the work underneath, so the sound and the sequencer are the machine's.

This chapter maps the machine's front panel and rear connectors to the page. Later chapters follow the manual's order and say how to do each job.

FRONT PANEL

The page has three parts. The top bar holds the workspace tabs, the LCD and the Undo, Redo and GLOBAL keys. The track rail runs down the left side. The workspace fills the rest.
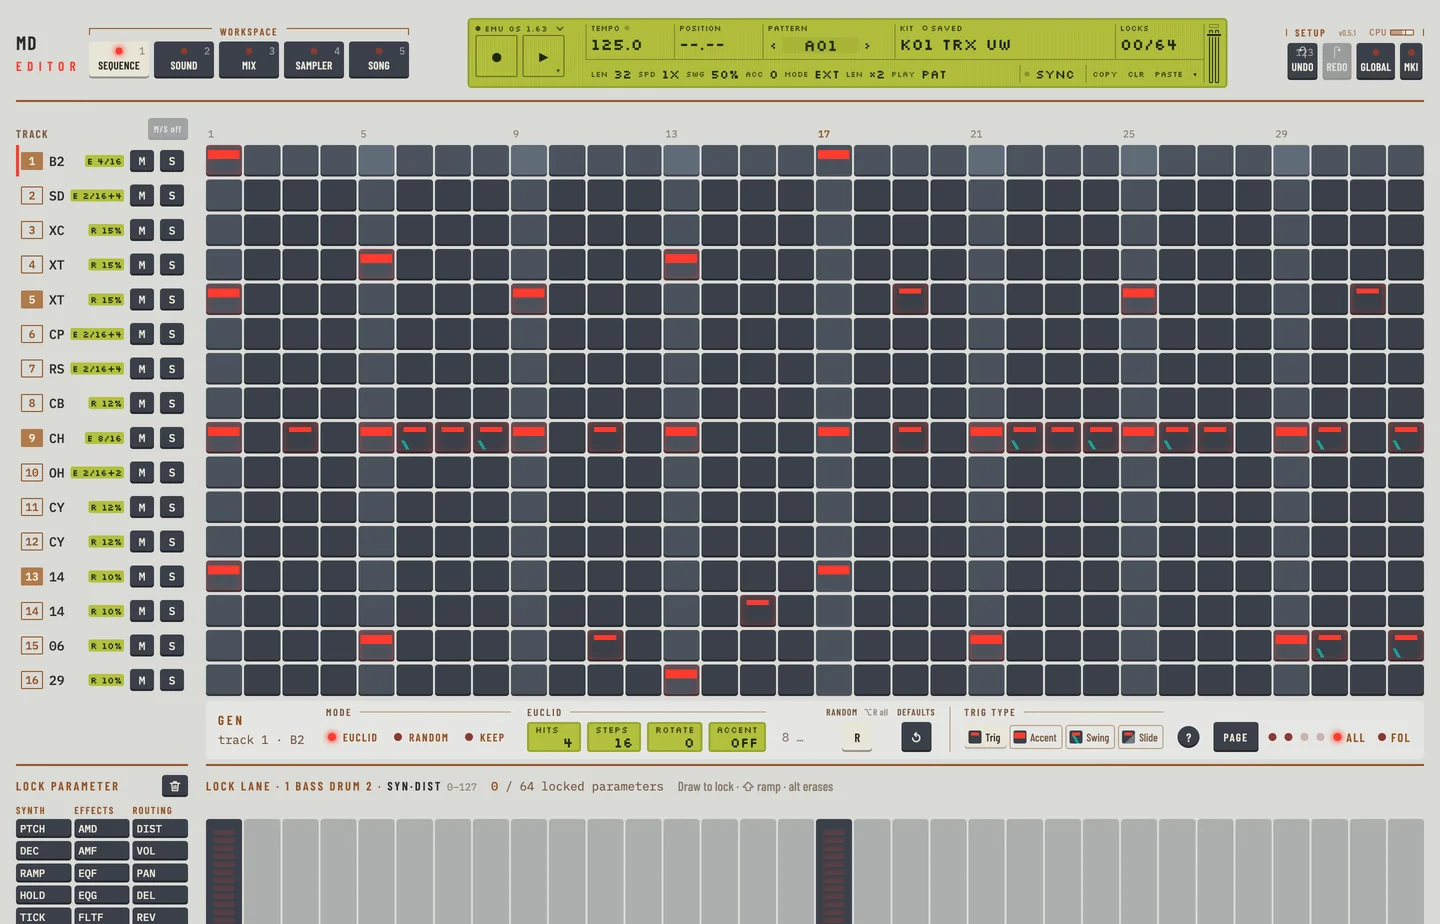
The Machinedrum Editor

The workspaces

The machine has pages that you reach with keys. The editor has workspaces that you reach with the tabs in the top bar.

WorkspaceKeyWhat it holds
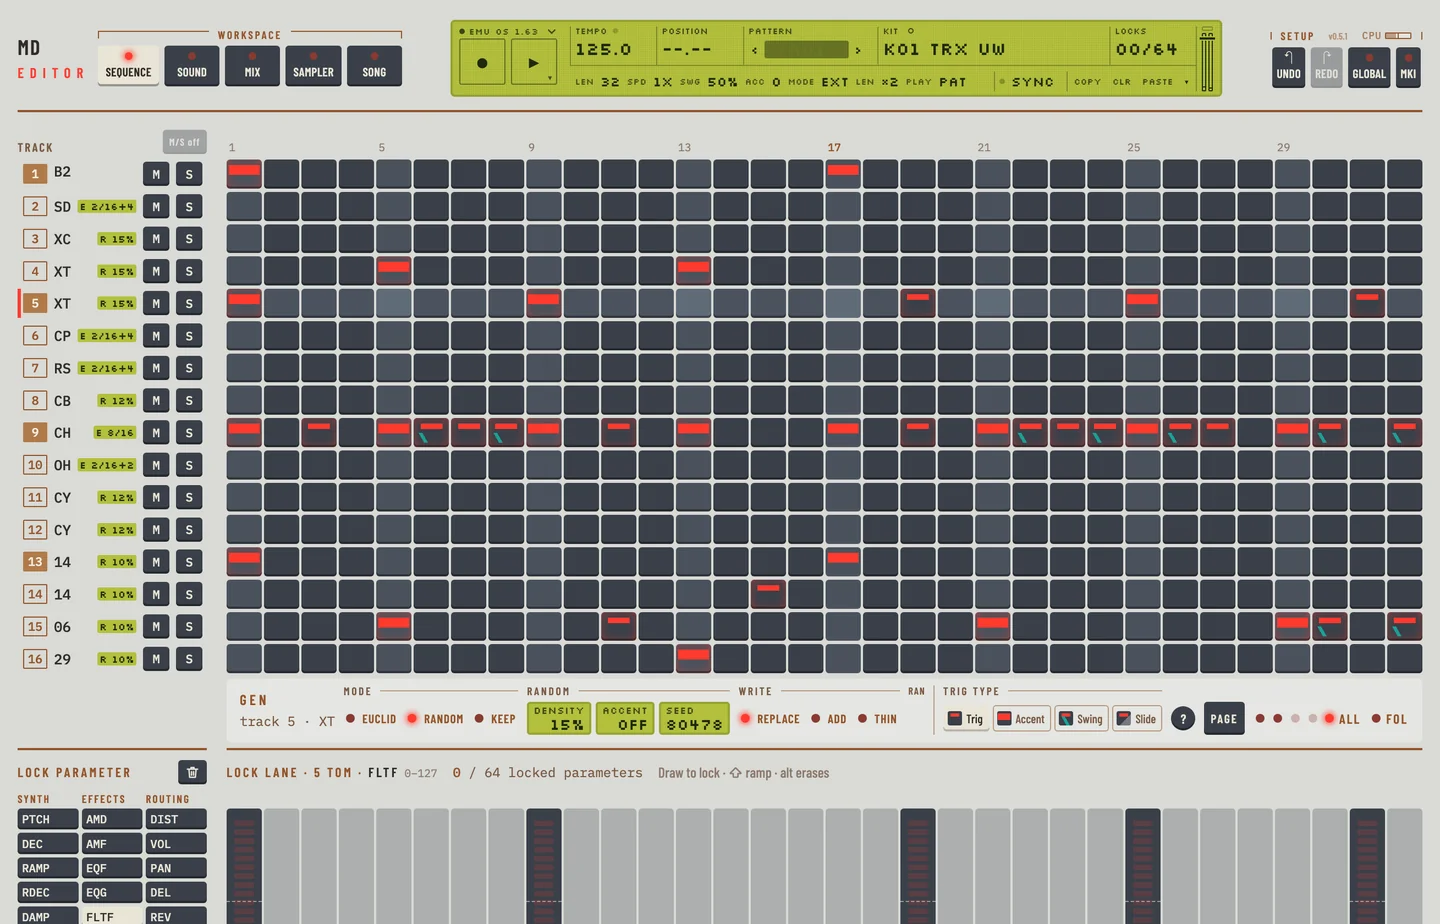
Pattern[1]the step grid, the lock lane and the generators
Kit[2]the selected track's machine, effects, routing and LFO
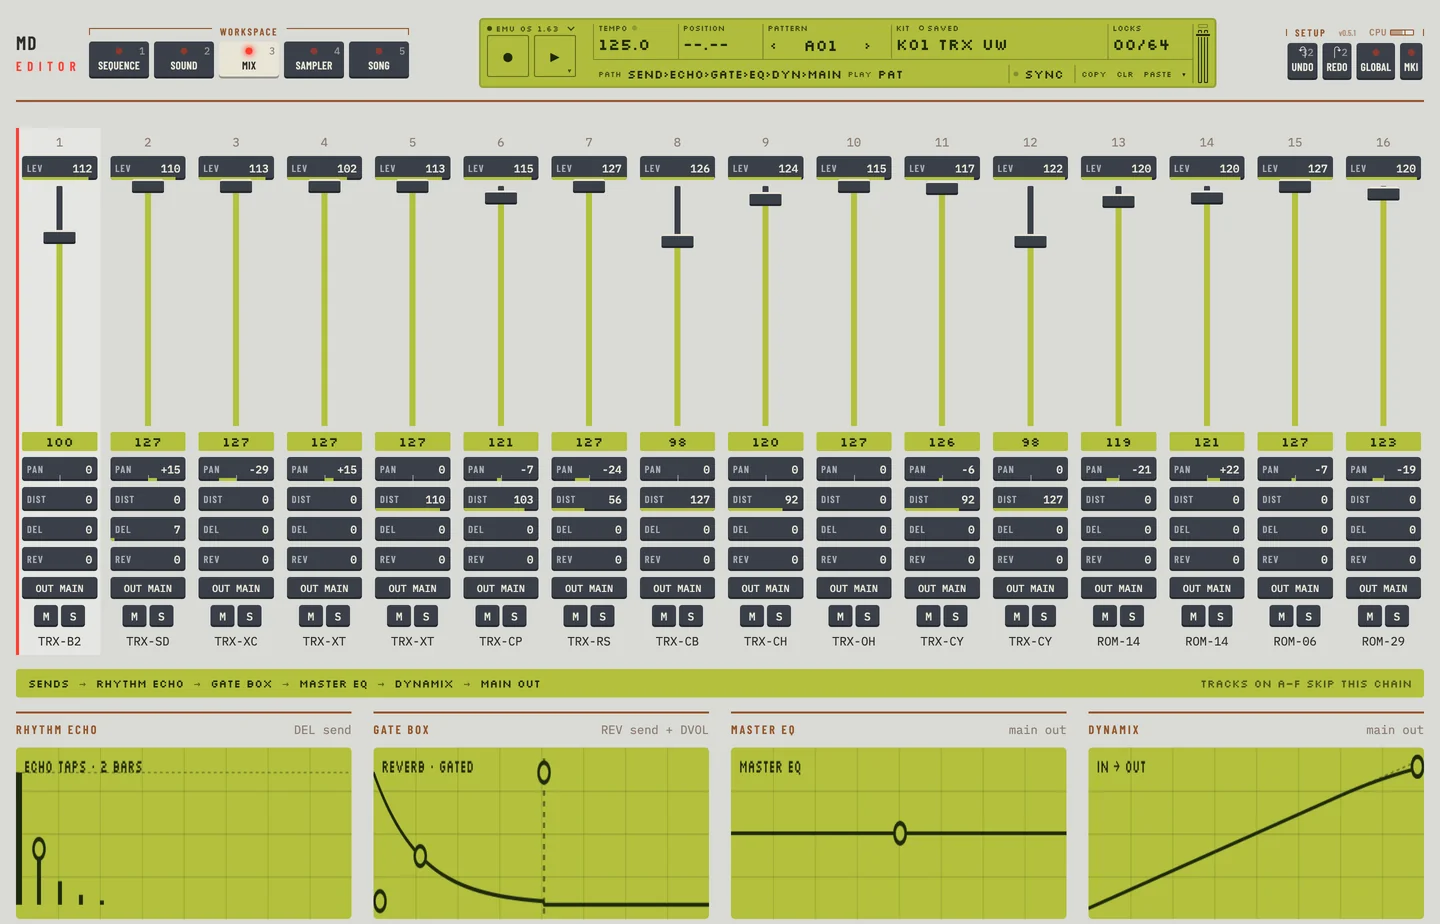
Mix[3]one strip a track, and the four master effects
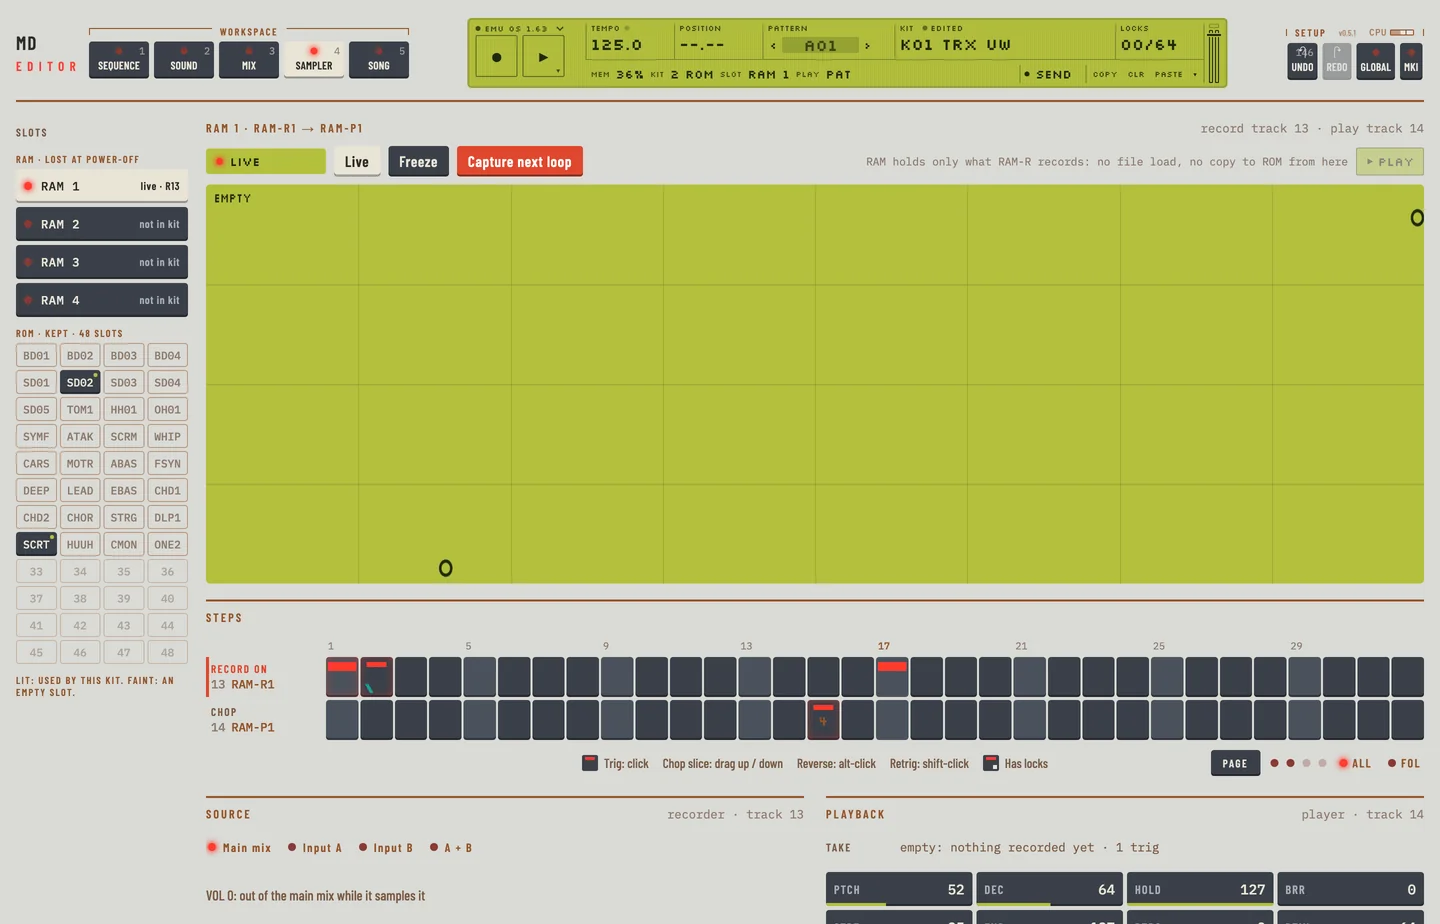
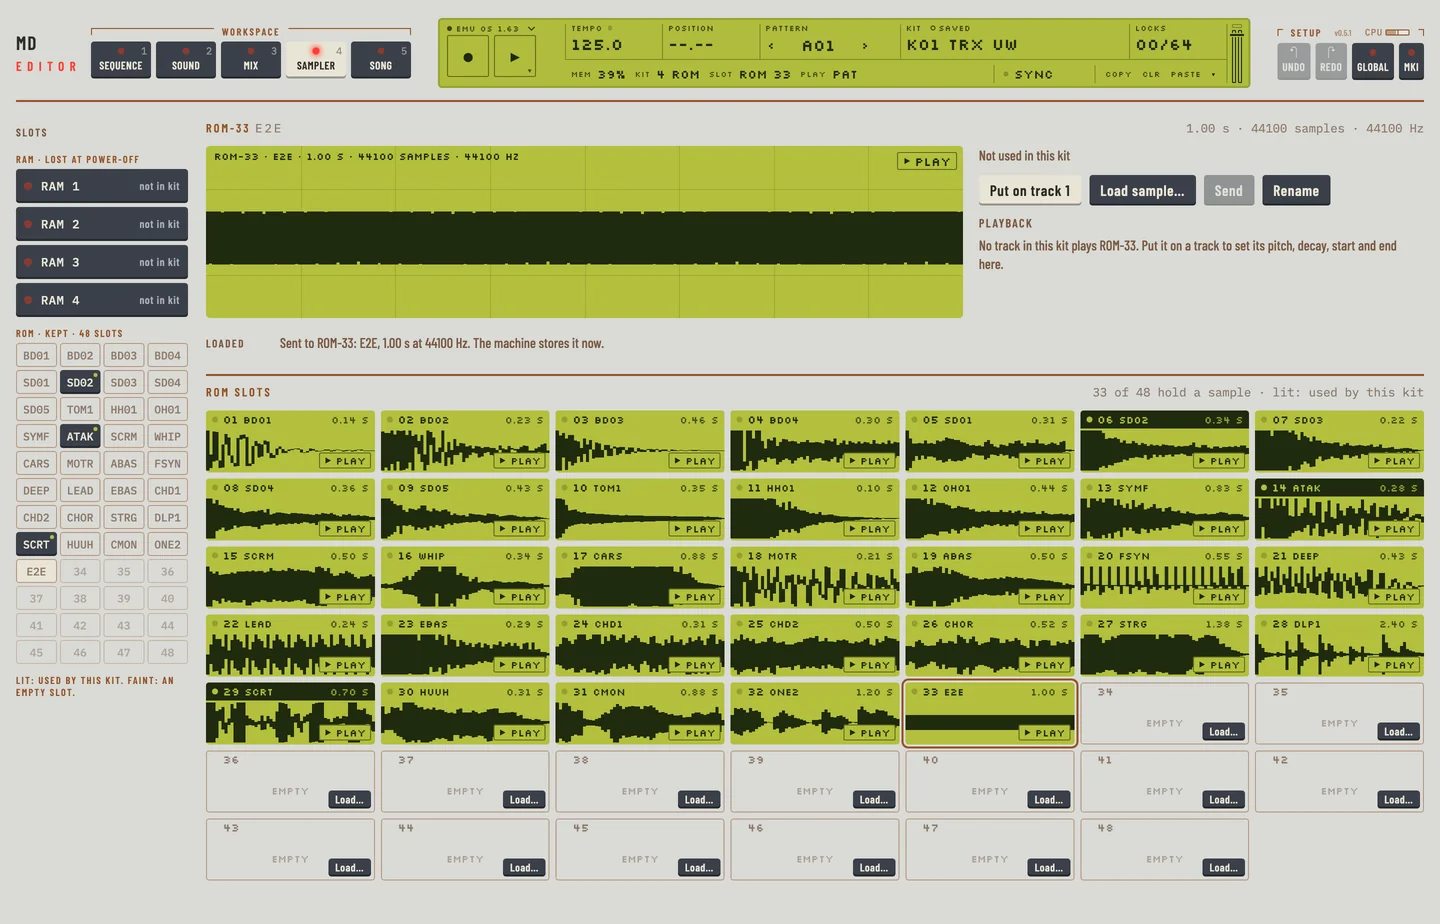
Sampler[4]the sample slots and the RAM machines
Song[5]the song arrangement

The PLATE entry in the engine menu (the EMU OS entry in the LCD) switches the page between the silver MKI look and the black MKII look. It changes the colours only.

From the front panel to the page

On the machineIn the editor
Master volume knobthe volume of your DAW or system
SOUND SELECTION wheel and LEDsthe track rail
TRIG keys 1 to 16the steps of the grid, and the piano keys
SYNTHESIS, EFFECTS and ROUTING keygroups on the Kit workspace, all in one view
DATA ENTRY knobs A to Hthe value boxes
SCALE SETUP key and page LEDsthe Page key and four LEDs on the Pattern workspace
RECORD, PLAY, STOPREC and the Play and Stop key in the LCD
TEMPO keythe Tempo field of the LCD
KIT keythe Kit field of the LCD
BANK key and the A to H keysthe pattern chooser
FUNCTION keythe [⌥] key
CLASSIC/EXTENDED keyMODE on the Pattern workspace's second LCD line
PATTERN/SONG keyPLAY on the LCD's second line
ENTER/YES, EXIT/NO and the arrow keysnot needed: every menu is a control, and [ESC] closes a window

On the machine you move through menus with ENTER/YES, EXIT/NO and the arrow keys. In the editor you click the control. The firmware still takes those keys, but only a real machine's panel (the hardware MIDI engine) can send them.

Select a track

The track rail lists the 16 tracks. Each entry shows the track number, the machine on it, and an M and an S key for mute and solo.

  • Click a track in the rail to select it.
  • Press [↑] or [↓] to select the track before or after.

On the machine you hold FUNCTION and press a TRIG key to select a track. In the editor a plain click selects it.

On the Mix workspace a light on each strip flashes when its track plays a trig. This is the editor's version of the SOUND SELECTION LEDs.

Classic and extended mode

  1. Open the Pattern workspace.
  2. Click MODE on the LCD's second line.
  3. The field reads CLASSIC or EXT. Each click switches.

In CLASSIC mode a pattern holds trigs only. In EXTENDED mode a pattern also holds its kit link and its parameter locks, and locks play only in EXTENDED mode.

In CLASSIC mode the lock lane says that its locks are muted. The locks are not lost: they come back when you switch to EXTENDED. In CLASSIC the pattern chooser shows no kit under any pattern.

  1. Click the pattern name in the LCD to open the pattern chooser. In EXTENDED it shows each pattern's kit, in CLASSIC it does not.
  2. Press [ESC] to close it.
The pattern chooser in CLASSIC mode

The FUNCTION key

The machine's FUNCTION key is the [⌥] key of the computer. Hold it while you press a key or drag a control, and the action reaches every track, or a wider range.

  • [⌥] and drag a value: move the same knob on every track.
  • [⌥] + [R]: randomise every track.
  • [⌥] + [M]: mute every track.
  • [⌥] + [SPACE]: live recording.
  • [⌥] + [DELETE] or [⌥] + [BACKSPACE]: clear the whole pattern.

While you hold [⌥], the keys it changes say what they do then. Clr becomes All.

The editor has no single key for every FUNCTION combination of the machine. Each combination is a control of its own, and the chapter for its job names it.

Pattern banks

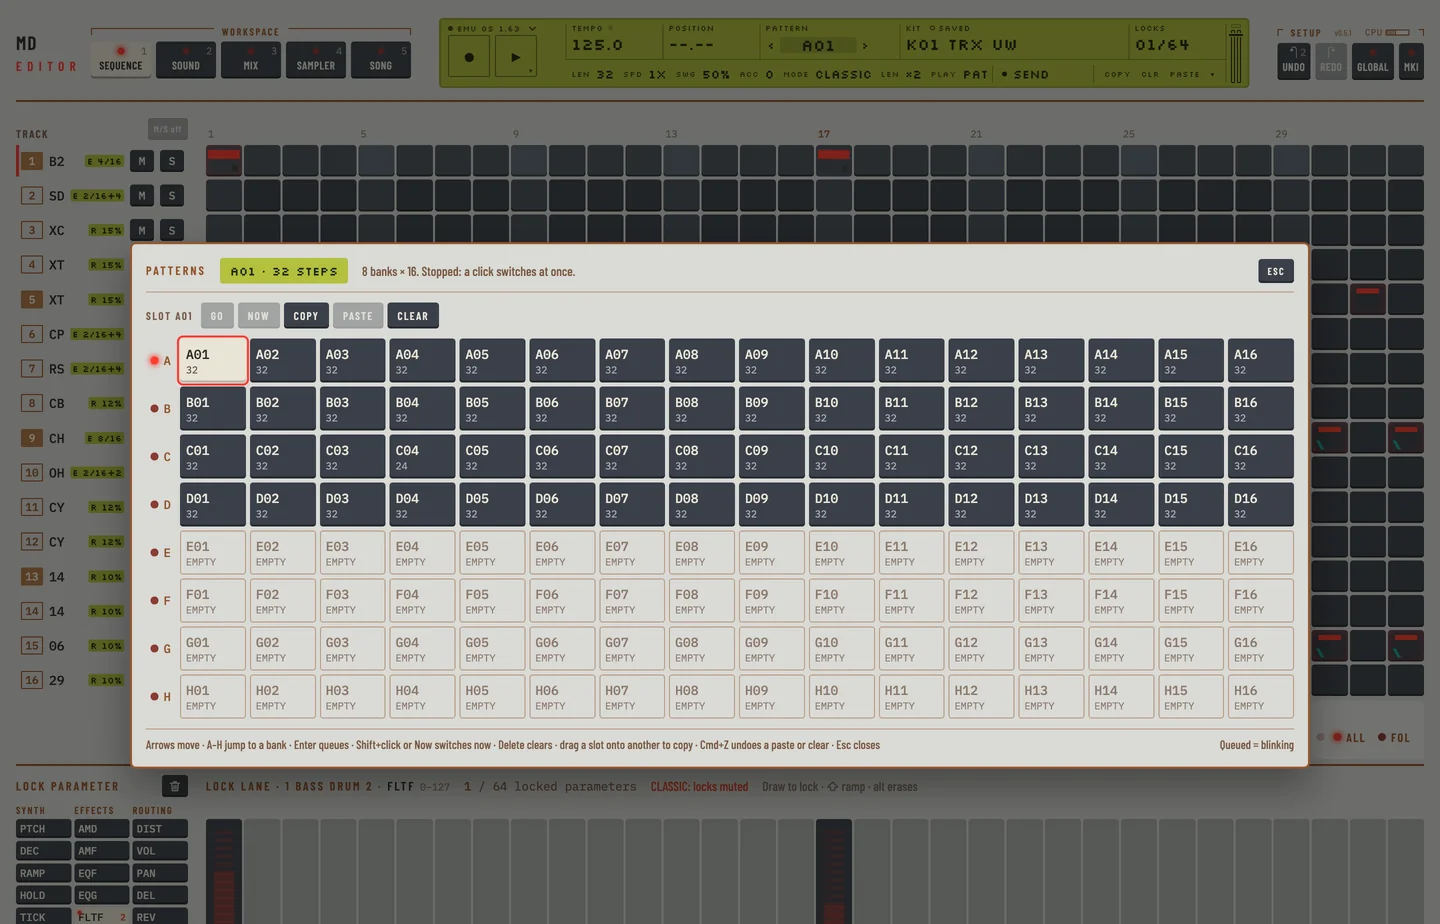
Patterns are in eight banks, A to H, of 16 patterns each.

  1. Click the pattern name in the LCD. The pattern chooser opens.
  2. Press a letter from [A–H] to jump to that bank, or click a bank key.
  3. Click a pattern. While the machine plays, it starts the pattern when the current one ends. When it is stopped, the pattern changes at once.
  4. Press [ESC] to close the chooser.

Every slot shows its name and its length in steps. A slot with no trigs reads EMPTY. To copy a pattern:

  1. Select a pattern that has trigs and click Copy.
  2. Select another slot and click Paste. The slot takes the steps and the kit link of the copy.
  3. To empty a slot, select it and click Clear. Its tile reads EMPTY.
  4. Press [⌘] + [Z] to take a paste or a clear back, once for each.

The ‹ and › keys beside the pattern name step to the pattern before or after.
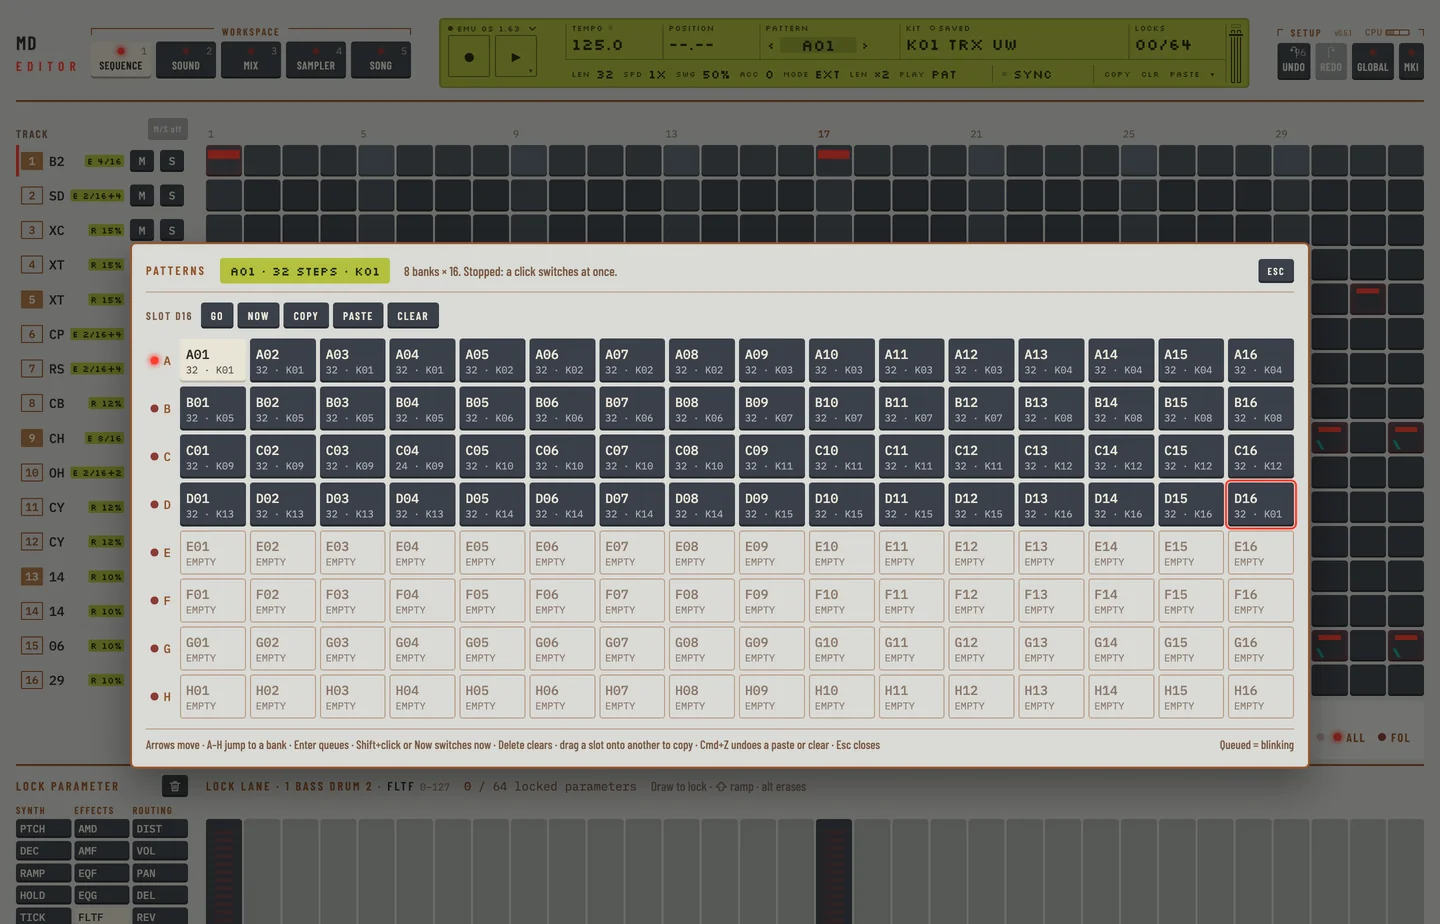
The pattern chooser
The pattern chooser

Level

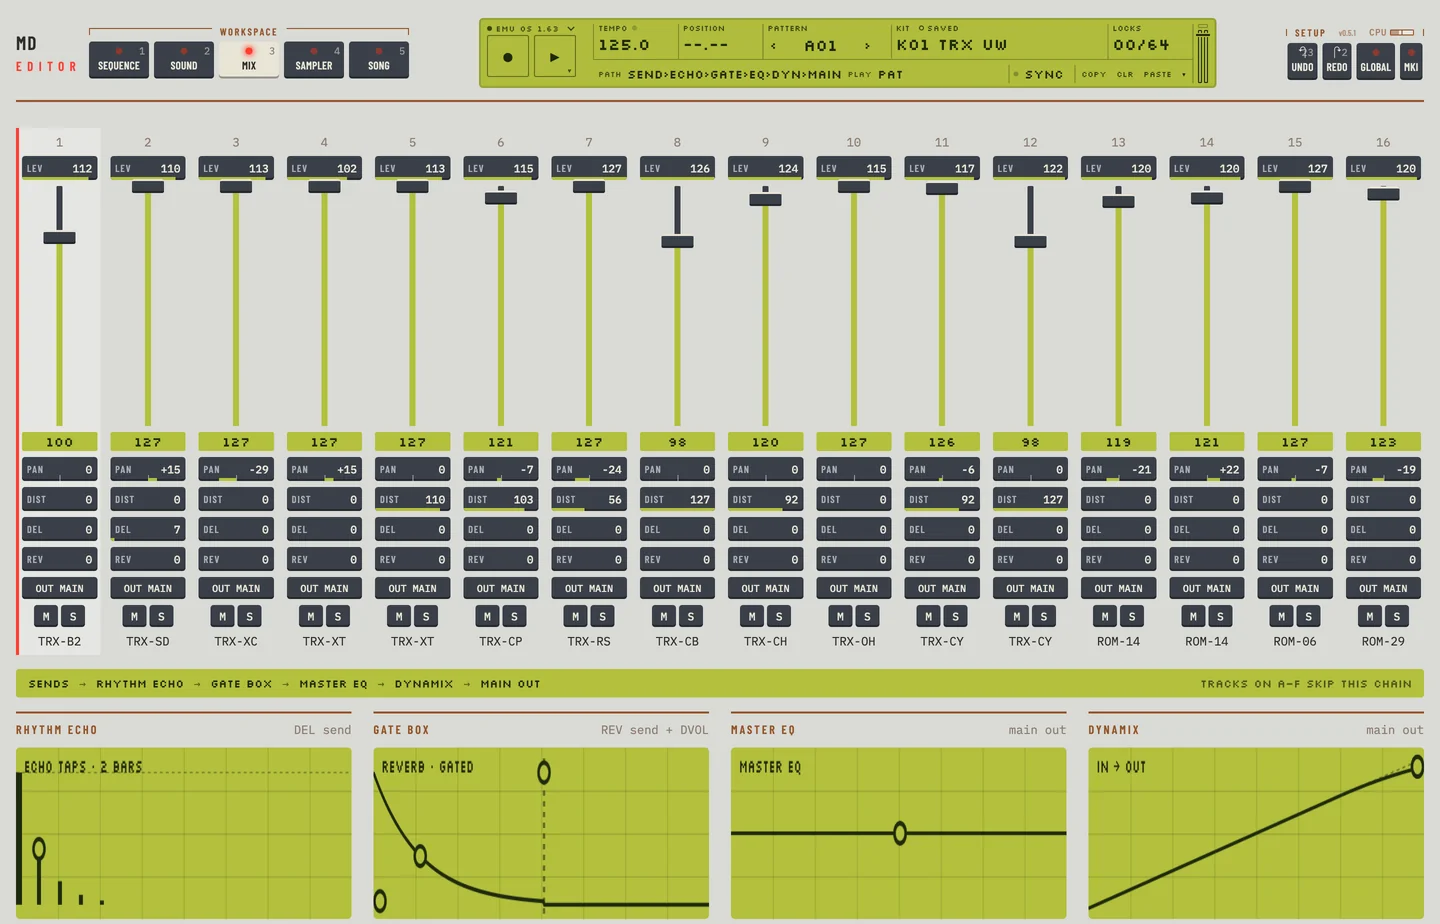
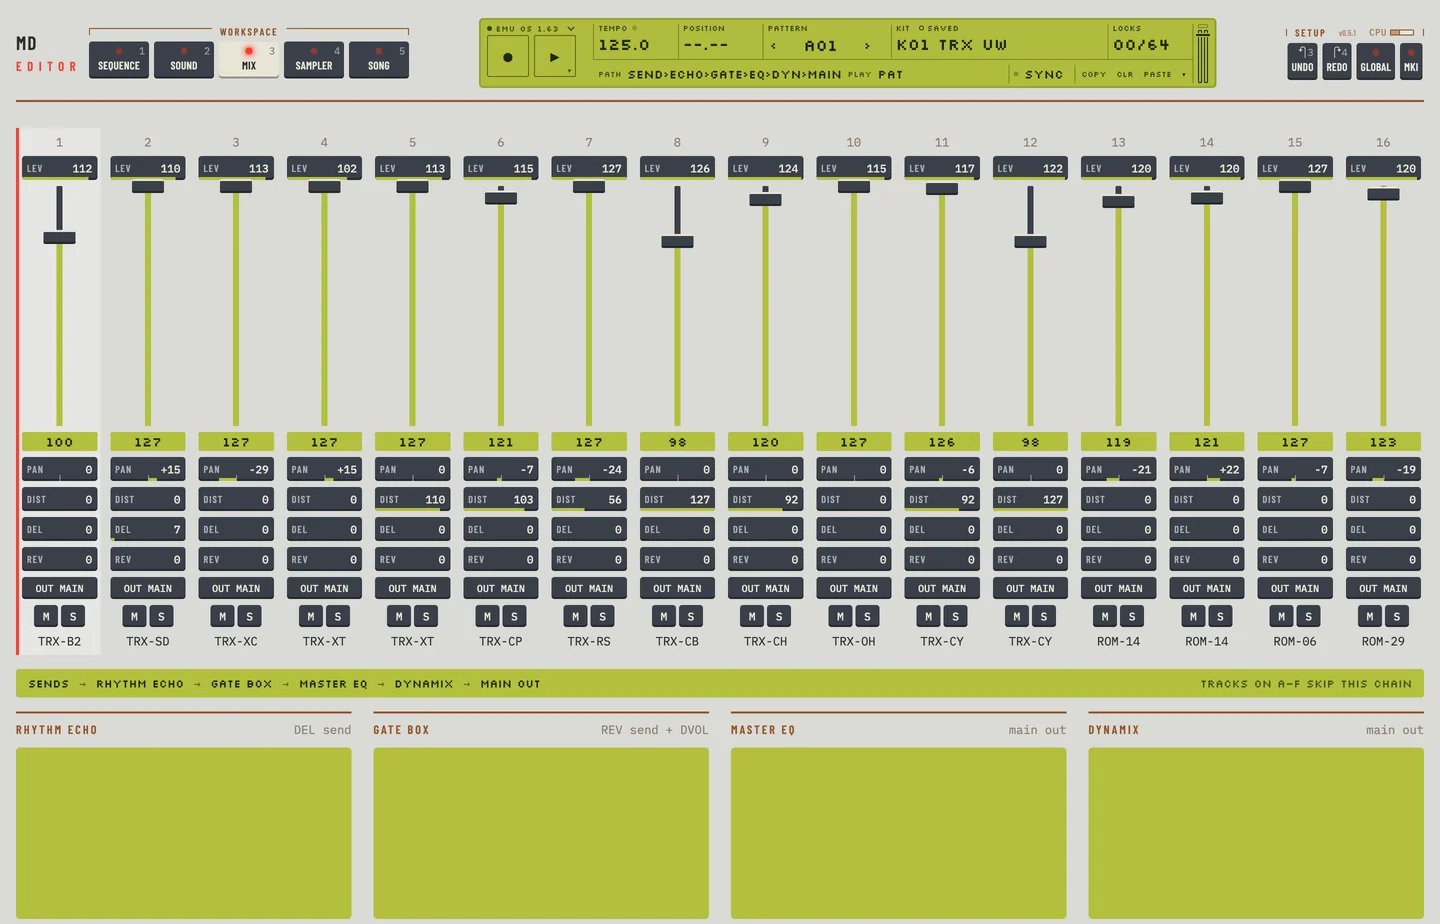
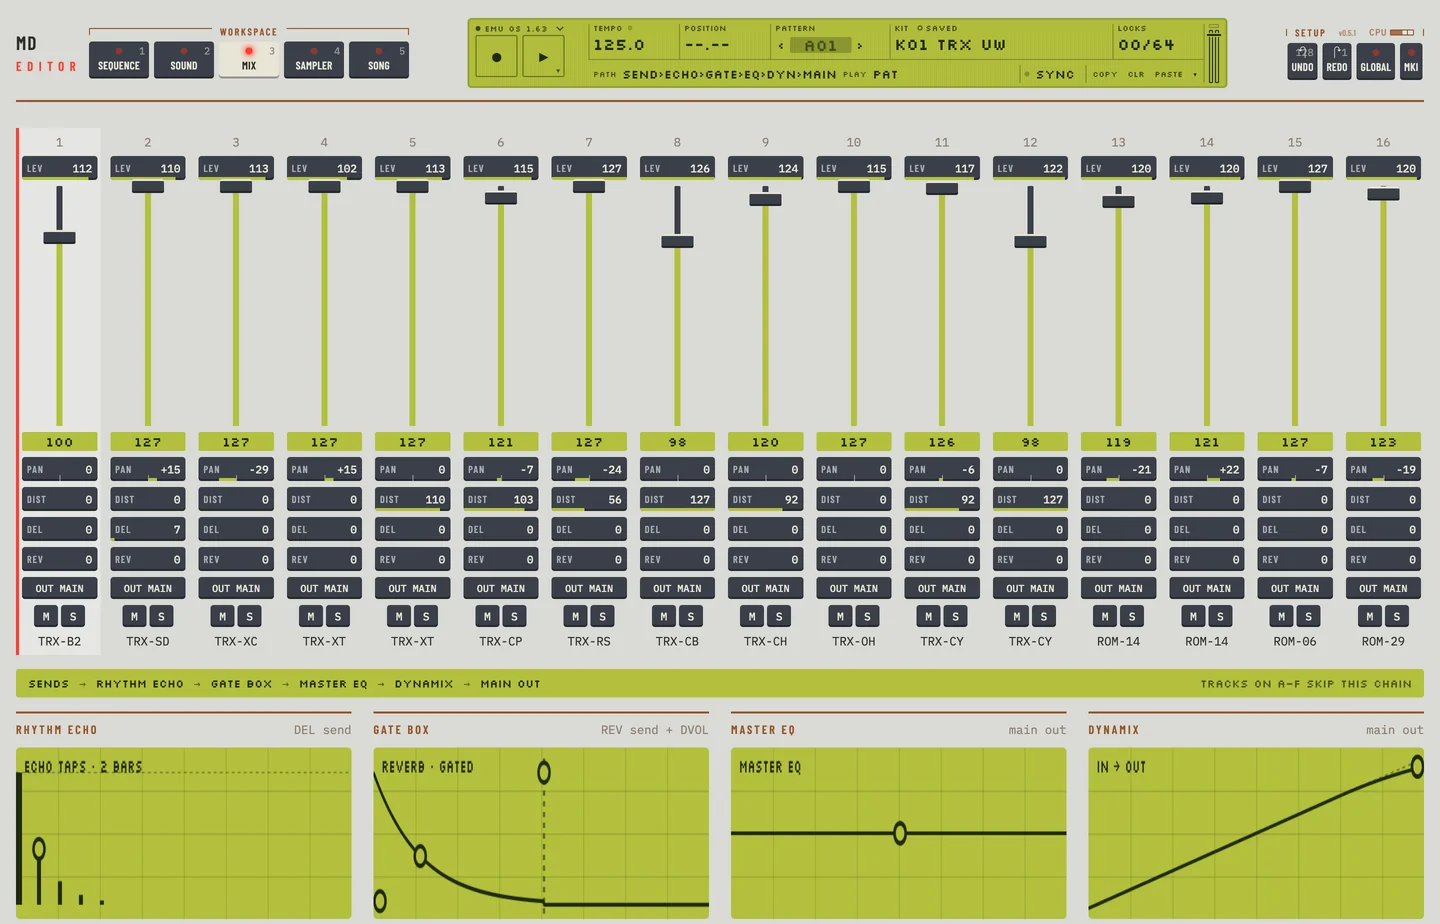
The machine's LEVEL knob sets the overall level of the selected track. It is stored in the kit, and it cannot be locked or modulated by an LFO. In the editor it is the LEV box at the top of each strip on the Mix workspace.

  1. Press [3] for the Mix workspace.
  2. Drag the LEV box of a track up or down, or scroll the wheel over it. The kit that plays takes the new level at once.
  3. Double-click the box to set it back to 100.
  4. [⌘] + [Z] takes each change back.
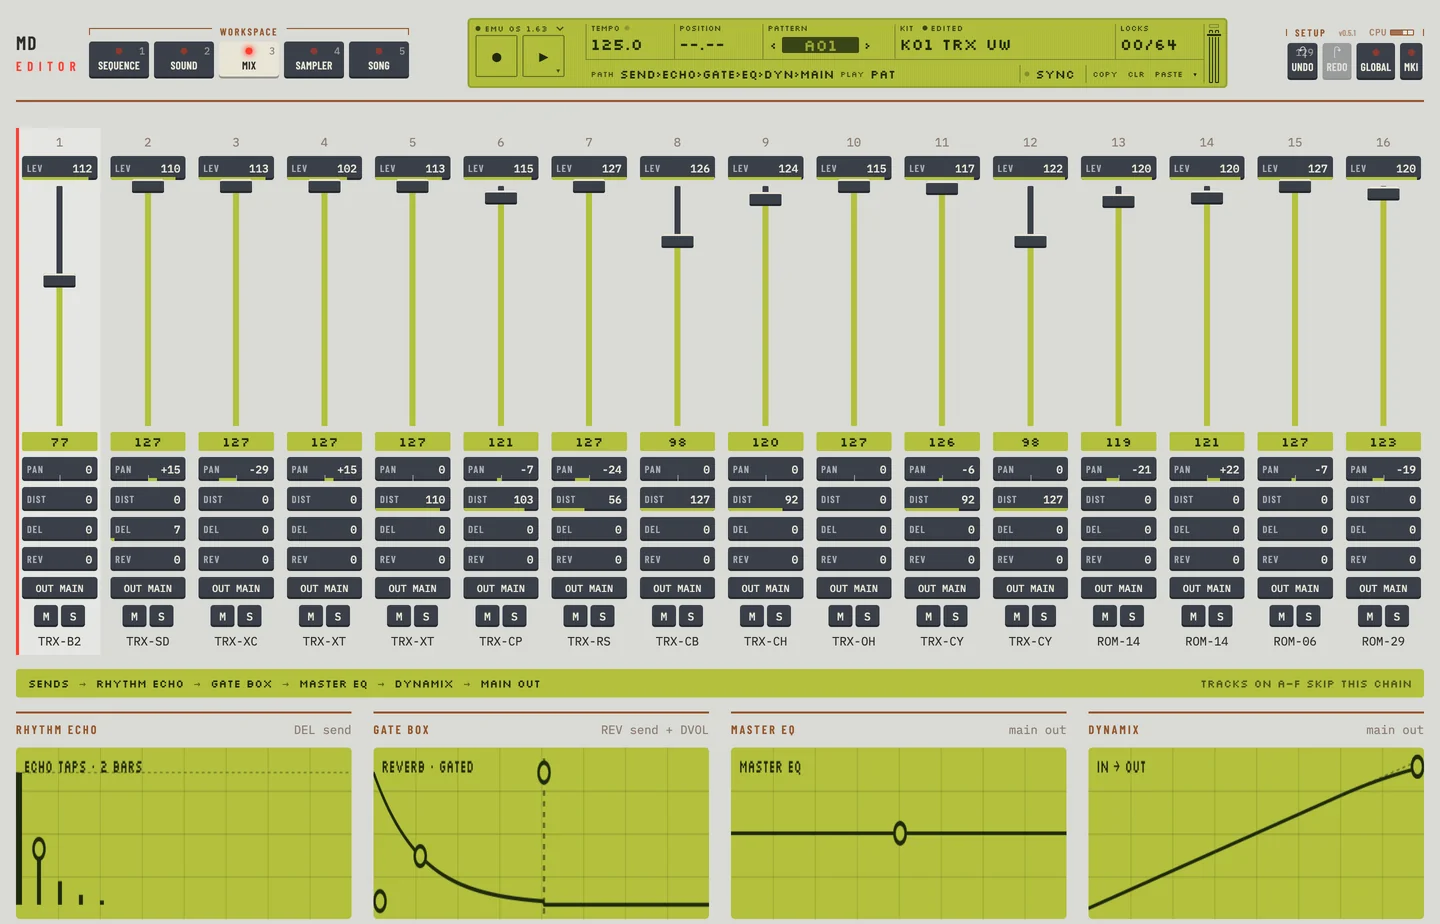
The Mix workspace with a LEV box on each strip

VOL under it is the track's volume on the routing page. It is a different value: VOL can be locked, LEV cannot.

Tempo

  1. Drag the Tempo value in the LCD up or down. Each pixel is half a BPM; hold [⇧] for a tenth of a BPM a pixel.
  2. Or press [T] or [B] in time with the beat. The tempo is the average of your last taps.

To set the tempo in single steps, click the Tempo value without dragging:

  1. A TEMPO window opens.
  2. Click + to go one BPM faster and - to go one BPM slower.
  3. Hold +10 % to play 10 % faster for as long as you hold it. The LCD says so. The tempo you set is not changed, and it returns when you let go.
  4. Press [ESC] to close the window.

In a DAW the machine follows the host's tempo. The Tempo field is marked and does not edit; change the tempo in the DAW, or set Tempo in to INT in GLOBAL for the machine's own clock.

Data entry

Each parameter is a value box. A box shows the name and the value.

  • Drag a box up or down, or sideways, to change it.
  • Hold [⇧] and drag for fine steps, a quarter as fast.
  • Scroll the wheel over a box: one step a notch, ten with [⇧].
  • Double-click a box to set it to 64, or to 100 for VOL.
  • Hold [⌘] and click a box to type its value. A field opens over the box. Type the value and press [ENTER], or press [ESC] to leave it as it was. A box that has the focus opens the field with [ENTER] too.

On the machine you press a DATA ENTRY knob in to turn it in coarse steps. In the editor the wheel with [⇧] does the same.

The three parameter pages

The machine shows the synthesis, effects and routing parameters one page at a time. The Kit workspace shows all three at once, in groups. A small word at the right of a group's title names the machine's page that holds its knobs.

Recording and the transport

There is no record mode to switch on. The step grid is always open for editing, so the machine's RECORD key has no counterpart.

To record live, click REC or press [⌥] + [SPACE]. Click the steps of a track to play and record it, and move a value to lock it. Click REC again to stop recording and go on playing.

Press [SPACE] to start. The key shows ▶ while the machine is stopped and ■ while it plays. Press it again to stop.

On the machine a second press of [PLAY] pauses. In the editor you pause with [⇧]:

  1. Hold [⇧] and click the Play key, or press [⇧] + [SPACE]. The machine holds its step. The Play key blinks and <POSITION> keeps the step.
  2. Click the Play key, or press [⇧] + [SPACE] again. The machine goes on from the step it held.
  3. To end the pause instead, choose Stop in the transport menu. <POSITION> reads --.--.

The transport menu has Play or Stop, Pause or Continue, Record and Panic, each with its key. Right-click the Play key to open it. With the Play key focused, Shift+F10 or the menu key opens it too.

On the machine a double press of [STOP] silences every voice. In the editor this is Panic: press [⌘] + [.], or choose Panic in the transport menu. The editor presses the machine's [STOP] twice, and the machine stops.

There is no key that restarts the pattern from the top while it plays. Stop, then play.

Pattern or song

The LCD's second line has a PLAY field on every workspace. It reads PAT in pattern mode and SONG in song mode, and each click switches. On the Song workspace the PATTERN, CHAIN and SONG keys over the pattern palette set what plays. PATTERN and CHAIN keep the machine in pattern mode: in PATTERN a click on a pad queues that pattern, in CHAIN the pads number the chain. SONG puts the machine in song mode, and the pads add rows to the arrangement. The field shows what the machine reports.

Kits and songs

Click the Kit field of the LCD to open the kit library. Chapter 3 describes it. The ‹ and › keys beside the kit name load the previous and the next kit, and go round from K64 to K01. If the kit has unsaved edits, the editor asks first.

The machine's song menu is the Songs column of the Song workspace: load, save, save to another slot with a name, copy, paste, clear and rename. Chapter 9 describes it.

TRIG keys

The steps of the grid are the TRIG keys. Click an empty step to draw a trig. Click a trig to select it, and it stays selected: [DELETE] or [BACKSPACE] removes it and the arrows move the selection. Double-click a trig to remove it. Select more steps with ⌘-click, then click the small ⋯ on a selected step for its menu, or right-click the step.

To play a first beat:

  1. Open the Pattern workspace and select a track in the rail.
  2. Click four empty steps of that track. Each lights as a trig.
  3. Press [SPACE]. The pattern plays with your trigs.
  4. Press the same key to stop.
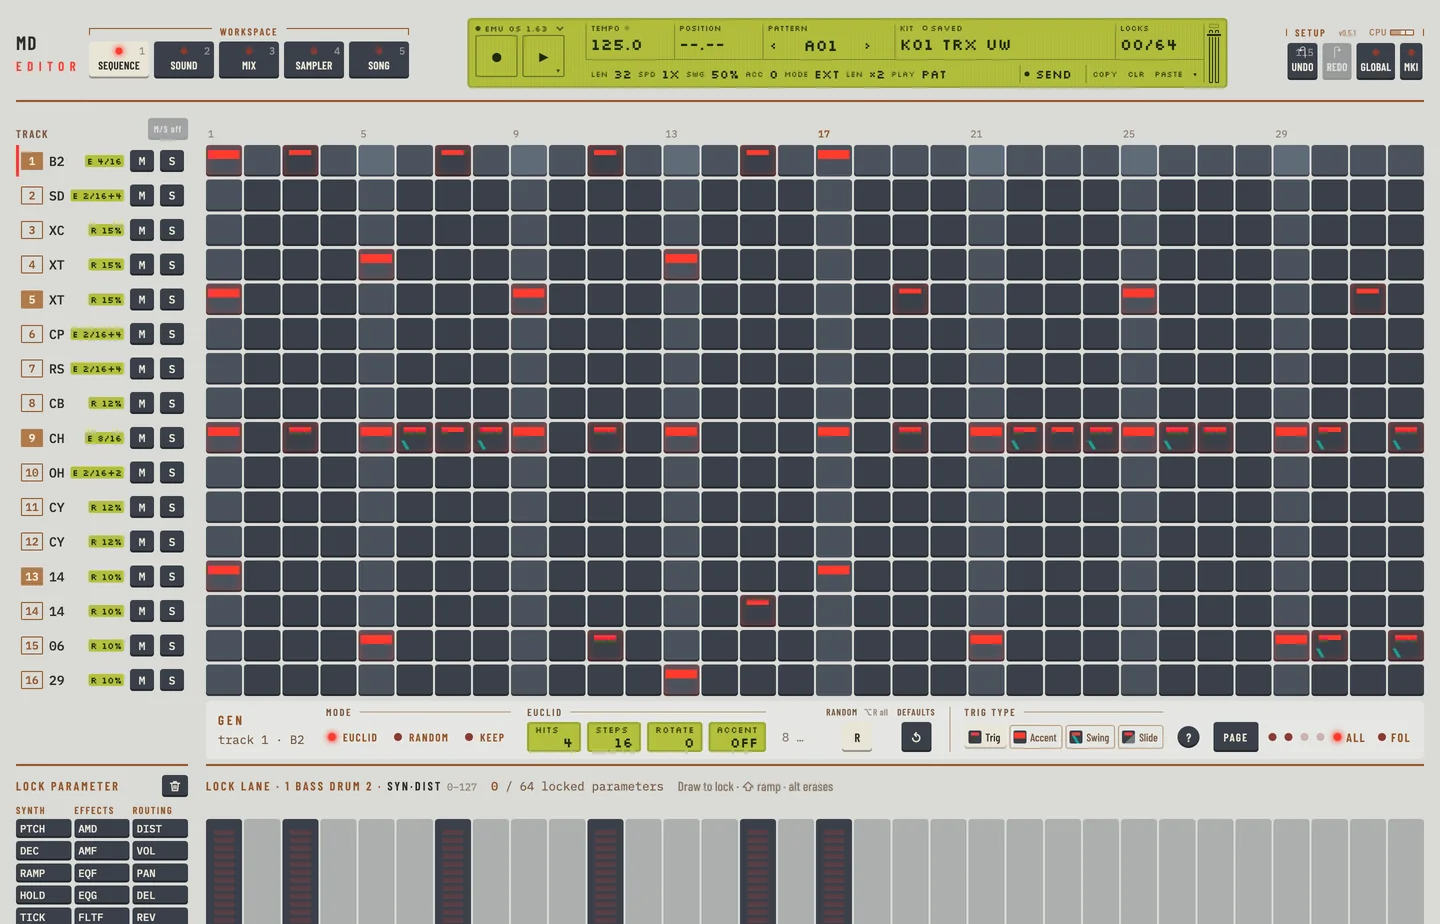
The step grid with trigs

The piano keys play the selected track from any workspace: [A S D F G H J K L] play the white keys C to D. [Z] or [X] moves the octave, two up or down (the PTCH range of the machines) and [C] or [V] sets the velocity.

Pattern pages

A pattern of 64 steps has four pages of 16.

  • Click Page to show the next page. Hold [⇧] and click to show the previous one. The left and right square bracket keys do the same.
  • Four LEDs beside the key show the pages the pattern has. The page that plays is lit. Click an LED to show that page.
  • If the pattern has one page, click ×2 on the LCD to double its length. The LEDs then show the pages of the new length.
  • All shows every step at once. It is on when the editor starts.
  • Fol makes the page follow the play position. With Fol on and the machine playing, the lit LED moves to the second page when the position passes step 16.
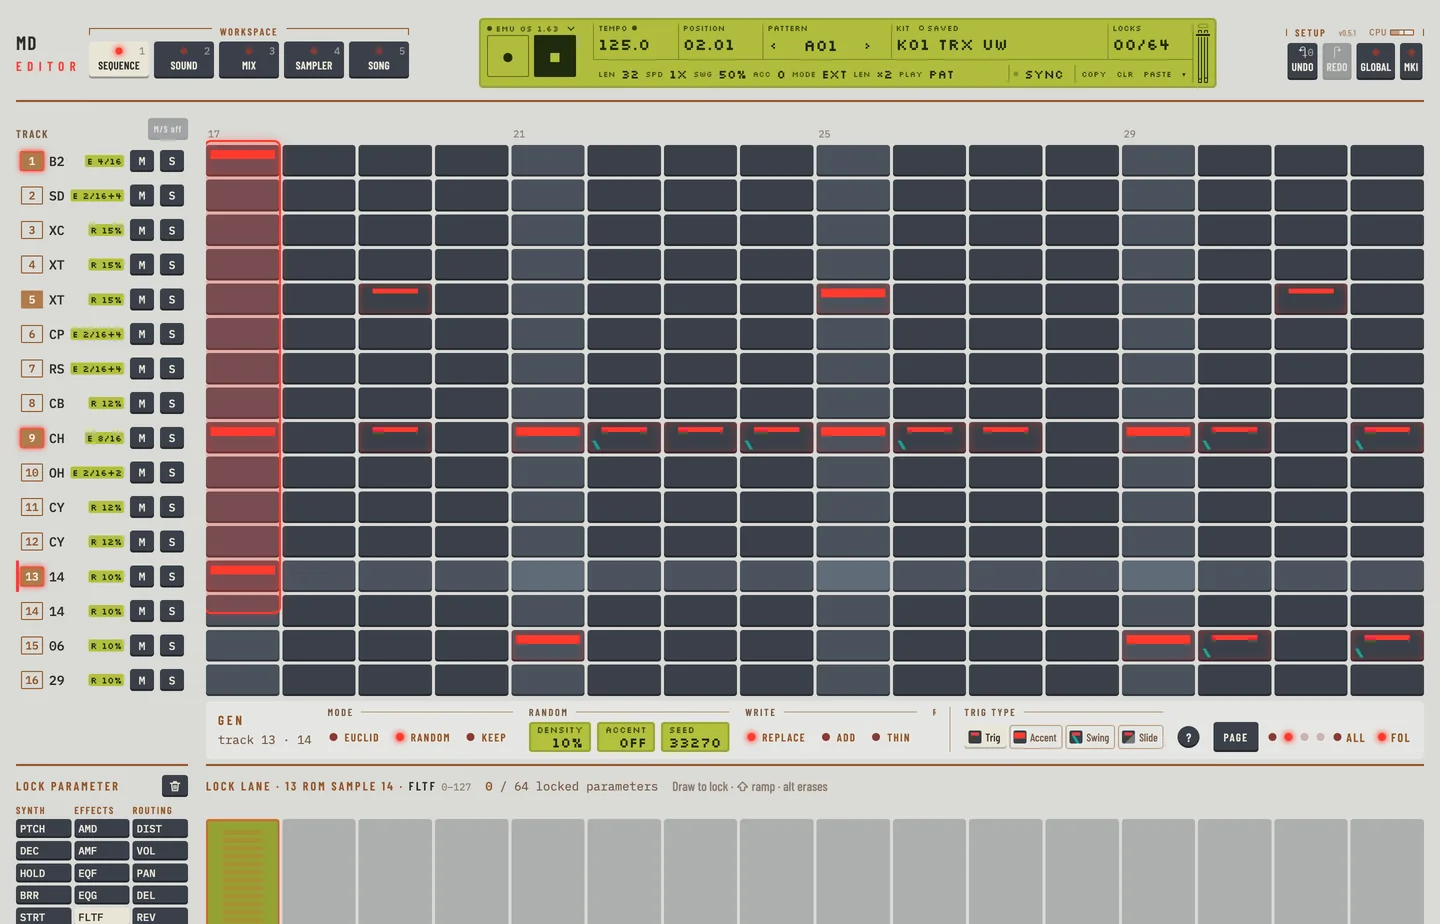
The Pattern workspace with its page LEDs

REAR CONNECTORS

The editor has no power switch or power input. It runs as a plug-in in your DAW, or as a standalone program. It has no rack mount, no battery and nothing to care for.

MIDI

In a DAW the plug-in takes MIDI from the host, and the AUDIO / MIDI panel only tells you that the host owns audio and MIDI. In the standalone, open the AUDIO / MIDI settings with [,]. The MIDI card lists the MIDI inputs, the output and Bluetooth devices. No MIDI input is on until you switch it on. The list follows the system: a device plugged in or out appears or goes at once, and an input or output you had chosen comes back when its device returns. The Monitor row counts what came in and went out. A red line under the output warns when a virtual bus, such as an IAC bus, is both an input and the output: switch the input off or send to another bus. See "MIDI and sync" in the installation guide.

The machine's own MIDI out reaches your DAW through the plug-in's MIDI output, and the standalone's MIDI output. It carries notes, controllers, program changes, pitch bend, pressure, clock, start, stop and continue. It never carries SysEx.

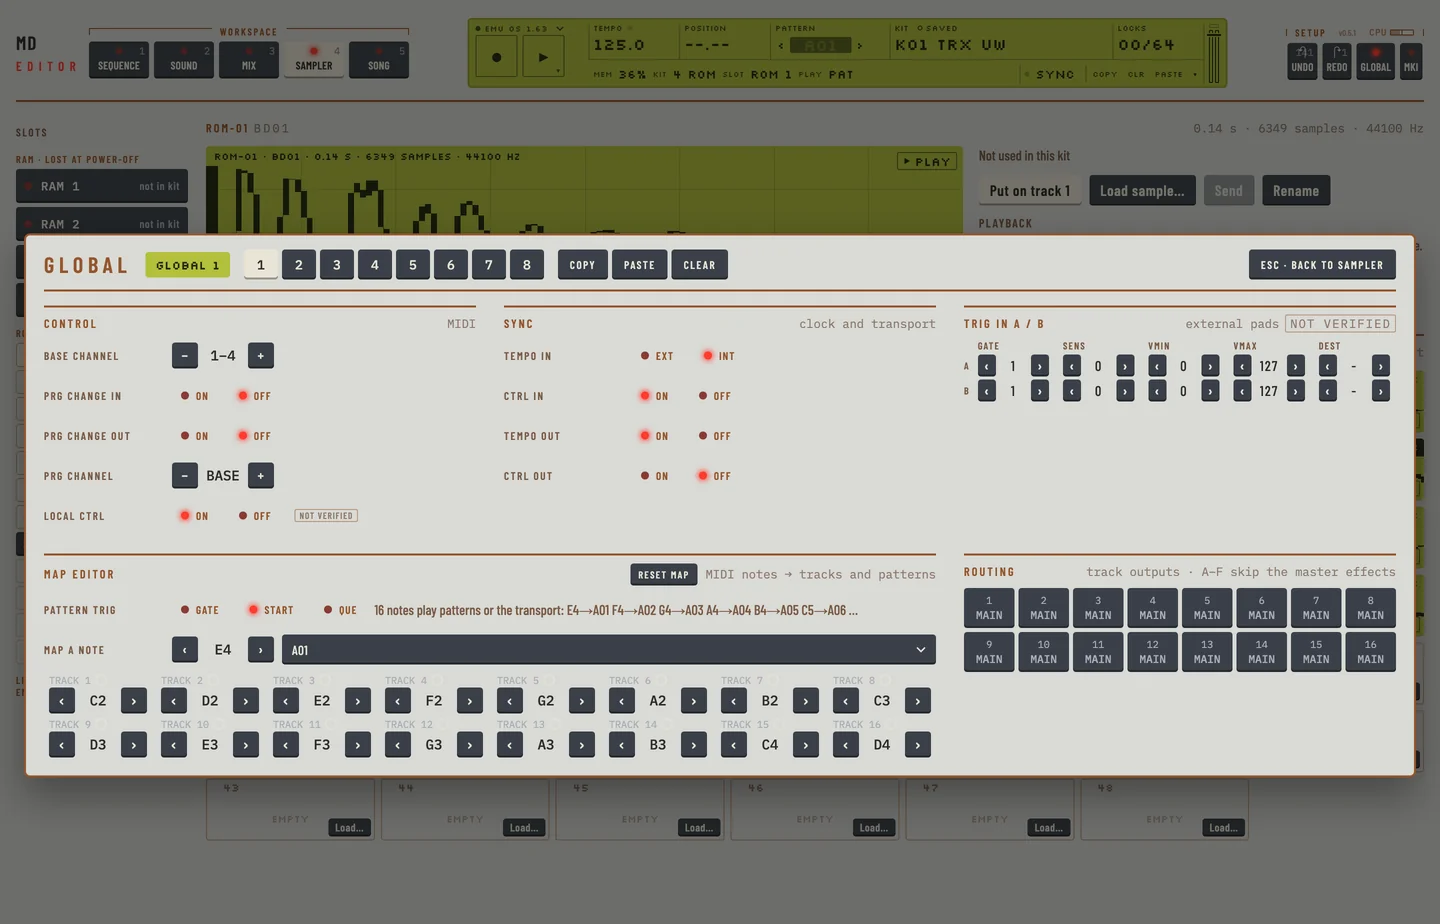
The machine's MIDI channels, sync and the rest of its global settings are on the GLOBAL panel. Click GLOBAL in the top bar, or choose GLOBAL… in the engine menu of the LCD.

MIDI Thru has no meaning in the editor.

Audio inputs A and B

The Input card of the AUDIO / MIDI settings sets where the external audio comes from.

  1. Choose a device under Device.
  2. Watch Level for the signal.
  3. Click LIVE to pass the input to the machine.

The input starts MUTED, so that a microphone and speakers cannot feed back. Keep speakers away from a microphone when it is live.

A track plays the input when its machine is one of the External input machines (INP). Choose one with the machine key on the Kit workspace.
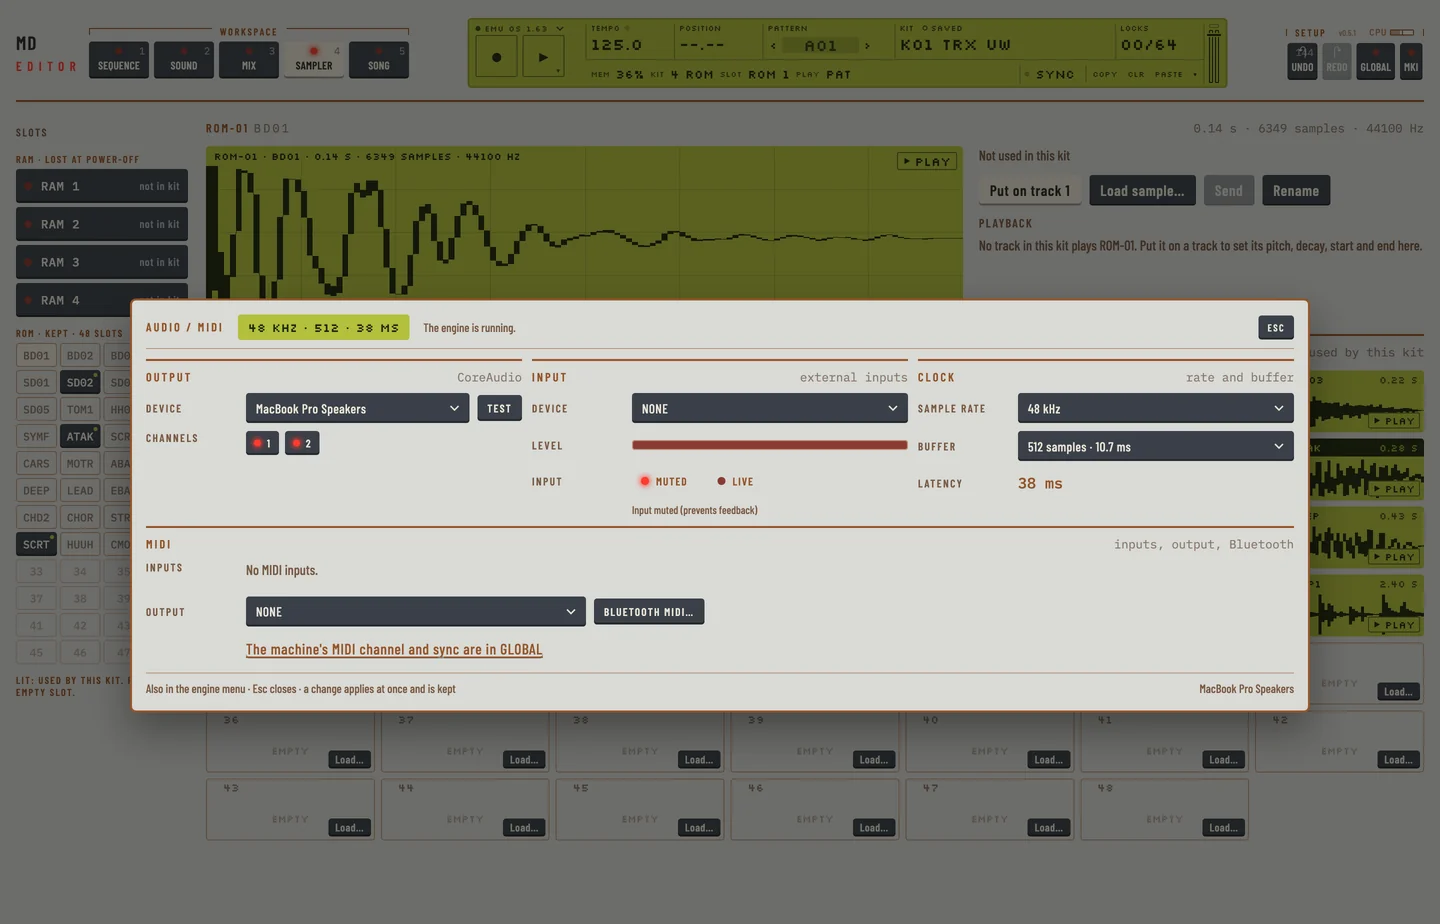
The AUDIO / MIDI settings

Outputs

The machine has a main output and six individual outputs, A to F. Each track goes to one of them.

  1. Open the Mix workspace.
  2. Click OUT at the foot of a track's strip. The key reads OUT MAIN, OUT A, and on to OUT F, and each click goes to the next.

A track on A to F skips the master effects. The Routing card of the GLOBAL panel has the same 16 keys.

In a DAW the individual outputs appear as output buses of the plug-in, as far as the host offers them. The editor has no headphone output; use your DAW's or your system's.
2. LCD user interface and quick startMachinedrum Editor

2

LCD user interface and quick start

MD manual pp.9-12

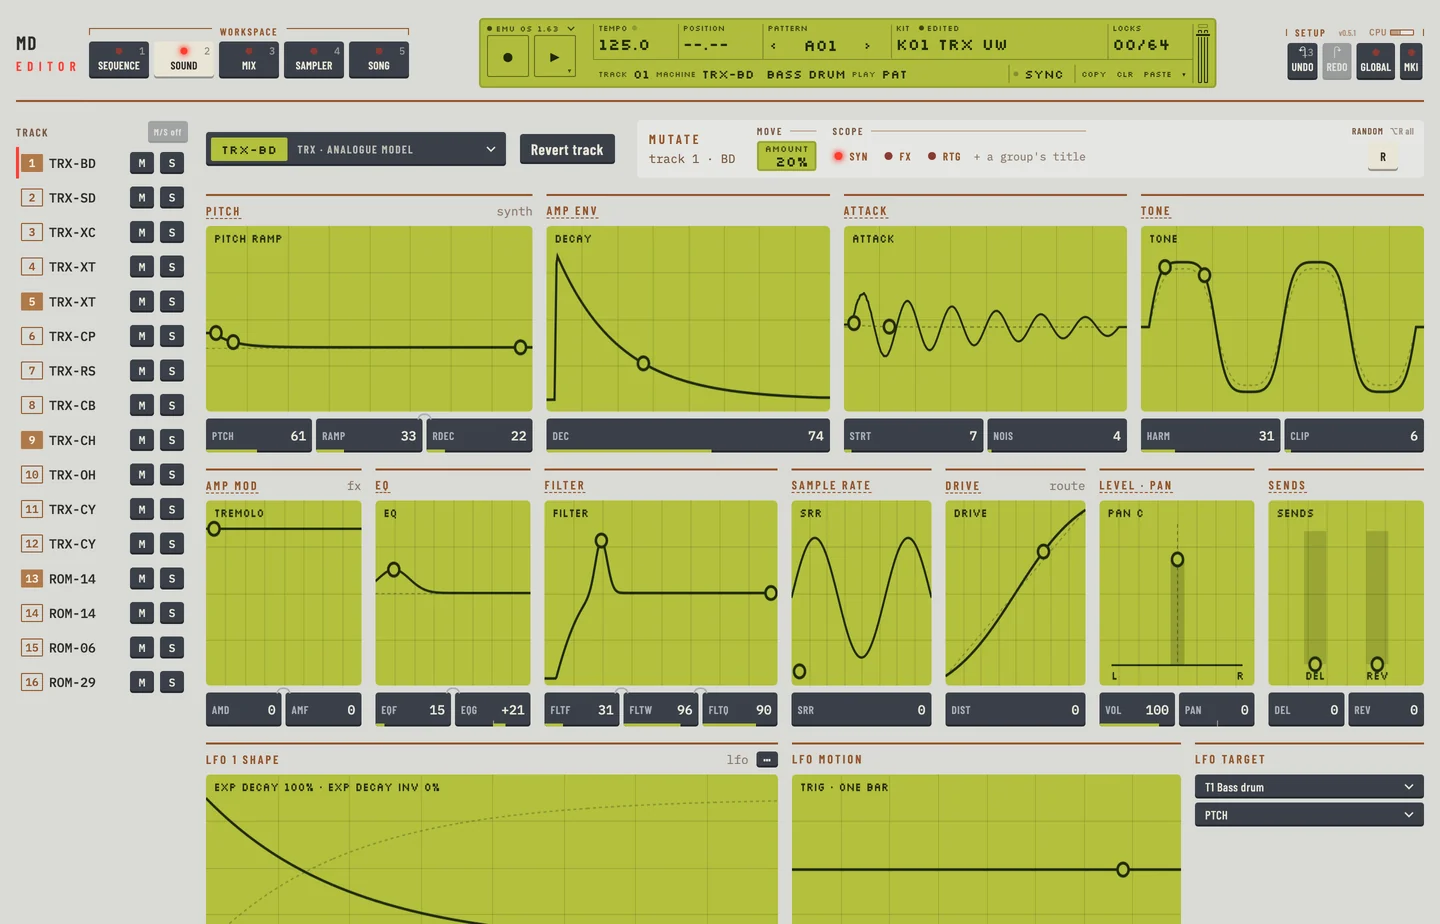
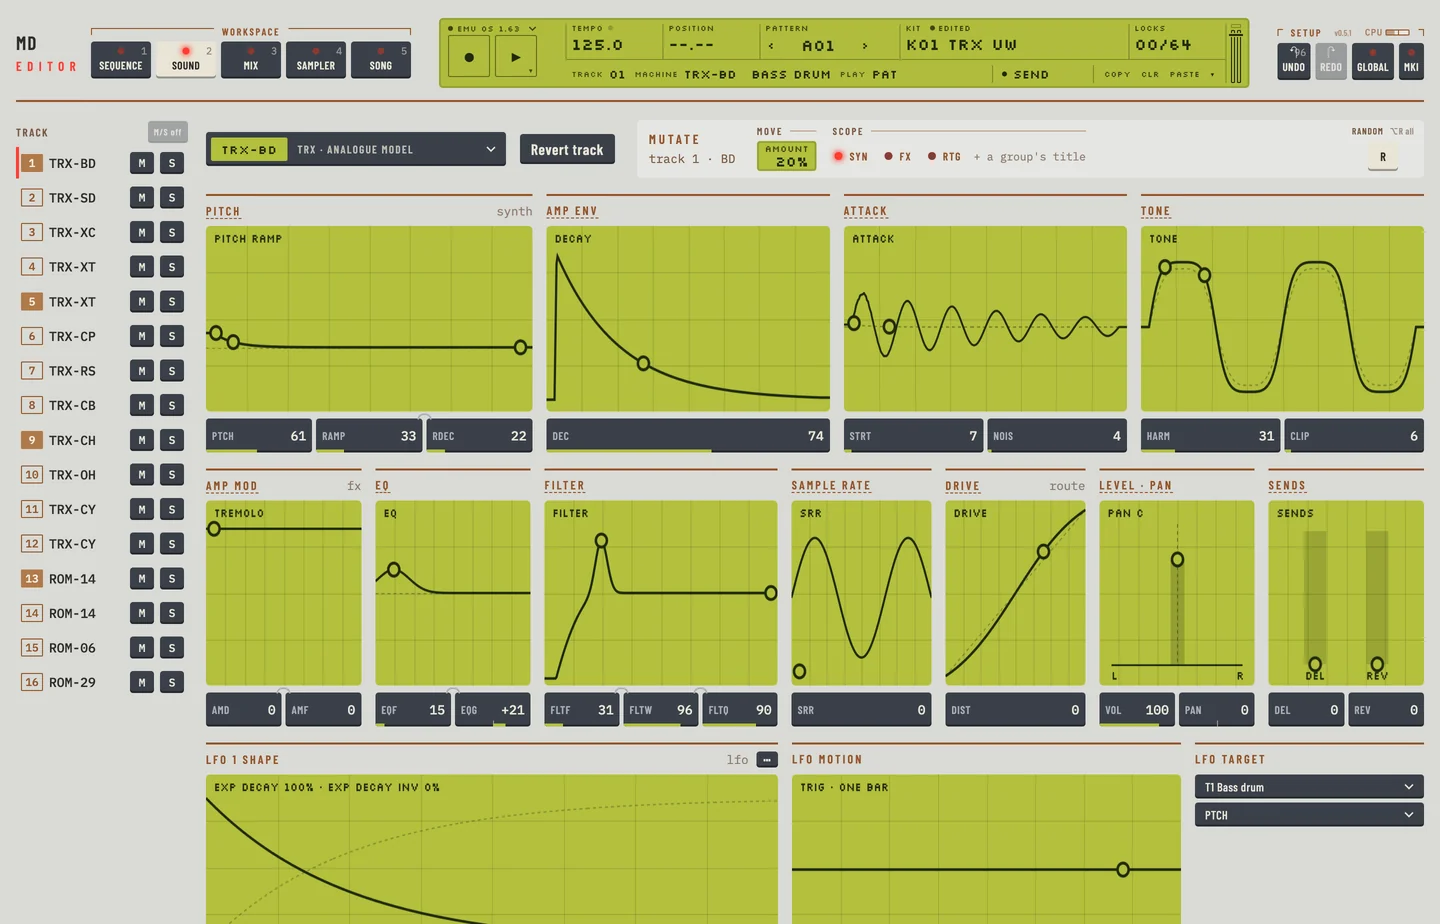
The LCD sits in the middle of the top bar. It shows the state of the machine: the engine, the transport, the tempo, the position, the pattern, the kit and the lock count. A second line holds values that depend on the workspace. Most fields are also controls.

THE LCD USER INTERFACE

The LCD at the top of the page

From left to right the LCD holds:

  • The engine label with its LED, and the REC and Play keys.
  • Tempo, with an LED that blinks on every fourth step while the machine plays.
  • Position.
  • Pattern, with ‹ and › keys.
  • Kit, with a chip that reads saved or edited.
  • Locks.
  • The second line, the Sync field, and the Copy, Clr and Paste keys.

The engine label

The label says what the machine is doing. READY, with the engine's name (EMU OS 1.63), means it takes input. Until then the fields dim, REC and Play are off, and edits wait.

LabelMeaning
NO ROMno firmware is installed yet
LOADING ROMthe machine is being prepared or restored
BOOTING OSthe firmware is starting
EMU OS 1.63the emulated machine is ready
ROM ERRORthe firmware you installed is not OS 1.63
HW CONNECT, HW NO MIDIthe editor is waiting for a real machine on MIDI

Tempo

Tempo shows the tempo in BPM with one decimal, for example 124.0. Drag it up or down to change it, or tap it with [T] or [B]. Click it without dragging to open the TEMPO window, which has + and - keys for single BPM steps and a +10 % key. Chapter 1 describes both.

Position

Position shows the bar and step of the playhead, for example 02.05, in bars of 16 steps. It reads --.-- while the machine is stopped.

On the Pattern workspace the four page LEDs beside the Page key show the same thing as the machine's four pattern-page boxes: the page that plays is lit.

Transport

REC and the Play key have LEDs. The Play key shows ▶ while the machine is stopped and ■ while it plays. REC is lit during live recording.

While the machine is paused the Play key blinks and Position keeps the step the pause holds. The Play key then continues.

Kit

Kit shows the kit number and name, for example K01 WAREHOUSE. The chip beside the label reads saved when the kit on the machine is the one stored in its slot, and edited when you have changed it since. Click the field to open the kit library.

Pattern

Pattern shows the pattern that plays, for example A01. While another pattern waits for the end of the current one, the field shows the waiting pattern and blinks.

Locks

Locks counts the parameters locked in the pattern, out of the 64 the machine holds, for example 41/64. It changes its look at 52 and again at 64.

The second line

The second line shows values that belong to the workspace you are in.

WorkspaceFields
PatternLEN, SPD, SWG, ACC, MODE, LEN ×2, PLAY
KitTRACK, MACHINE, the machine's name, PLAY
MixPATH, the signal path, PLAY
SongSONG, ROWS, BARS, TIME, PLAY

On the Kit workspace the machine key under the header also shows the machine and its family, for example EFM and FM drums.

Sync

The Sync field reads Sync when the editor is in step with the machine and Send while it sends your edits. When the machine follows the host's clock it reads Host. While the editor reads the machine's patterns, kits and songs in the background after start-up, it shows how many of them are read, as a count out of the total. You can edit while it reads.

Level

The machine shows the level of the track as a bar on its screen. The editor shows it on the Mix workspace: the bar inside each strip's LEV box fills with the track's level. Chapter 1 says how to set it.

Value boxes

Parameters appear as value boxes on the Kit and Mix workspaces. A box shows the parameter name and its value, 0 to 127. A few parameters run from one side to the other, or from cut to boost, and show -64 to +63 with 0 in the middle. They are PAN, EQG, the levels and balances of the RAM recorder, and the gains of the master EQ's CTR machine.

When two parameters depend on each other, the machine draws a small clip between their values. The Kit workspace draws the same clip, a small arch over the gap between the two boxes, for example between RAMP and RDEC on TRX-BD and between FLTF, FLTW and FLTQ on every machine. The editor groups the boxes by what they do, so the two boxes of a pair can sit in two groups. Point at a box to see which value it works with.

Clips between RAMP and RDEC, and between the filter's values

LAYER EDIT AND WINDOWS

On the machine a window opens over the main screen and EXIT closes it. In the editor the machine picker, the kit library, the pattern chooser, the GLOBAL panel, the AUDIO / MIDI settings and the keyboard view open over the workspace. Press [ESC] to close the one that is open.

Press [?] to open the keyboard view. It lists every key and gesture of the editor.

QUICK START

This is a first session. It loads a kit, places trigs, plays them and changes a sound.

Playing and tweaking drum sounds

  1. Click the Kit field of the LCD. The kit library opens.
  2. Click a kit. The machine loads it at once. If you have unsaved changes, the editor asks first.
  3. Press [ESC], then press [1] for the Pattern workspace.
  4. Click steps in the grid. A click on an empty step draws a trig. A click on a trig selects it. Double-click a trig to remove it. Each row of the grid is a track.
  5. Press [SPACE]. The pattern plays with your trigs. Press it again to stop.
  6. Click a track in the rail to select it. Press the keys A to L to play it by hand.
  7. Press [2] for the Kit workspace. Drag a value box to change the sound of the selected track.
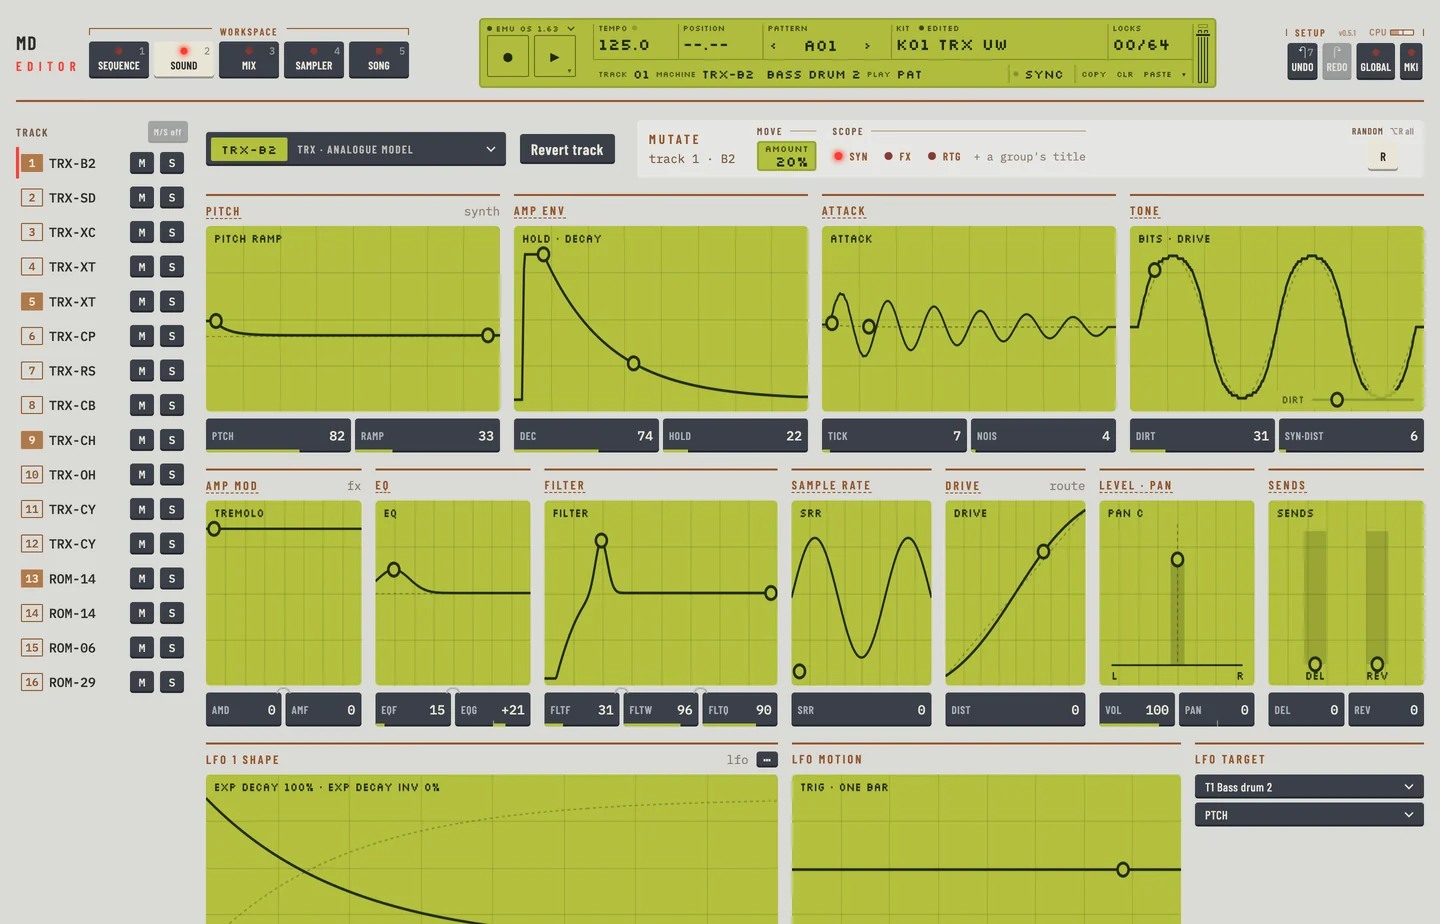
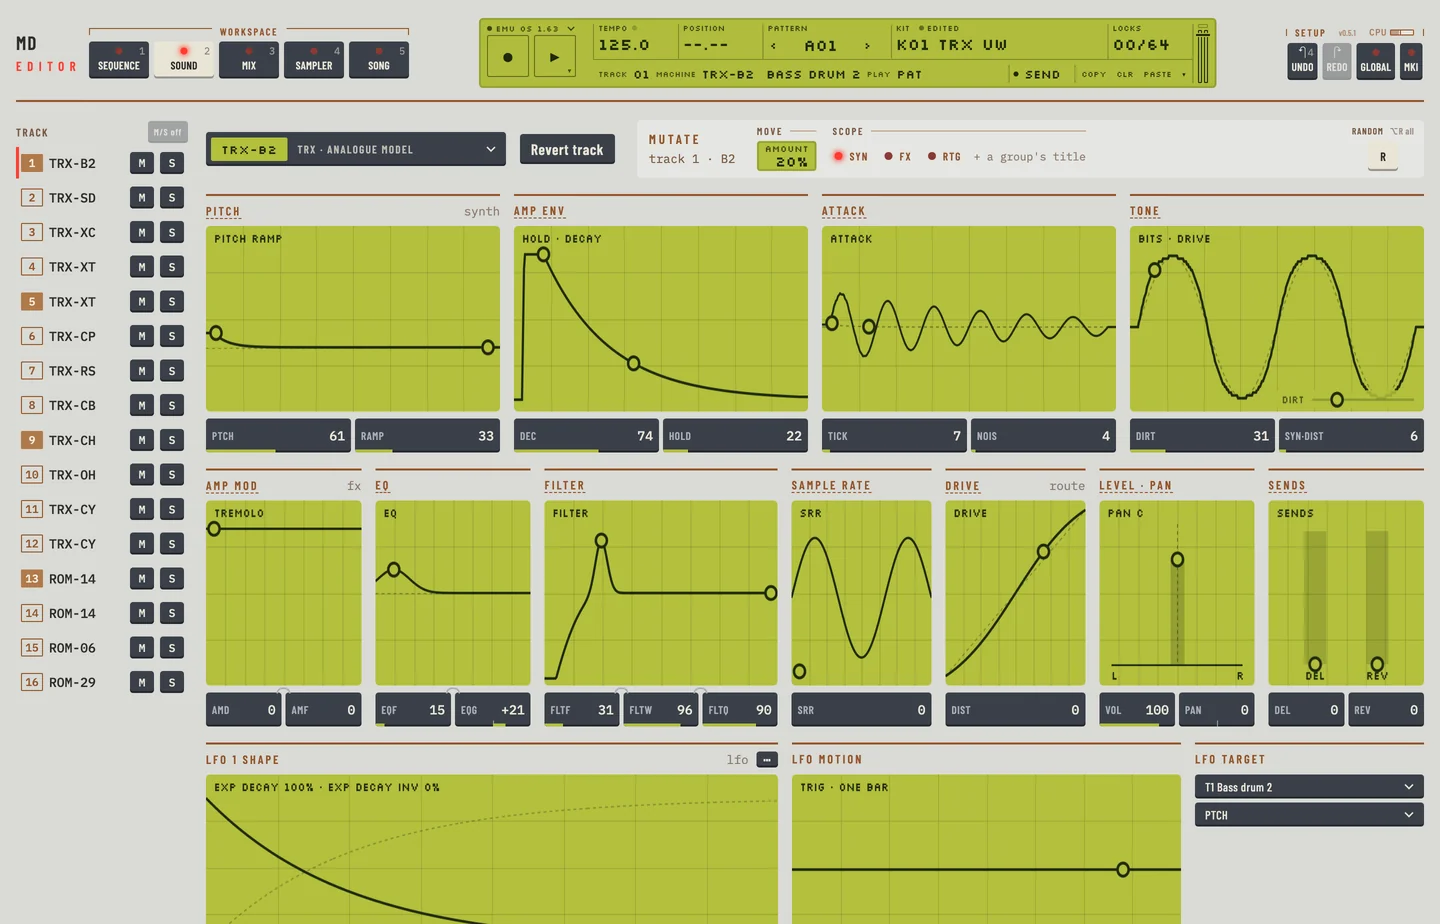
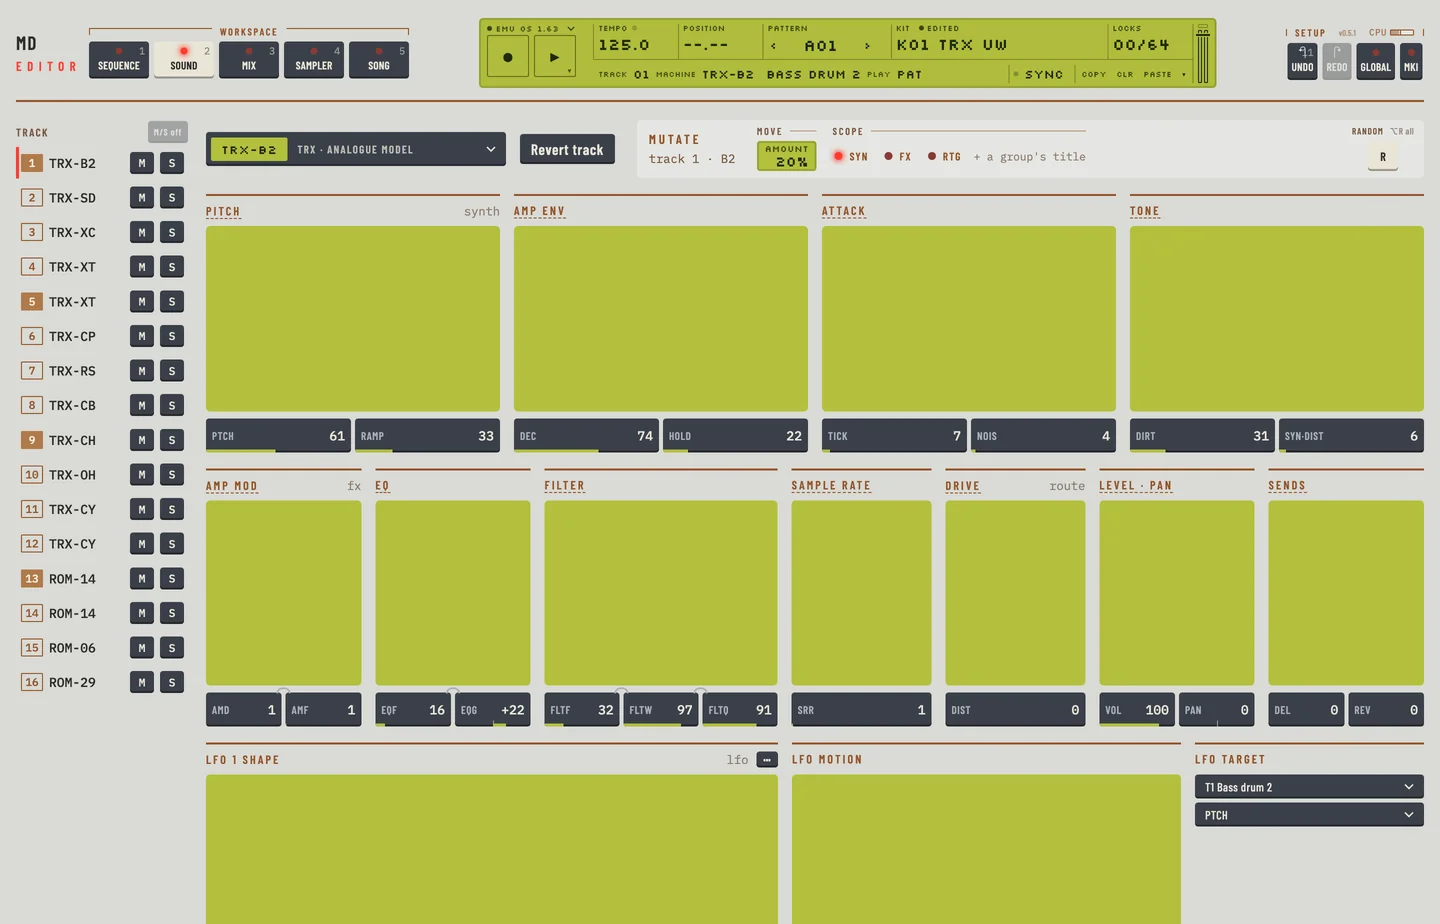
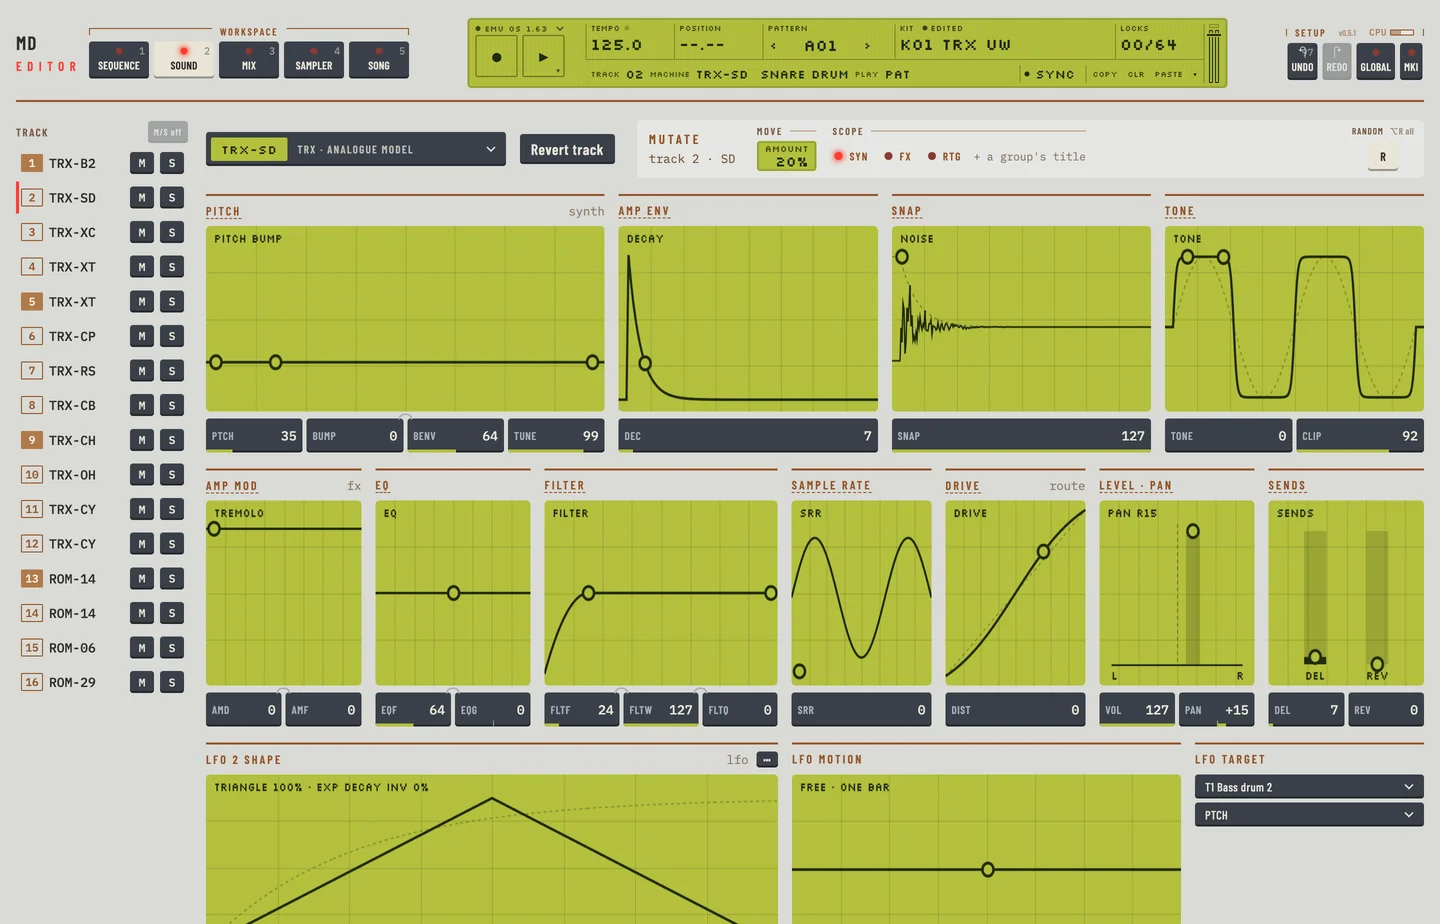
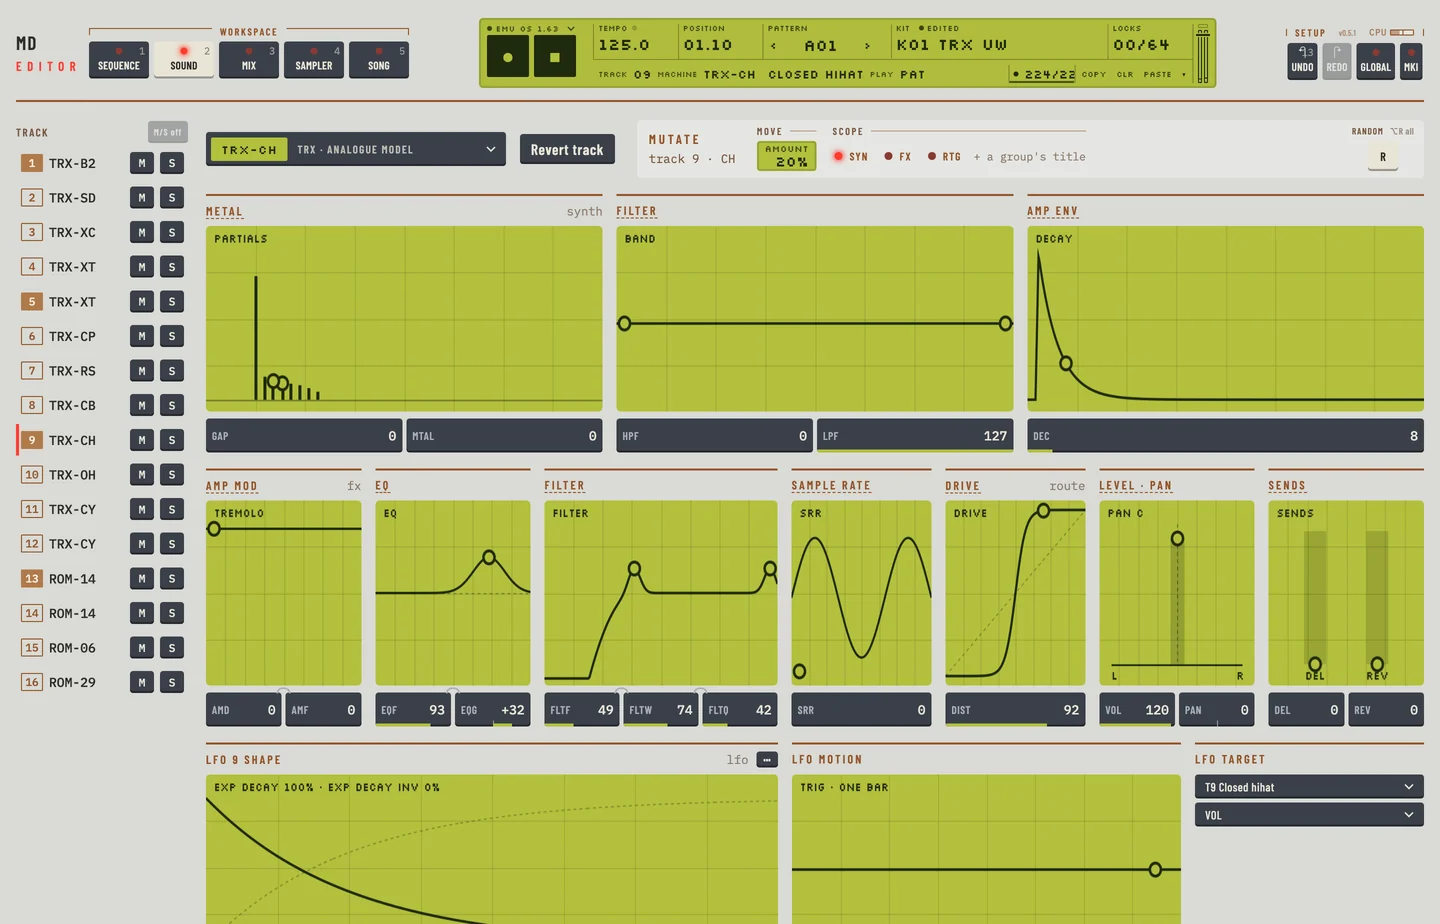
The Kit workspace
The Kit workspace

Turn a value in small steps when you need them. Hold [⇧] and drag for fine steps. Scroll the wheel over a box for one step a notch, and hold [⇧] for ten. Double-click a box to set it back to 64.

One notch of the wheel and a drag on a value box

Hear a machine before loading it

In the machine picker you can hear a machine on the track before you keep it.

  1. Press [2] for the Kit workspace and select a track in the rail.
  2. Click the machine key under the header. The machine picker opens.
  3. Point at a machine and click its ▶, or move to it with [TAB] and press [SPACE]. The machine goes on the track and the track plays once. A line under the preview says which machine plays and which one was there before.
  4. Try other machines the same way. The picker stays open while you try.
  5. Press [ENTER] or click Keep to keep the machine, or click another machine to keep that one. Press [ESC] or click Back to put the old machine back.

The machine plays with the track's own values, so you hear it as it will be in the kit. The machine itself plays a new machine with its default values instead. Trying machines and keeping one is one step for [⌘] + [Z]: a single press brings back the track as it was before you started. During live recording the machine changes but no note plays, so no trig is recorded.

Using the track effects

Each track has an amplitude modulator, an EQ, a filter and a sample rate reducer. They are groups on the Kit workspace. Chapter 4 describes them.

Selecting and playing a pattern

Click the pattern name in the LCD to open the pattern chooser. Chapter 1 describes how to choose a pattern, and chapter 8 how the sequencer works.

3. Sound synthesis: kitsMachinedrum Editor

3

Sound synthesis: kits

MD manual pp.13-21

A kit holds the sixteen sounds of the Machinedrum. For each track it stores the machine, its parameters, its track effects, its routing and its LFO. It also stores the four master effects and the kit's name. The machine holds 64 kits.

In the editor the kit that plays is the working kit. Your edits change the working kit at once. They reach the stored slot only when you save.

MACHINEDRUM KITS

The Kit field of the LCD shows the working kit. Its chip says whether the kit is saved or edited. The chip turns to edited when you change the kit. Edits are lost when you load another kit, unless you save them first. The editor asks before it loses edits. Press [ESC] to cancel the question: nothing loads and your edits stay. [SPACE] presses the focused Cancel key.

The kit library, the Kit workspace and the Mix workspace all read and write the whole kit. The Kit workspace holds the sounds, the Mix workspace the routing and the master effects.

LOADING A KIT

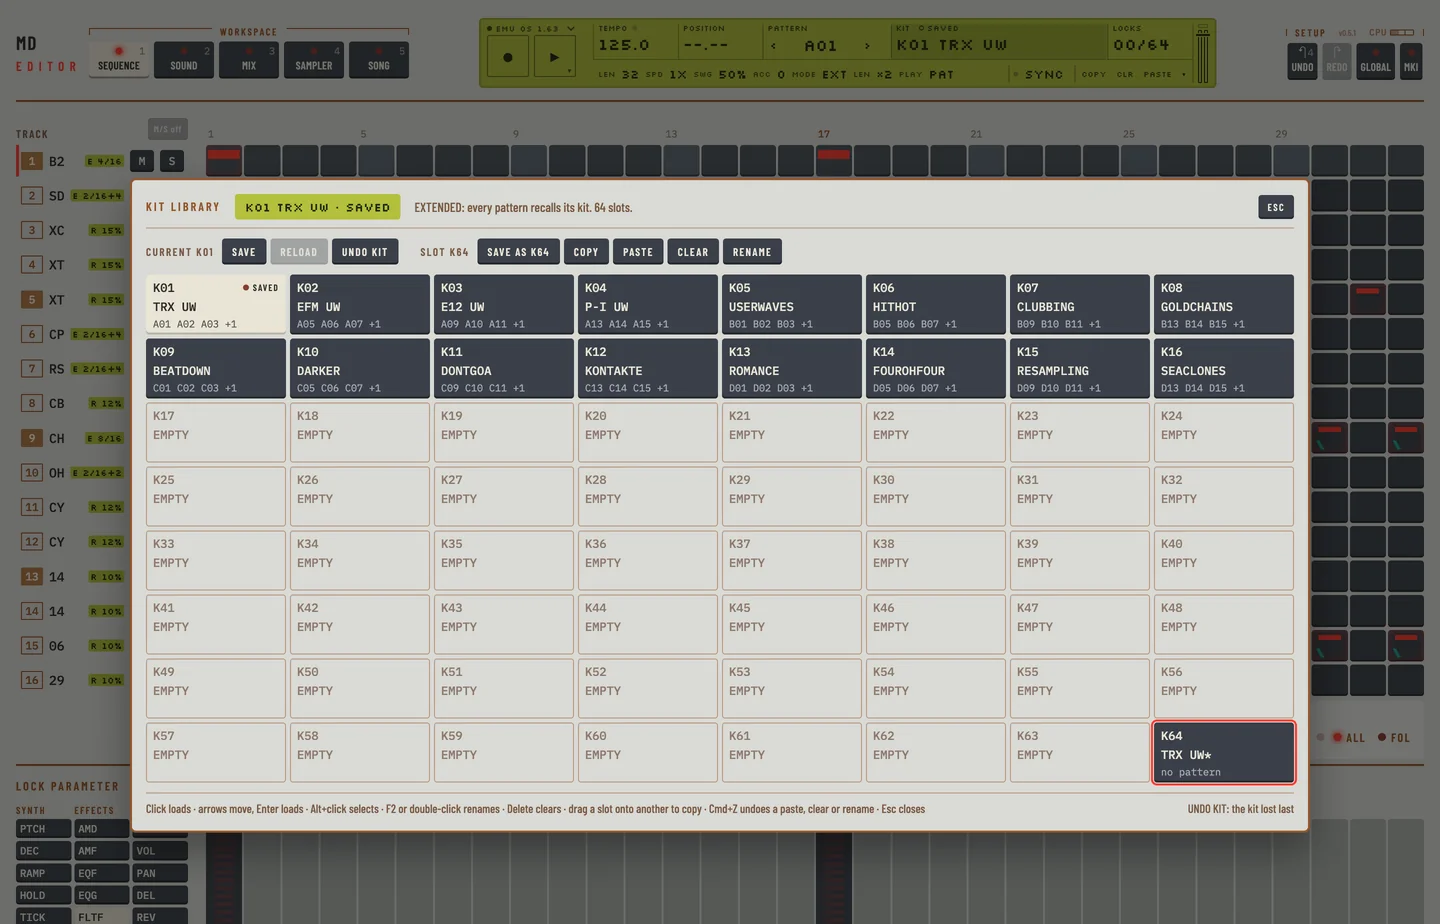
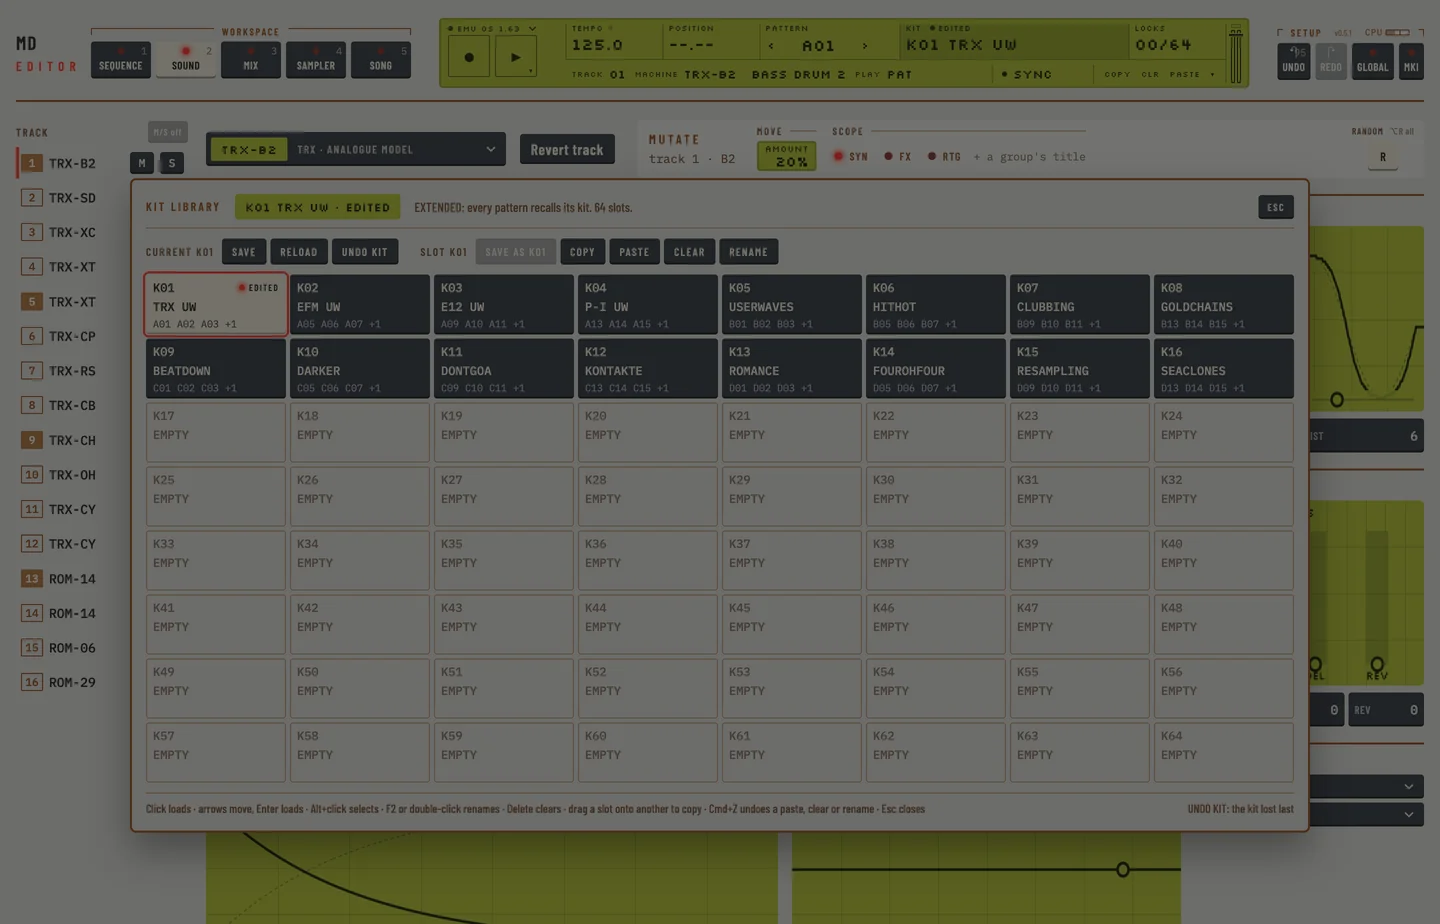
  1. Click the Kit field of the LCD, or focus it and press [ENTER / SPACE ON KIT OR THE PATTERN]. The kit library opens with the 64 slots in rows of eight.
  2. Click a slot. The machine loads the kit at once. The slot you clicked becomes the current kit.
  3. Press [ESC] to close the library.

If the working kit has unsaved edits, the editor asks before it loads. The loaded kit replaces your edits, but the machine keeps them in its own UNDO KIT.

The kit library
The kit library

To look at a slot without loading it, hold [⌥] and click it, or move with [ARROWS]. Press [ENTER] to load the slot you selected.

Each slot shows its number, its name and the patterns that link to it. In EXTENDED mode a kit that no pattern links to has a star after its name. A slot that was never written reads EMPTY.

SAVING AND NAMING A KIT

Save a kit

  1. Open the kit library.
  2. Click Save to store the working kit in the slot it came from.
  3. Or select another slot and click Save as with its number. The working kit goes into that slot and becomes the current kit. In EXTENDED mode the current pattern links to it.
  4. The editor asks before it overwrites a slot that holds a kit. Click Overwrite. While the question is open, the library's own keys do nothing.
  5. The chip reads saved.

The kit that the save overwrites goes to the machine's UNDO KIT. The slot you saved from keeps what it had when you use Save as.

Name a kit

  1. Select the slot in the kit library.
  2. Click Rename, press [F2], or double-click the slot.
  3. Type the name. It has at most 16 characters. Letters become capitals. The name takes letters, digits, spaces and a few marks; the editor drops any other character as you type.
  4. Press [ENTER] to keep the name, or [ESC] to leave it.

Renaming the current kit changes the working kit, so you must save to store the name. Renaming another slot writes the name into that slot after the editor asks you to confirm. [⌘] + [Z] takes a rename back.

UNDO KIT

The machine keeps one UNDO KIT: the kit lost to your last load or save.

The editor has its own undo for slot changes. Press [⌘] + [Z] in the kit library to take back a paste, a clear or a rename. Press [⌘] + [Z] anywhere to undo your last edit, and [⌘] + [⇧] + [Z] to redo it.

To throw away your edits to the current kit, click Reload in the kit library. It loads the slot again. Reload is off while the kit is saved.

To get back the kit lost to your last load or save:

  1. Open the kit library: click the KIT field on the LCD.
  2. Click UNDO KIT. The lost kit plays again, with its unsaved edits, and the slot it came from becomes the current kit.
  3. Click Save to keep it.

If the current kit has unsaved edits, the editor asks first: the machine does not keep them when it loads the UNDO KIT.

COPY KIT

  1. Select a slot in the kit library.
  2. Click Copy, or press [⌘] + [C / V].
  3. Select the slot to copy to.
  4. Click Paste, or press the same keys with [V]. If the slot holds a kit, the editor asks first: click Overwrite.
  5. Press [⌘] + [Z] with the library open to put the slot back as it was.

You can also drag a slot onto another slot to copy it there.

A copy of the current kit includes the edits you have not saved. Pasting into the current kit also loads it, because the machine only plays what it has loaded. Press [⌘] + [Z] to take a paste back.

CLEAR KIT

  1. Select a slot in the kit library.
  2. Click Clear, or press [DELETE].

The slot is written as the machine's own CLEAR KIT leaves it: every track is GND-EMPTY at the same values (level 100, VOL 127), each track's LFO on its own track, the master effects at their start, and no name. The slot then reads EMPTY. Press [⌘] + [Z] to get the kit back.

KIT ASSEMBLY

Each track holds one machine. The machine decides which synthesis parameters the track has.

  1. Open the Kit workspace and select a track.
  2. Click the machine key at the left of the header. It shows the machine and its family. The picker opens.
  3. Click a family at the left: TRX, EFM, E12, P-I, GND, INP, MID, CTR, ROM or RAM.
  4. Click a machine. The track takes it at once.
  5. Press [⌘] + [Z] to put the old machine back.

Hover over a machine to see its name and the names of its knobs in the line under the grid.

FamilyMachines
TRXanalogue models
EFMFM drums
E1212-bit samples
P-Iphysical models
GNDtone and noise
INPexternal input
MIDMIDI out
CTRcontrol
ROMROM samples, on the UW models
RAMRAM record and play, on the UW models

Keep effects and routing

The picker has a Keep effects + routing key, lit when it is on. It is on at start.

  • With it on, the new machine keeps the track's effects and routing values.
  • With it off, the effects and routing values of the track go back to neutral.

The synthesis values stay as they are in both cases and go to the new machine.

  1. Open the picker. Keep effects + routing is lit.
  2. Pick another machine. The track keeps its effects and routing values.
  3. Press [⌘] + [Z] to take the change back.

SETTING MUTE AND TRIG RELATIONS OF A KIT

A relation links one track to another. Both are set on the Kit workspace, in the Relations group at the right end of the last row.

  • Mute: a trig on this track mutes the track you choose. Use it for an open and a closed hihat.
  • Trig: a trig on this track also trigs the track you choose. Use it to layer sounds. Trig relations do not chain.
  1. Select the track that causes the effect.
  2. Under Mute or Trig, open the menu and choose a track, or choose none.
  1. To remove a relation, choose none in the same menu.

Relations are part of the kit. Save the kit to keep them.

The Relations group
The Relations group

COPY MACHINE

  1. Open the Kit workspace and select a track.
  2. Click Copy on the LCD, or press [⌘] + [C].

This copies the machine of the track, its parameter values, its level and its LFO.

PASTE MACHINE

  1. Select the track to paste onto, on the Kit workspace.
  2. Click Paste on the LCD, or press [⌘] + [V].

The track takes the copied machine, values, level and LFO. [⌘] + [Z] takes the paste back. The LFO now targets the track you pasted onto. You can paste as often as you like, onto any track and into any kit: the copy stays until you copy something else.

CLEAR MACHINE

  1. Select a track on the Kit workspace.
  2. Click the machine key at the left of the header. The picker opens.
  3. Choose GND-EMPTY. The track has no machine: the key shows GND-EMPTY.
  4. Press [⌘] + [Z] to take the clear back.

The key Clr on the LCD is a different thing. It sets every parameter of the track, its effects and its routing to neutral values and its level to 100, and the track keeps its machine.

MACHINE PARAMETER EDITING

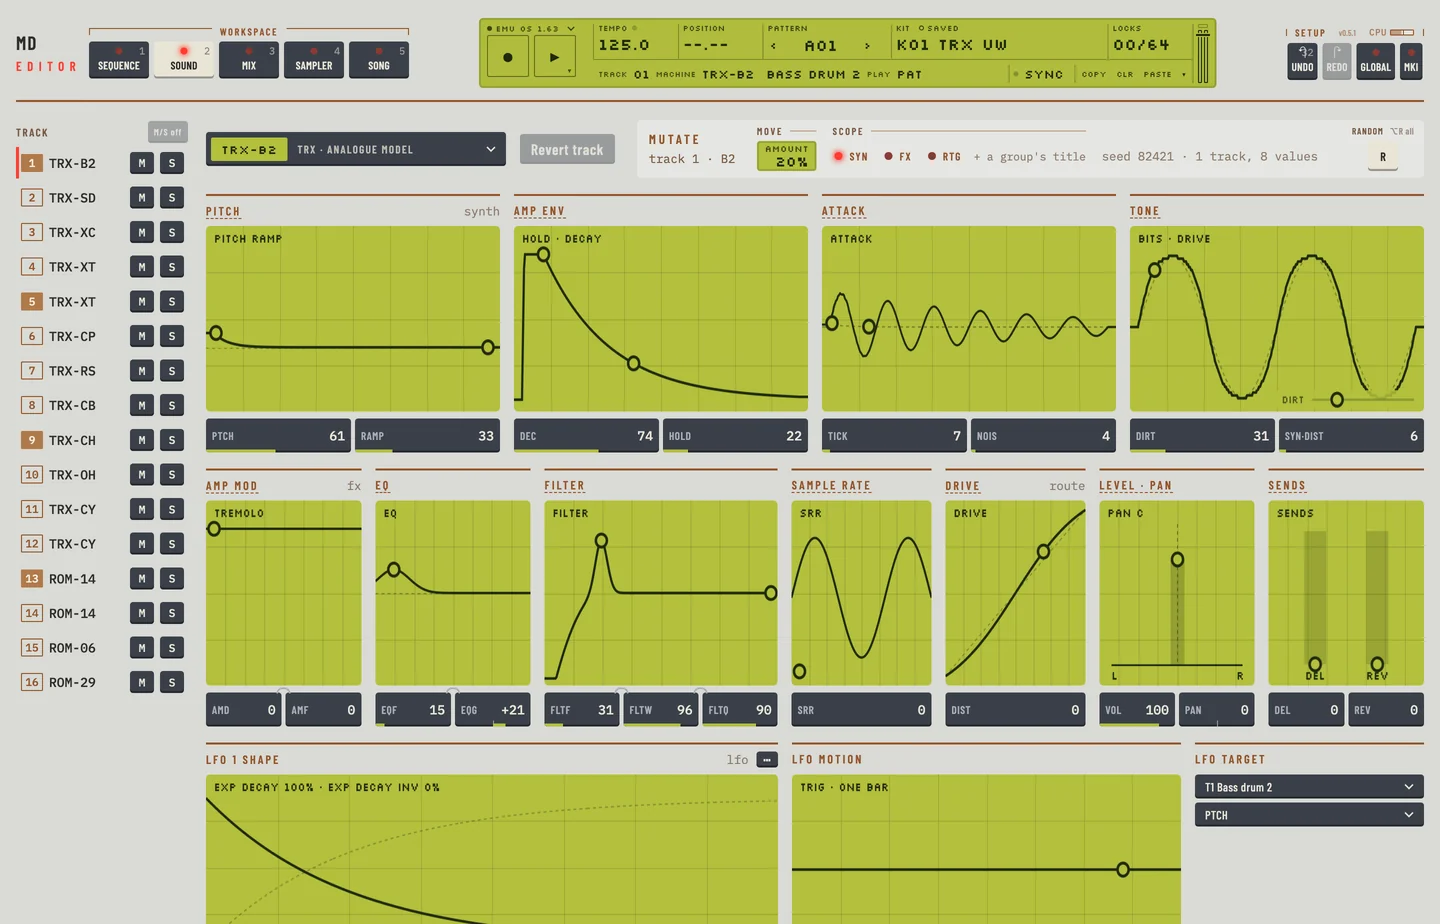
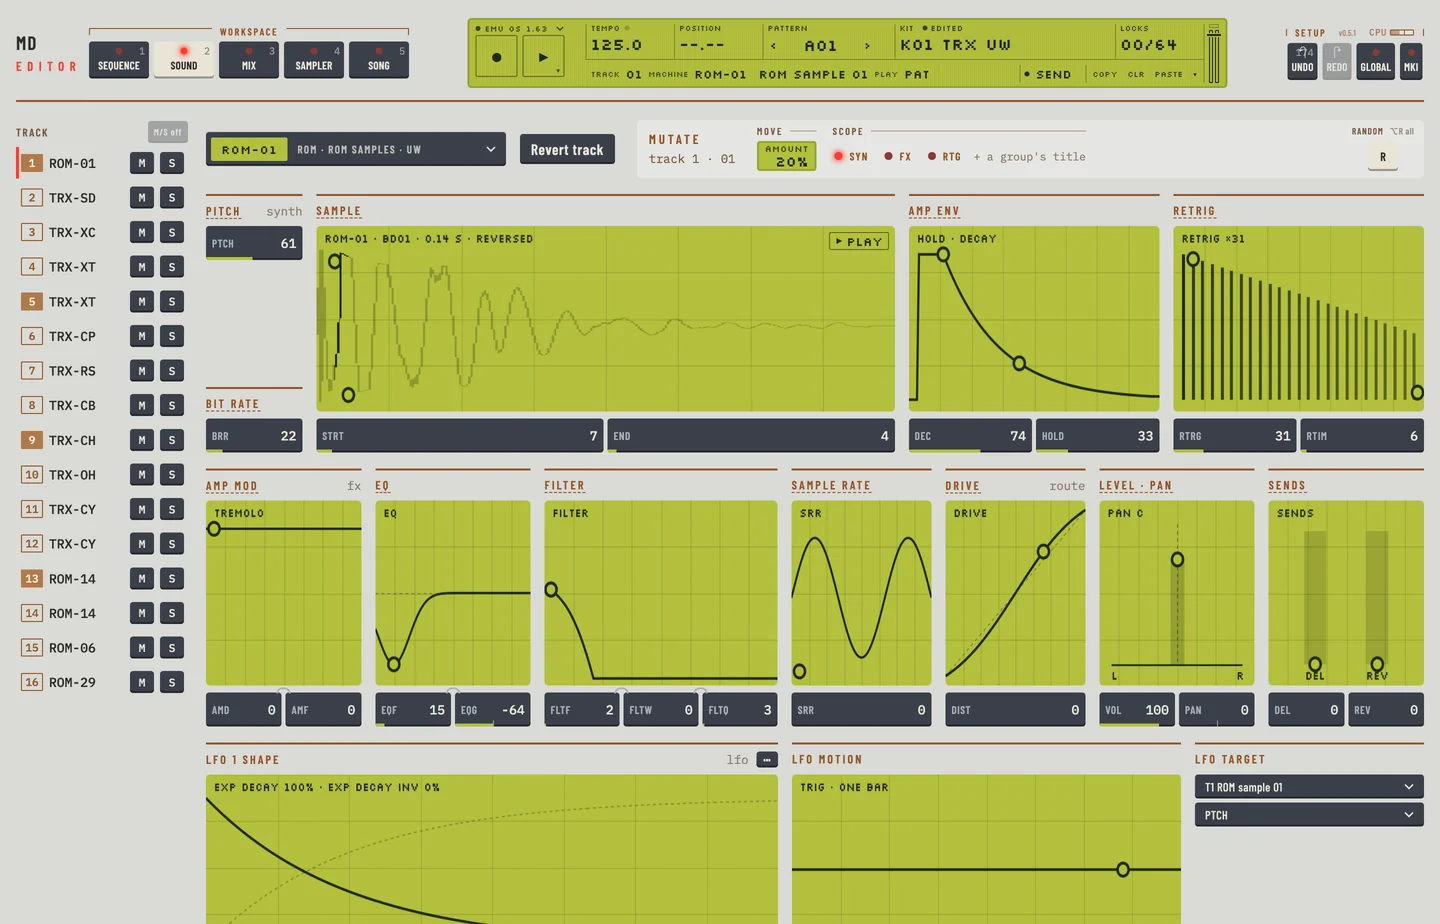
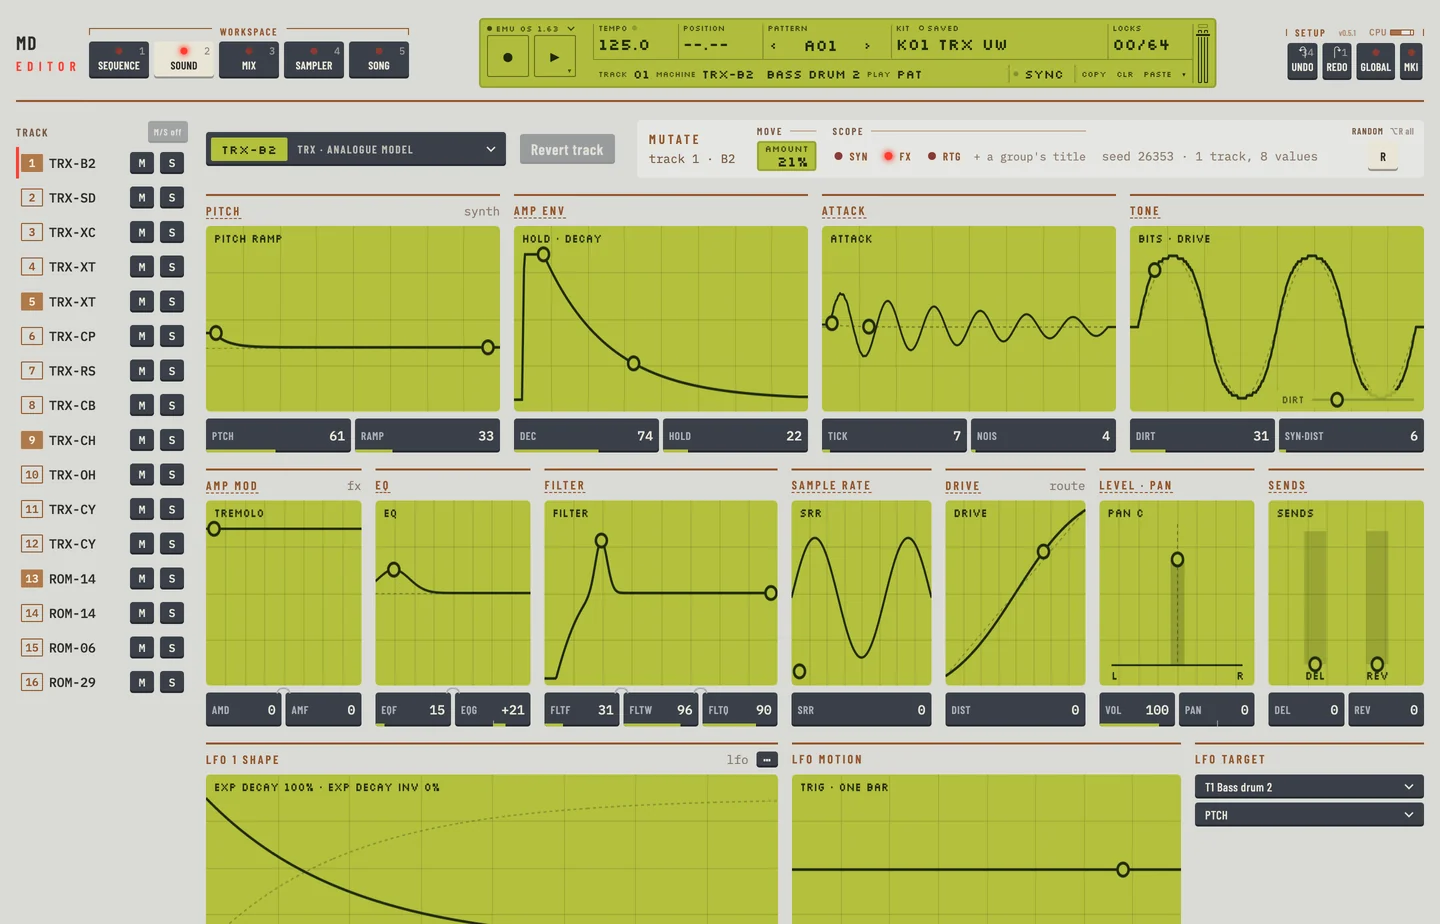
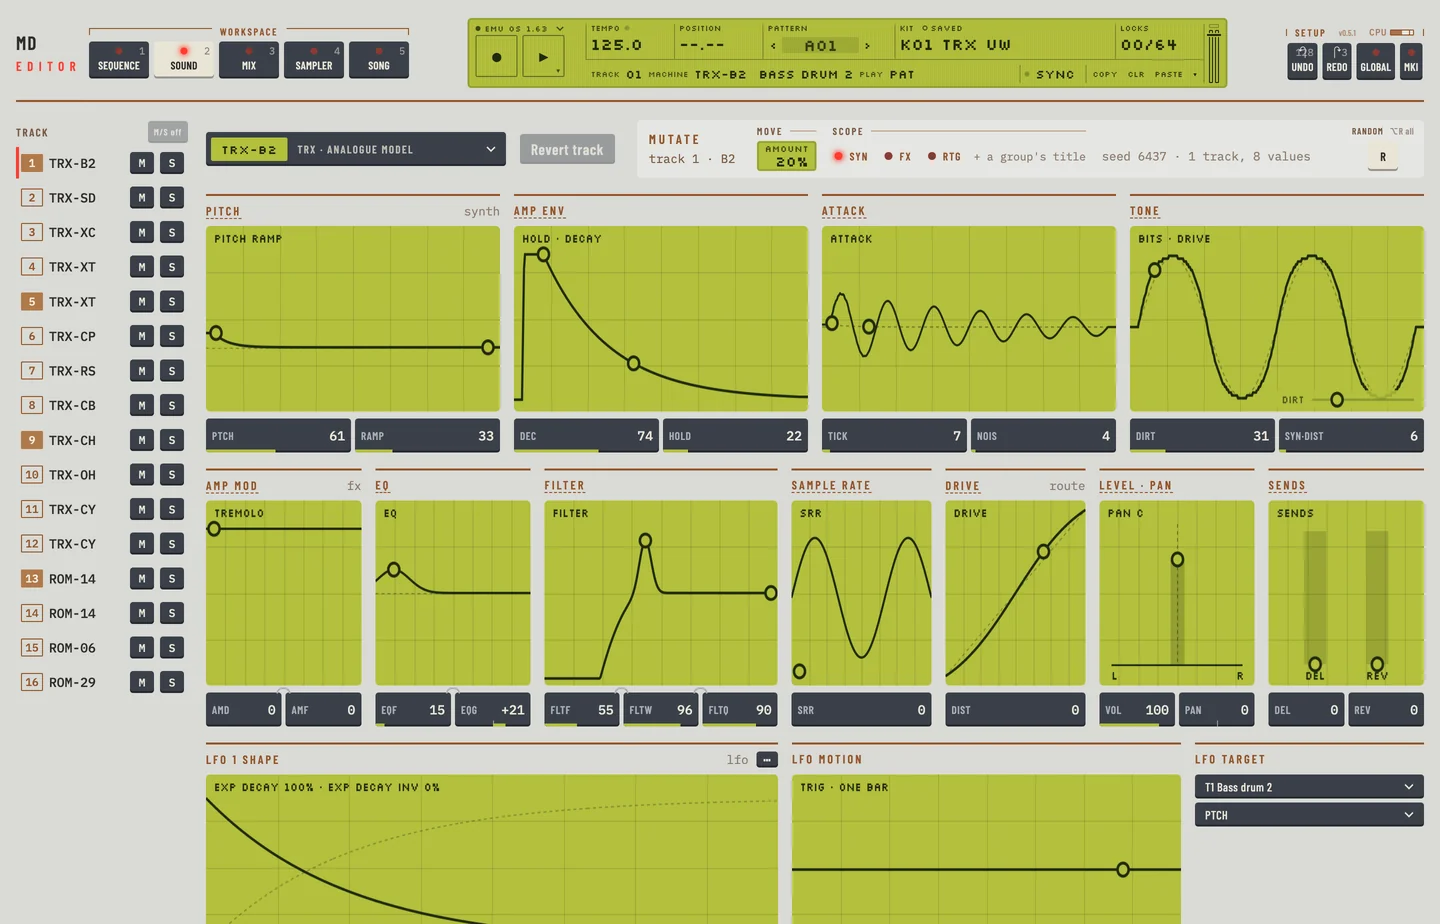
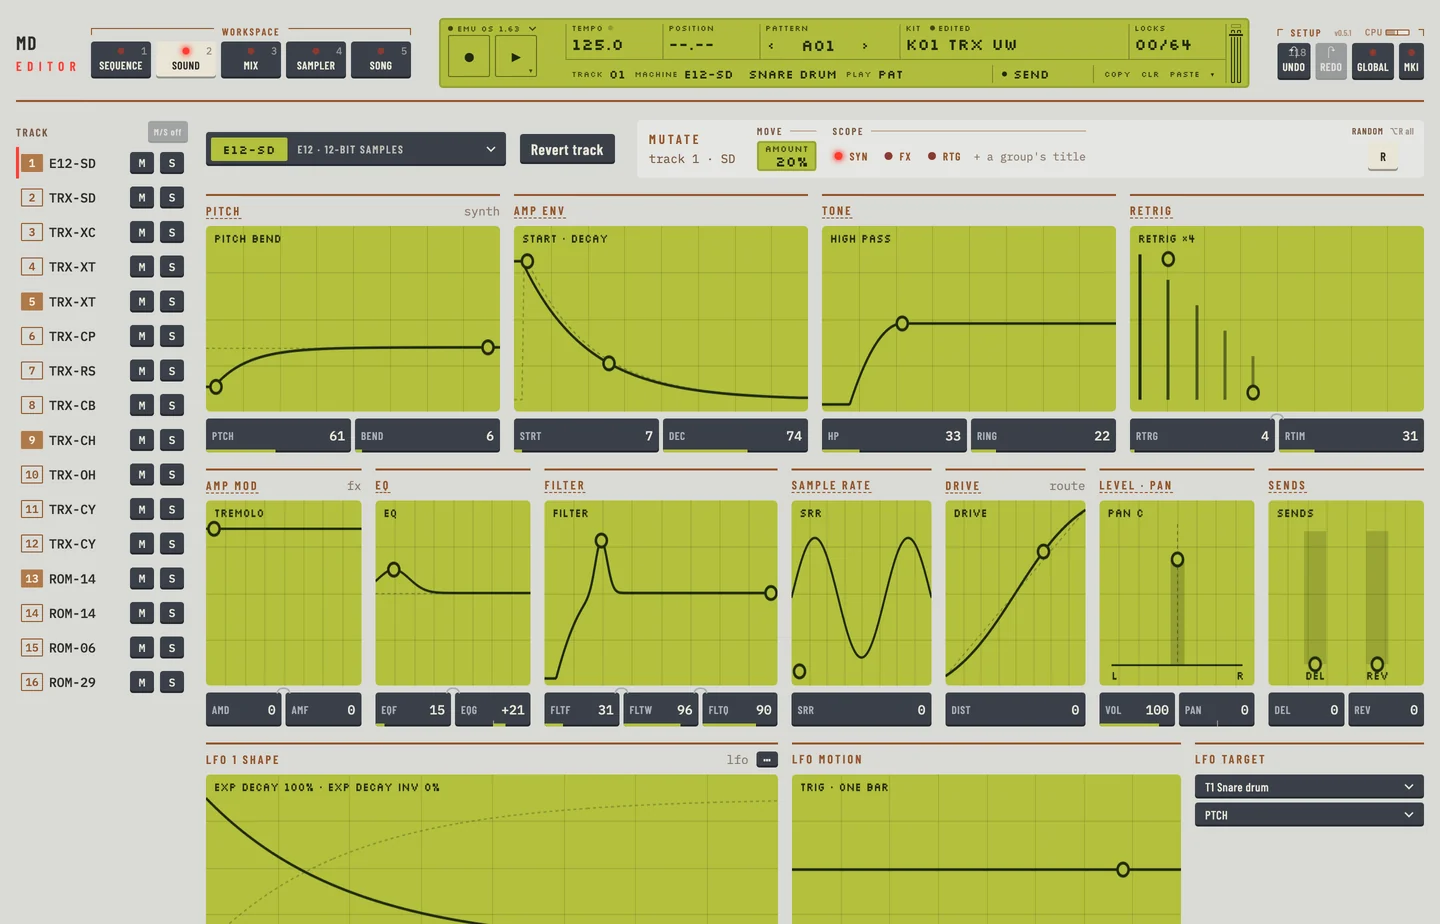
The Kit workspace shows the selected track's parameters in groups. Each group has a title, a small screen and value boxes. Every knob of the machine sits in one group.

  • The first row holds the synthesis groups of the machine, for example Pitch, Amp env and Tone.
  • The second row holds the track effects and the routing: chapters 4 and 5.
  • The third row holds the LFO and the track's relations: chapter 7.

A group's screen is a picture of what its knobs do. Drag the dots on it to change the knobs. A dot on a rail at the foot of a screen is a knob the curve shows. Each screen has a help text; hover over it.

Machines without a picture, such as MIDI out, show only boxes and a line about what the machine does.

A machine's groups
A machine's groups

To change a value with the keyboard, focus a box and press [↑] or [↓]. Each press moves it one step.

Hold [⌥] and drag a value to move the same knob on every track. This is Control All. MIDI and control machines are left out. [⌘] + [Z] takes the whole move back in one step.

4. Track effectsMachinedrum Editor

4

Track effects

MD manual pp.22-24

Each track has four effects after its machine: an amplitude modulator, a one-band EQ, a filter and a sample rate reducer. They act on that track only. Their parameters are part of the kit.

On the Kit workspace they are the first four groups of the second row. A small word at the right of the first group names the machine's EFFECTS page. Each group has a screen and value boxes. Drag a box or a dot on the screen to change a parameter.

The track effects on the Kit workspace

To set an effect:

  1. Press [2] for the Kit workspace and select a track in the rail.
  2. Drag the value box of the parameter, or drag a dot on the group's screen.
  3. Or focus the box and press an arrow key. Each press moves the value one step.
  4. Press [⌘] + [Z] to take the change back.

To lock an effect parameter to a step, open the Pattern workspace and click the parameter's key in the lock lane, in the row of keys labelled Effects. Chapter 8 describes the lock lane.

AMPLITUDE MODULATOR

The group Amp mod holds AMD and AMF. It modulates the level of the track, like a tremolo.

  • AMD is the depth of the modulation.
  • AMF is the frequency of the modulation.

The screen shows the level the modulator leaves. The dot sets AMF sideways and AMD upward.

TRACK EQ

The group EQ is a one-band parametric EQ. Use it to boost or cut one range of frequencies.

  • EQF is the centre frequency of the band.
  • EQG is the gain. It shows -64 to +63. Negative values cut the band, positive values boost it, and 0 leaves the sound as it is.

The dot on the screen moves the band: sideways for EQF, up to boost and down to cut.

FILTER

The group Filter is a resonant filter with two cut-offs. You set the lower cut-off and the width of the band between them, so it works as a high-pass, a low-pass or a band-pass filter.

  • FLTF is the base frequency, the lower edge of the band.
  • FLTW is the width. The upper edge is FLTF plus FLTW.
  • FLTQ is the resonance. It boosts the sound around the edges.

The screen shows the band that passes. The left dot sets FLTF sideways and FLTQ upward. The right dot sets FLTW.

To use it as a high-pass filter, set FLTW to its highest value and move FLTF. To use it as a low-pass filter, set FLTF to its lowest value and move FLTW.

THE SAMPLE RATE REDUCER

The group Sample rate holds SRR. A higher value holds each sample for longer, which lowers the sample rate and adds a gritty sound.

The screen shows the held steps. Drag its dot sideways to set SRR.

5. Routing pageMachinedrum Editor

5

Routing page

MD manual pp.25-27

The routing parameters set how a track's sound goes through the distortion, the volume and pan, and on to the effect buses. They are part of the kit.

There are two places to set them:

  • On the Kit workspace they are groups of the second row, after the track effects: Drive, Level · pan and Sends. A small word at the right of the first one names the machine's ROUTING page.
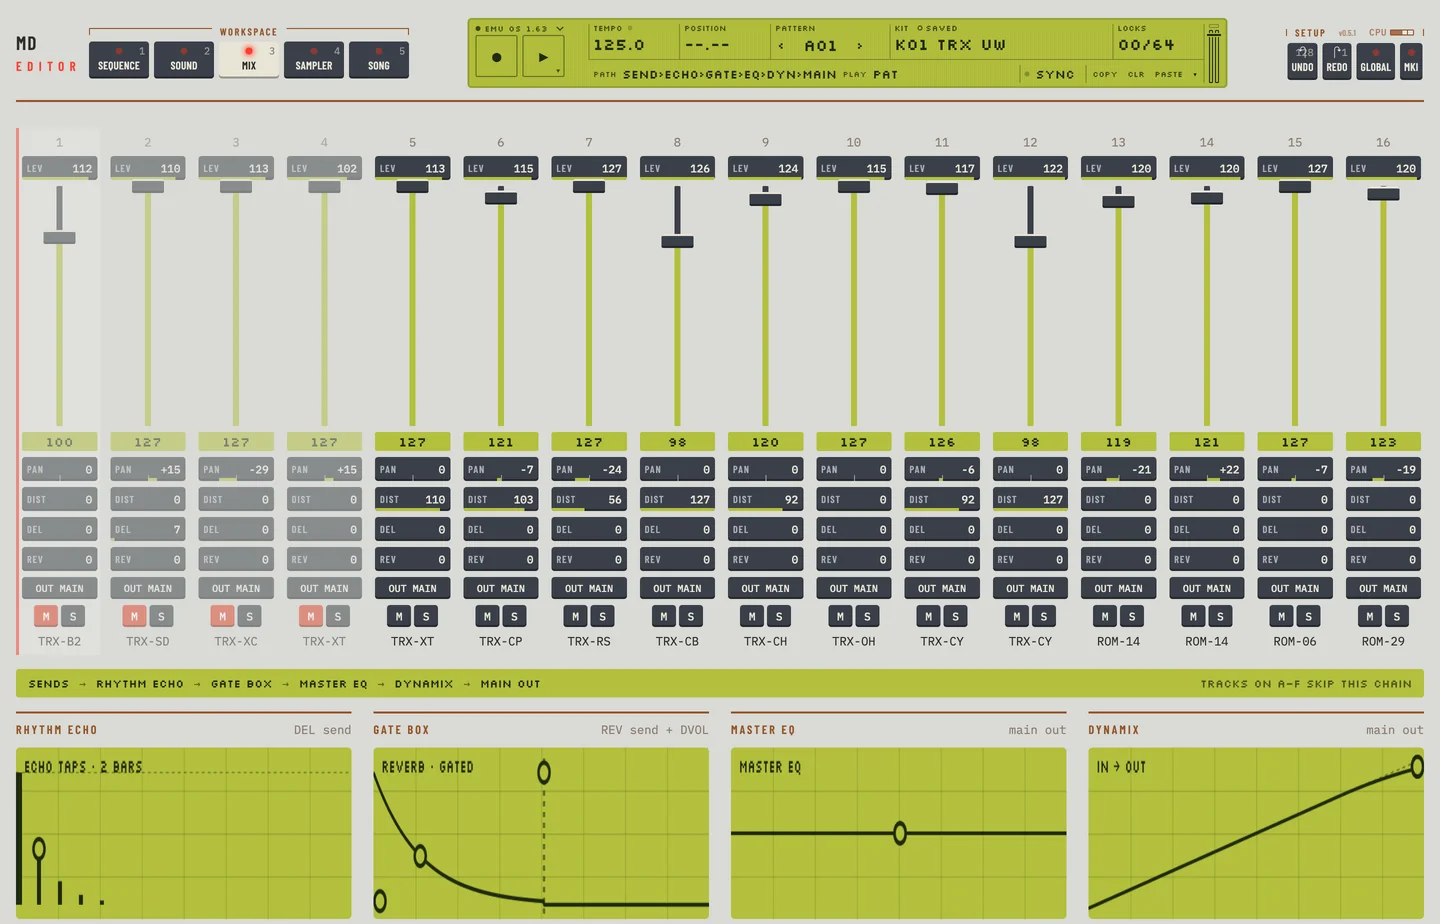
  • On the Mix workspace each track has a strip with its VOL fader and the PAN, DIST, DEL and REV boxes.
A strip on the Mix workspace

To lock a routing parameter to a step, open the Pattern workspace and click its key in the lock lane, in the row of keys labelled Routing.

DISTORTION

DIST controls the distortion of the track. It acts after the track effects and before the volume and pan.

The group Drive shows input against output. The dashed line is a clean signal.

To set it:

  1. Click the Kit tab.
  2. Select the track on the rail. The page shows the synthesis, effects and routing groups together.
  3. Drag the dot in Drive, or click the DIST box and press the up or down arrow key. The value changes in the kit.

On the Mix workspace use the DIST box of the strip.

The Kit workspace with the routing groups in the second row

VOLUME

VOL is the volume of the track. It is separate from the overall gain of the track and, unlike it, can be locked and moved by an LFO.

On the Mix workspace VOL is the fader of the strip. Drag the fader, or press [↑] or [↓] while it has focus. Double-click it to set 100. On the Kit workspace VOL is in the group Level · pan.

To take a change back, press [⌘] + [Z]. The fader goes back to where it was.

PAN

PAN places the track in the stereo field of the main outputs. It shows -64 for hard left to +63 for hard right, and 0 for the centre.

On the Kit workspace the group Level · pan has one dot: sideways sets PAN, upward sets VOL. On the Mix workspace drag the PAN box of the strip sideways. Press [⌘] + [Z] to take the change back.

DELAY SEND

DEL sets how much of the track goes to the Rhythm Echo, the delay of the master effects.

On the Kit workspace the group Sends has two bars, one for DEL and one for REV. Drag the dot on a bar, or click the box and press the up or down arrow key. On the Mix workspace use the DEL box.

A track on an individual output, A to F, has no delay. Its DEL box is greyed on the Mix workspace, with a note, and the value is kept.

REVERB SEND

REV sets how much of the track goes to the Gate Box, the reverb of the master effects. It is set in the same places as DEL.

A track on an individual output has no reverb. Its REV box is greyed in the same way.

LFO CONTROL

The three routing parameters LFOS, LFOD and LFOM are the speed, depth and mix of the track's LFO. They are the same kit values as SPD, DEPTH and SHMIX in the LFO group of the Kit workspace, so the LFO group holds all three. Chapter 7 describes the LFO.

Click any of the three boxes in the LFO group and press the up or down arrow key. Each one moves its own routing value and no other.

When you lock LFOS, LFOD or LFOM on a step, the lock also shows on the box of the LFO group.

6. Stereo master effectsMachinedrum Editor

6

Stereo master effects

MD manual pp.28-31

The stereo master effects are four effects that work on the main outputs. The Rhythm Echo and the Gate Box take signal from the tracks through their DEL and REV sends. The master EQ and Dynamix work on the final stereo output.

THE STEREO MASTER EFFECT SYSTEM

The master effects are on the Mix workspace, below the track strips. A line above them shows the signal path: sends, Rhythm Echo, Gate Box, master EQ, Dynamix, main out. Tracks on the individual outputs A to F skip this chain.

Each effect is a card with a name, a screen and eight value boxes. Drag a dot on the screen or a box to change a parameter.

  1. Click the Mix tab.
  2. Drag a value on one of the cards. The change is heard at once.
  3. Press [⌘] + [Z] to take it back.

The four cards hold 32 values. Each one moves its own parameter of its own effect and no other.

The master effects
The master effects

The master effects are part of the kit. Save the kit to keep your changes.

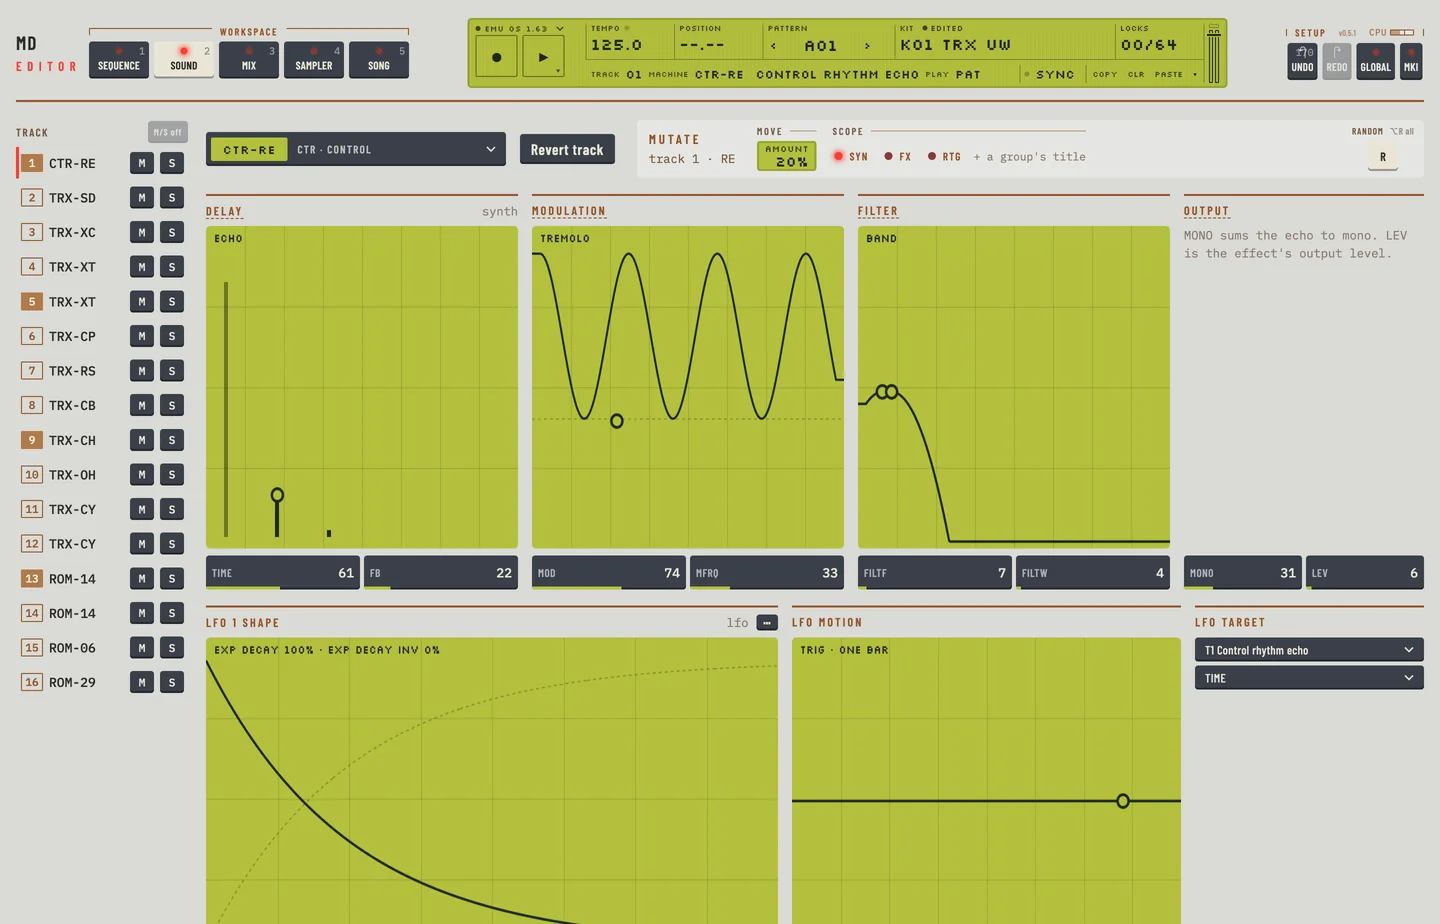
You cannot lock the master effects on the Mix workspace. To change them from the sequencer, use a CTR machine on a track. The machines CTR-RE, CTR-GB, CTR-EQ and CTR-DX hold the parameters of the Rhythm Echo, the Gate Box, the master EQ and Dynamix. They make no sound. On the Kit workspace they show the same groups as the cards, and you lock their parameters in the lock lane like any other.

To lock the Rhythm Echo time on a step:

  1. Click the Kit tab and select a track on the rail.
  2. Choose CTR-RE in the machine menu of the track. The track now stands for the Rhythm Echo.
  3. Click the Pattern tab. Click a step of that track to put a trig on it.
  4. Click the TIME key under Lock parameter, then drag across the lock lane over the trig. The step holds its own echo time.
A control track for the Rhythm Echo, with a lock on TIME

THE RHYTHM ECHO DELAY

The card Rhythm Echo is a delay in time with the tempo. Its sends come from the DEL parameter of the tracks.

ParameterWhat it does
TIMEthe delay time, in 128th notes: 64 is two beats
MODthe depth of the modulation of the time
MFRQthe frequency of that modulation
FBthe feedback
FILTFthe base frequency of the filter in the feedback
FILTWthe width of that filter
MONOthe panning of the feedback: low values give a ping-pong echo, high values keep the stereo image
LEVthe output level of the effect

The screen shows the repeats. Drag its dot sideways for TIME and up for FB. With FB at 64 each repeat is as loud as the one before. Above 64 the repeats grow, and the screen says so.

THE GATE BOX REVERB

The card Gate Box is a reverb for percussion, with a gate. Its sends come from the REV parameter of the tracks.

ParameterWhat it does
DVOLhow much of the Rhythm Echo's output goes into the reverb
PREDthe pre-delay
DECthe decay time, 0.5 to 3 seconds
DAMPthe damping of the high frequencies
HPa high-pass filter on the output
LPa low-pass filter on the output
GATEthe gate time; at 127 the gate is off
LEVthe output level of the reverb

The screen shows the reverb tail. Its three dots set PRED, DEC and GATE. The label under the screen reads "reverb · gate off" when GATE is at 127.

MASTER EQ

The card Master EQ has a low shelf, a high shelf and one parametric band. It shapes the final stereo output.

ParameterWhat it does
LF, LGthe frequency and gain of the low shelf
HF, HGthe frequency and gain of the high shelf
PF, PGthe centre frequency and gain of the parametric band
PQthe width of the parametric band; high values are narrow
GAINthe output gain of the main stereo out

The gains run from 0 to 127 in the boxes, with 64 flat. The screen shows the EQ curve. Each of its three dots sets a frequency sideways and a gain up or down.

THE DYNAMIX DYNAMICS PROCESSOR

The card Dynamix is a compressor for percussion. It works on the main output.

ParameterWhat it does
ATCKthe attack time of the level detector; long times let fast transients through
RELthe release time
TRHDthe threshold, where compression starts
RTIOthe ratio
KNEEthe softness of the change at the threshold; low values give a hard knee
HPa high-pass filter on the side chain, so bass does not trigger it
OUTGthe output gain, to make up for the loss
MIXthe balance of compressed and original signal; a high value bypasses the effect

The screen shows input against output. The dashed line is a signal that passes unchanged. Drag the first dot sideways for TRHD. Drag the dot at the right end for RTIO.

7. LFOsMachinedrum Editor

7

LFOs

MD manual pp.32-34

Each kit has 16 LFOs, one for each track. An LFO moves one parameter of one track, up and down, in time with the tempo. By default an LFO moves a parameter of its own track.

On the Kit workspace the LFO of the selected track fills the last row. Select another track in the rail to edit its LFO. The row holds three groups: LFO shape, LFO motion and LFO target. The title of the first reads LFO and the track number, for example LFO 3 shape.

The LFO row
The LFO row

LFO EDIT

On the machine you hold FUNCTION and press the SYNTHESIS, EFFECTS and ROUTING key to open the LFO edit window. In the editor the LFO row is always on the Kit workspace, so there is no window to open.

Target

The group LFO target has two menus.

  1. Open the first menu and choose the track the LFO moves. Entries read T1 and the track's sound.
  2. Open the second menu and choose the parameter. It lists the synthesis, effects and routing parameters of that track.

To move another LFO, choose that LFO's track and then LFOS, LFOD or LFOM. These are its speed, depth and mix. The machine applies its own rule for which LFO may move which.

An LFO can move a parameter of another LFO, its own included: choose LFOS of the same track as the target, and the LFO changes its own speed.

When you choose another track, the parameter stays if the new track has it. If not, the first parameter of the new track is chosen.

SHP1 AND SHP2

The group LFO shape has two rows of shape keys. SHP1 and SHP2 each choose one of six shapes: triangle, saw, square, linear decay, exponential decay and random.

SHP2 shows the same six shapes inverted.

Click a key to choose a shape. Try each of the six keys of SHP1 and each of SHP2: the kit follows each click. The screen shows one cycle of the LFO. The solid line is the mix of the two shapes. The faint lines are the shapes themselves.

UPDTE

The group LFO motion has the UPDTE keys.

  • FREE: the LFO runs on and never restarts.
  • TRIG: the LFO restarts on every trig of its track.
  • HOLD: the LFO holds the value it has when the track is trigged, until the next trig.

An LFO restarts only when its own track is trigged. Click a key to choose the mode.

SPEED

SPD is the speed of the LFO, in 1/128 notes of the tempo. Drag the SPD box, or the dot on the screen of LFO motion sideways. With the box focused, the up and down arrow keys move it one step at a time.

The screen shows the LFO across one bar of the track. The ticks mark the restarts of TRIG.

DEPTH

DEPTH is how much the LFO moves the parameter. Drag the DEPTH box, or the dot on the screen of LFO motion upward. The dashed line on the screen shows the depth.

SHMIX

SHMIX balances the two shapes. At 0 the LFO uses SHP1 only. At 127 it uses SHP2 only. Drag the SHMIX box, or the dot on the screen of LFO shape sideways.

SPD, DEPTH and SHMIX are also the routing parameters LFOS, LFOD and LFOM. See chapter 5.

LAYERING LFOS

If the LFOs of two tracks have the same target, their outputs add. You can build slow and fast movements on one parameter this way.

  1. Select the first track and set its LFO target.
  2. Select a second track and choose the same track and parameter as its LFO target.
  3. Both LFOs keep their settings, and their outputs add.

An LFO can also move several parameters of a machine at once, one parameter for each track's LFO.

COPY, PASTE, CLEAR AND UNDO

The LFO is part of the track's sound. Copy and paste on the Kit workspace take the machine, its values, its level and its LFO together: see "Copy machine" in chapter 3. Press [⌘] + [Z] to take an edit back.

To copy, paste or clear the LFO alone:

  1. On the Kit workspace, select the track.
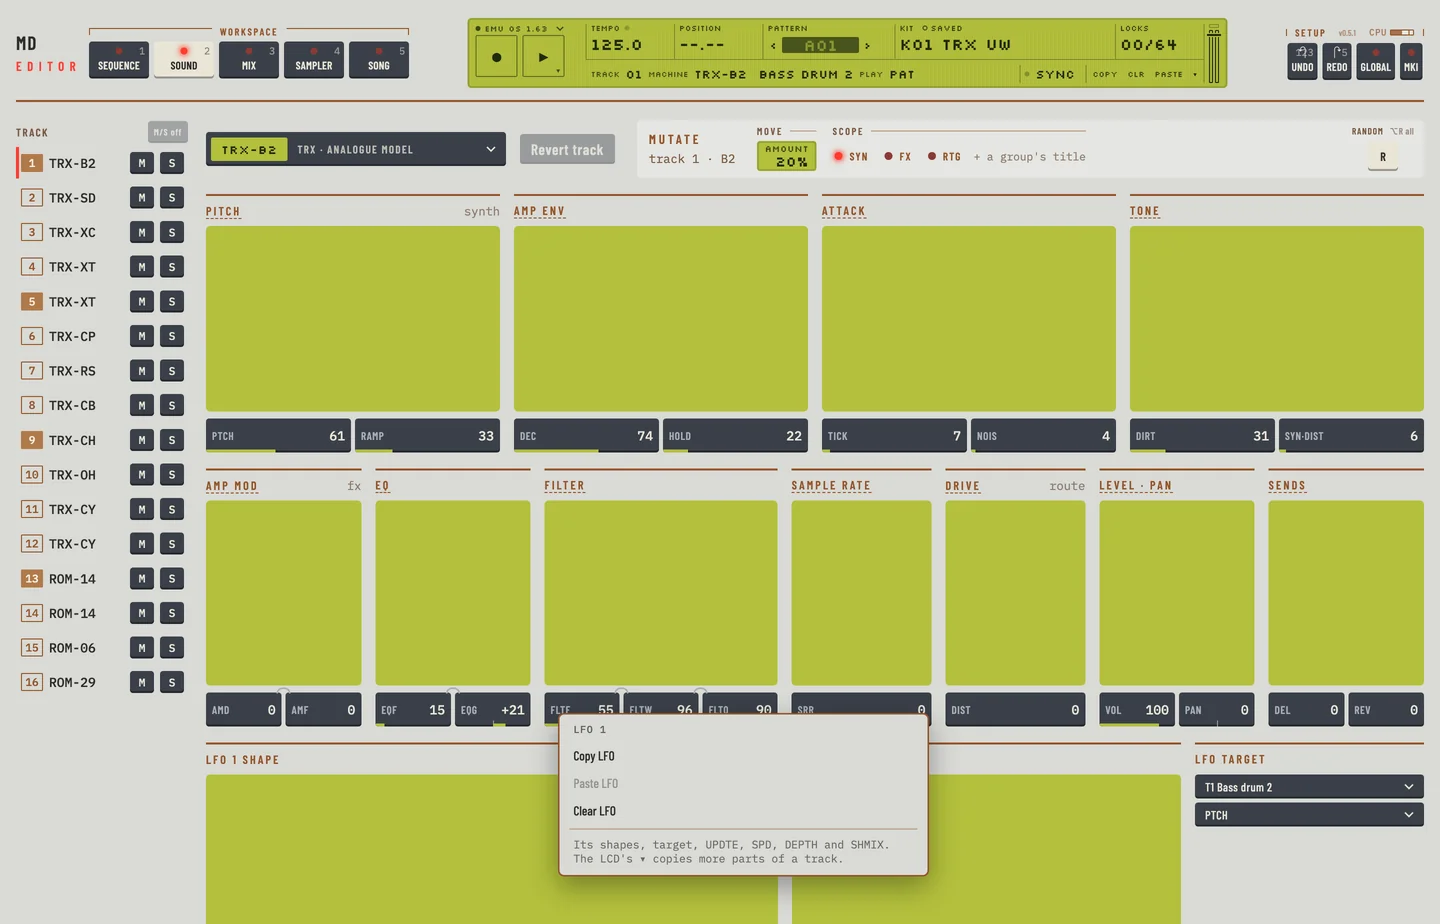
  2. Click ⋯ at the right of the LFO card's title. A menu opens.
  3. Choose Copy LFO. The shapes, the target, <UPDTE>, <SPD>, <DEPTH> and <SHMIX> are copied.
  4. Select another track, click ⋯ and choose Paste LFO. The LFO of that track becomes the copy.
  5. Choose Clear LFO to set an LFO back to its start: no shapes, the first parameter of its own track, <FREE>, <SPD> 64, <DEPTH> and <SHMIX> 0.
  6. Press [⌘] + [Z] twice. The clear goes, then the paste, and the LFO is as it was before.
The LFO menu
The LFO menu

The LFO is also a part of Copy…, Paste… and Clear… in the LCD's ▾ menu: see "Track copy" in chapter 8.

LFO settings are stored in the kit. Save the kit to keep them.

8. Pattern sequencerMachinedrum Editor

8

Pattern sequencer

MD manual pp.35-50

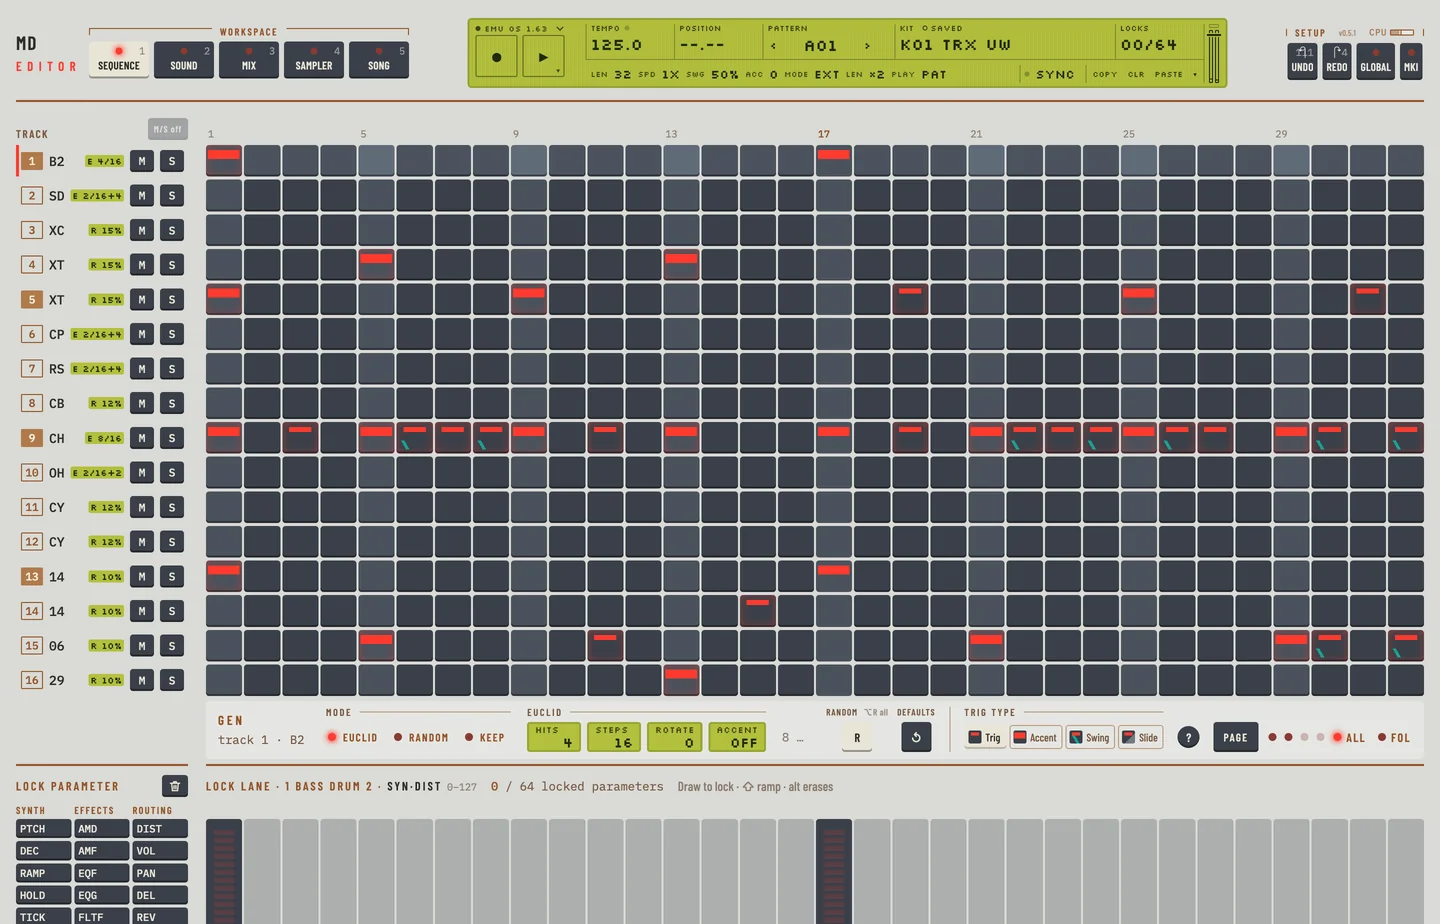
The pattern sequencer plays 16 tracks, one step after another, in a loop. A pattern is up to 64 steps long. The Machinedrum holds 128 patterns in 8 banks of 16, A01 to H16. Each step can hold a trig, an accent, a slide and parameter locks.

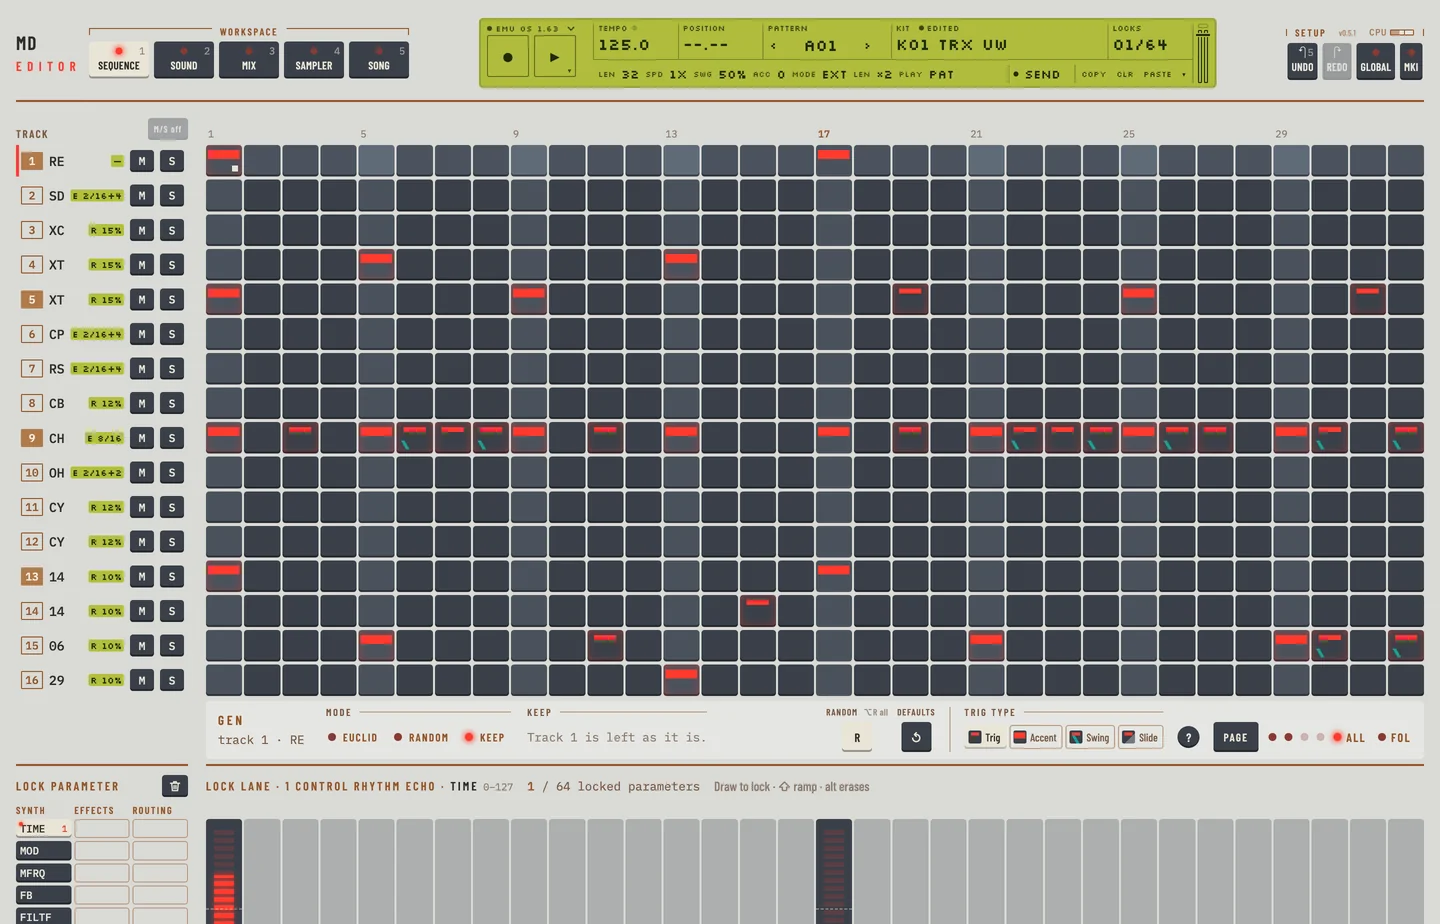
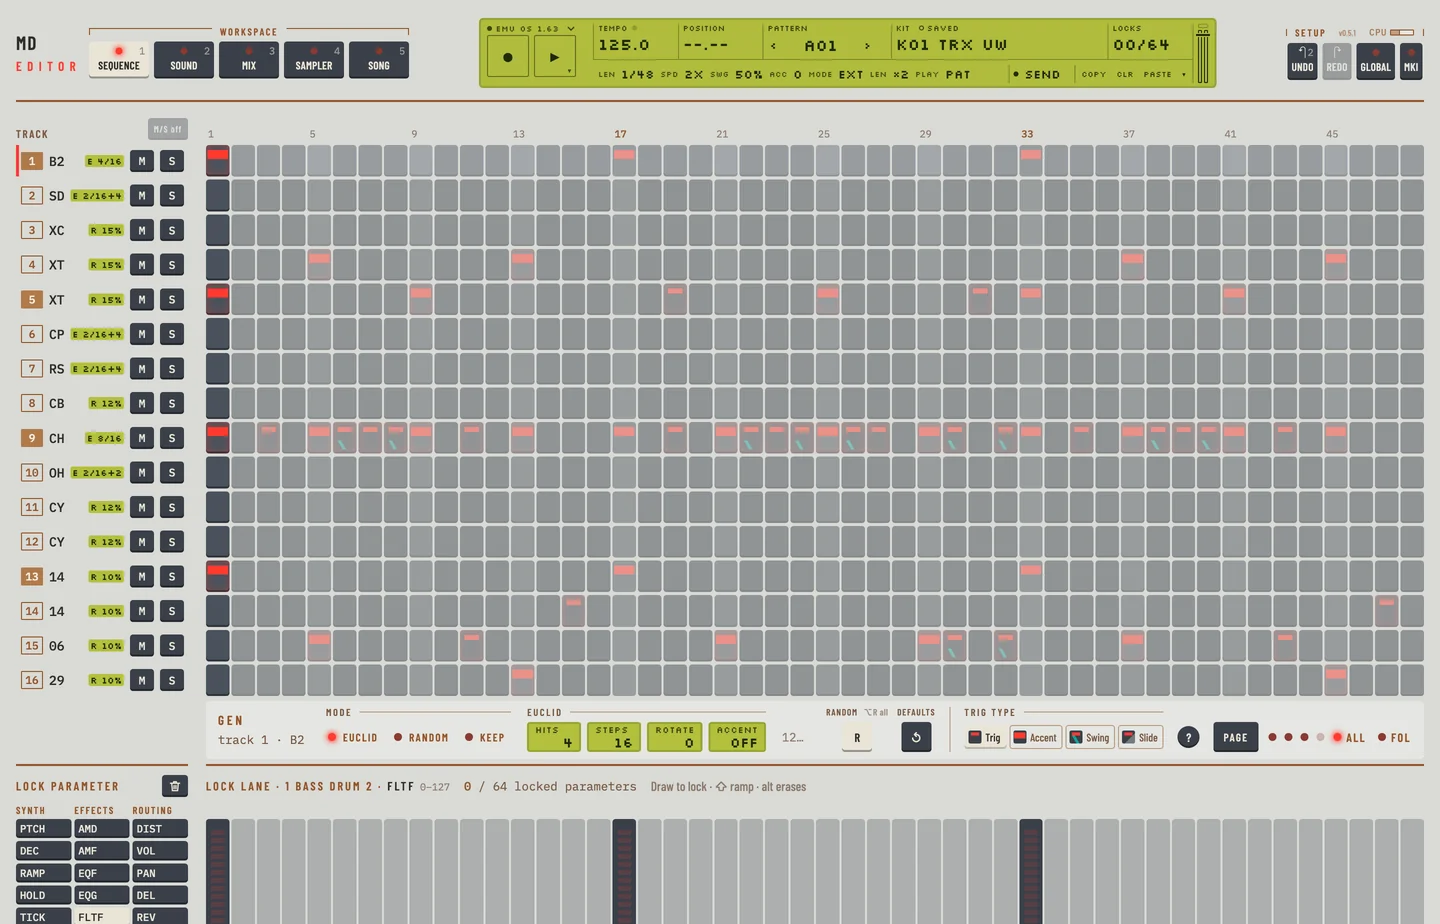
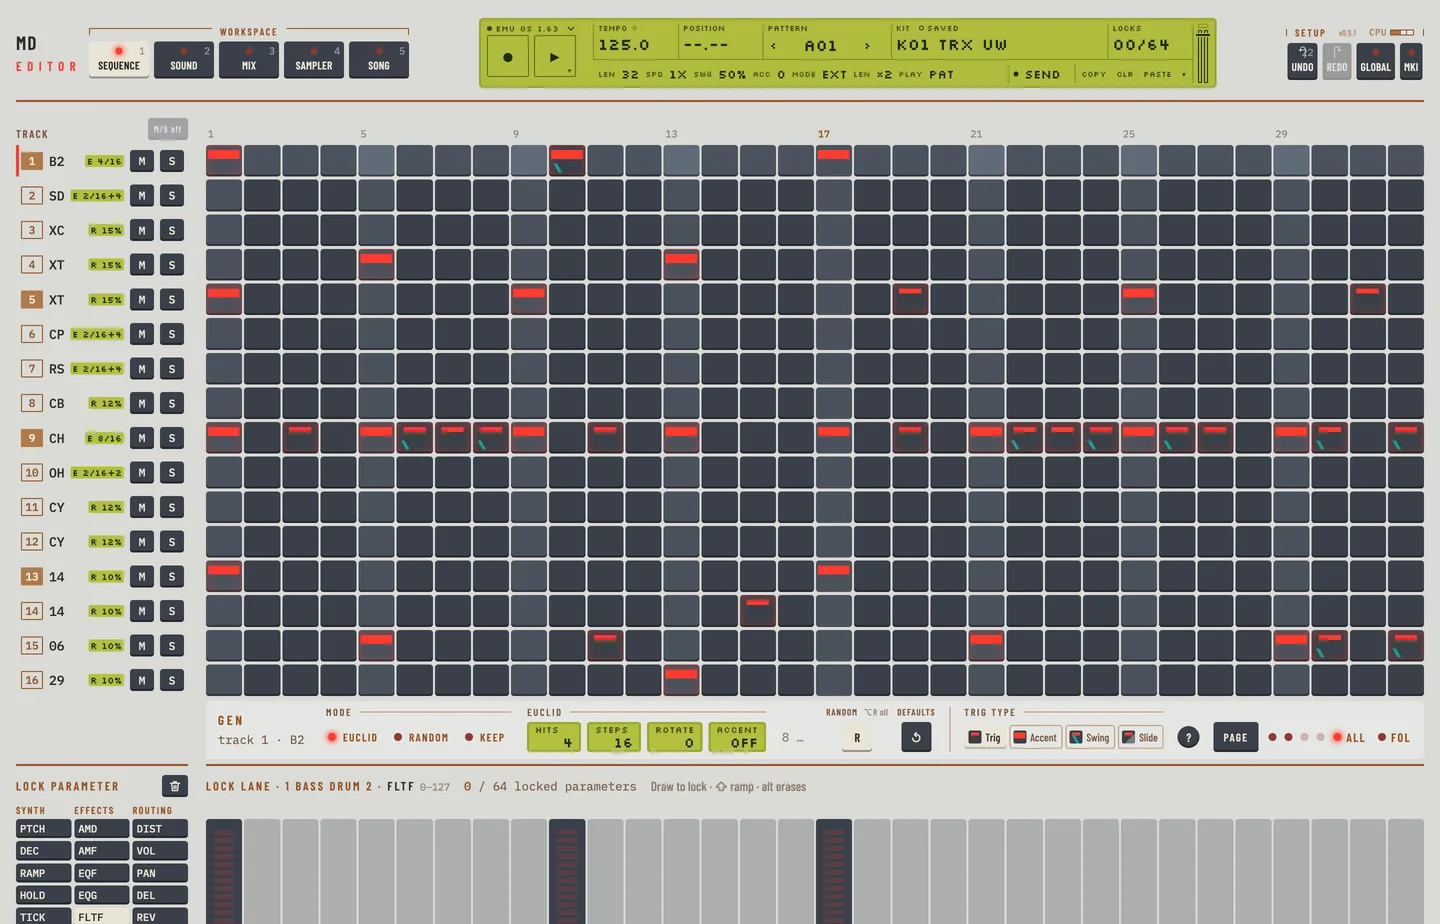
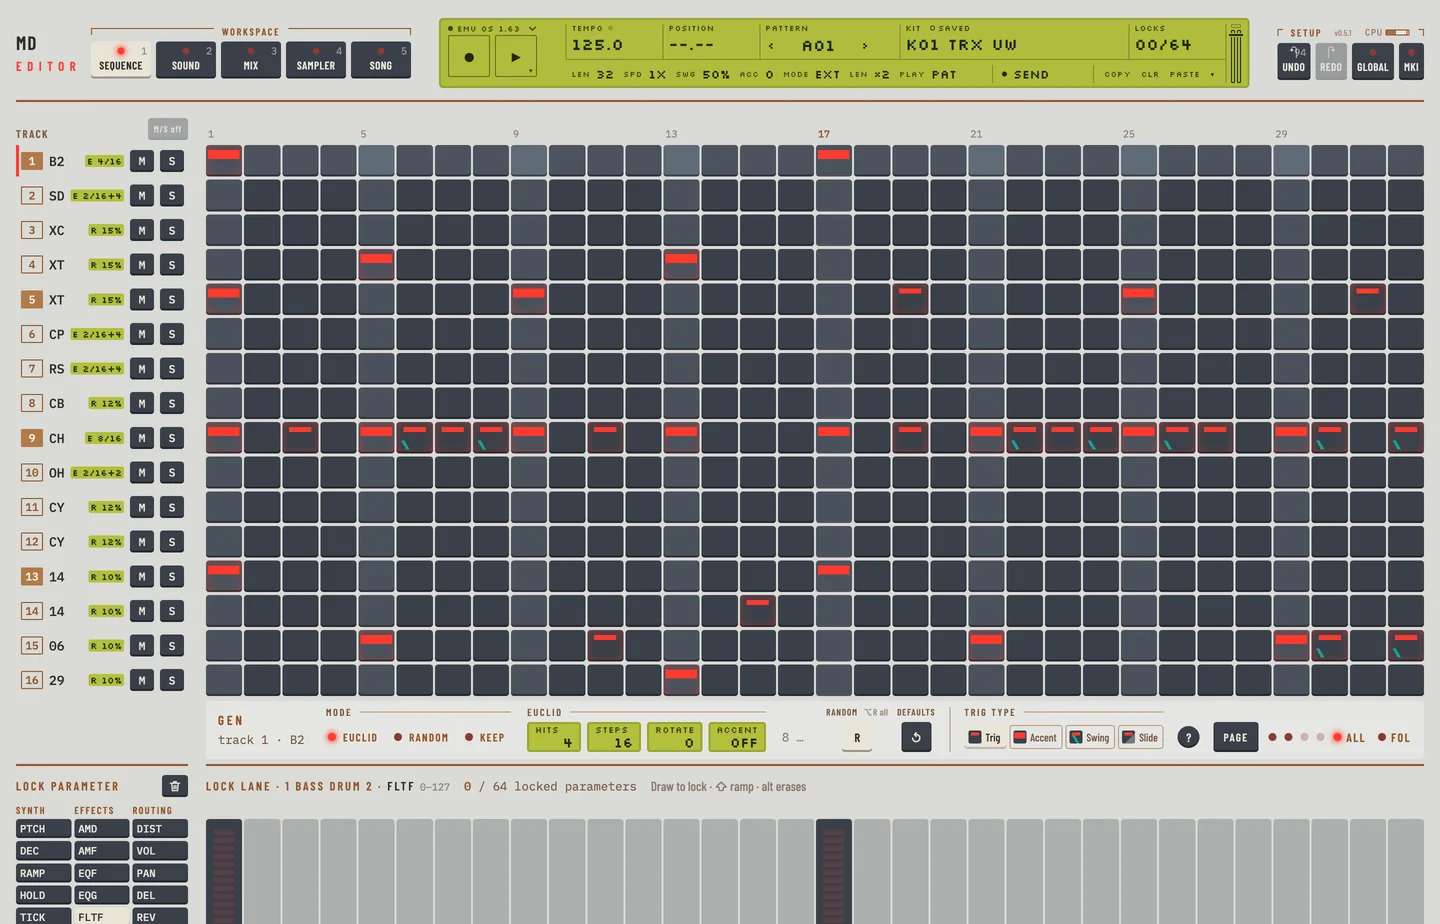
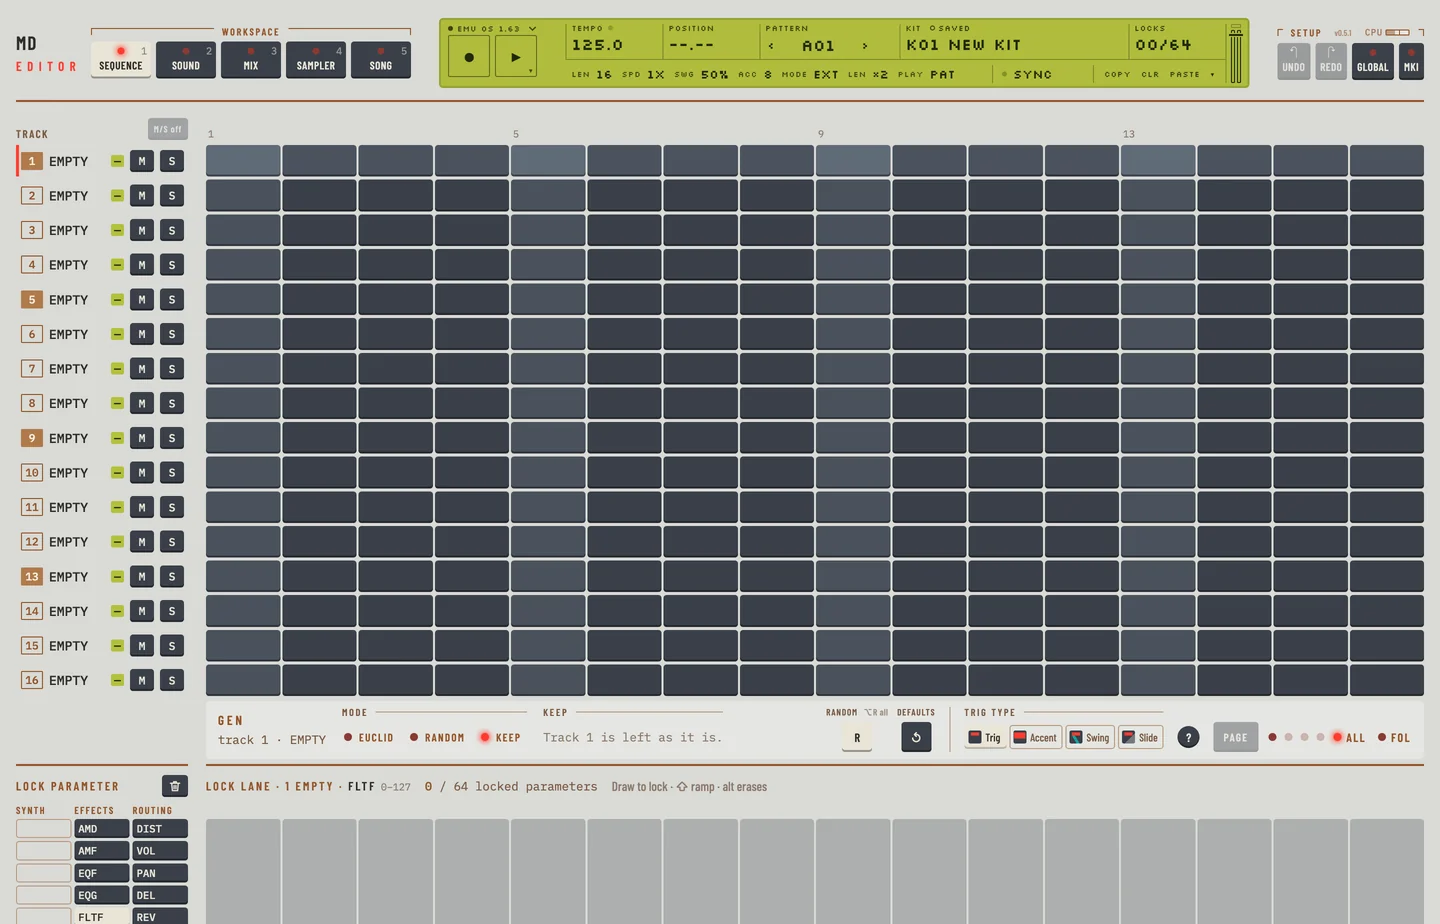
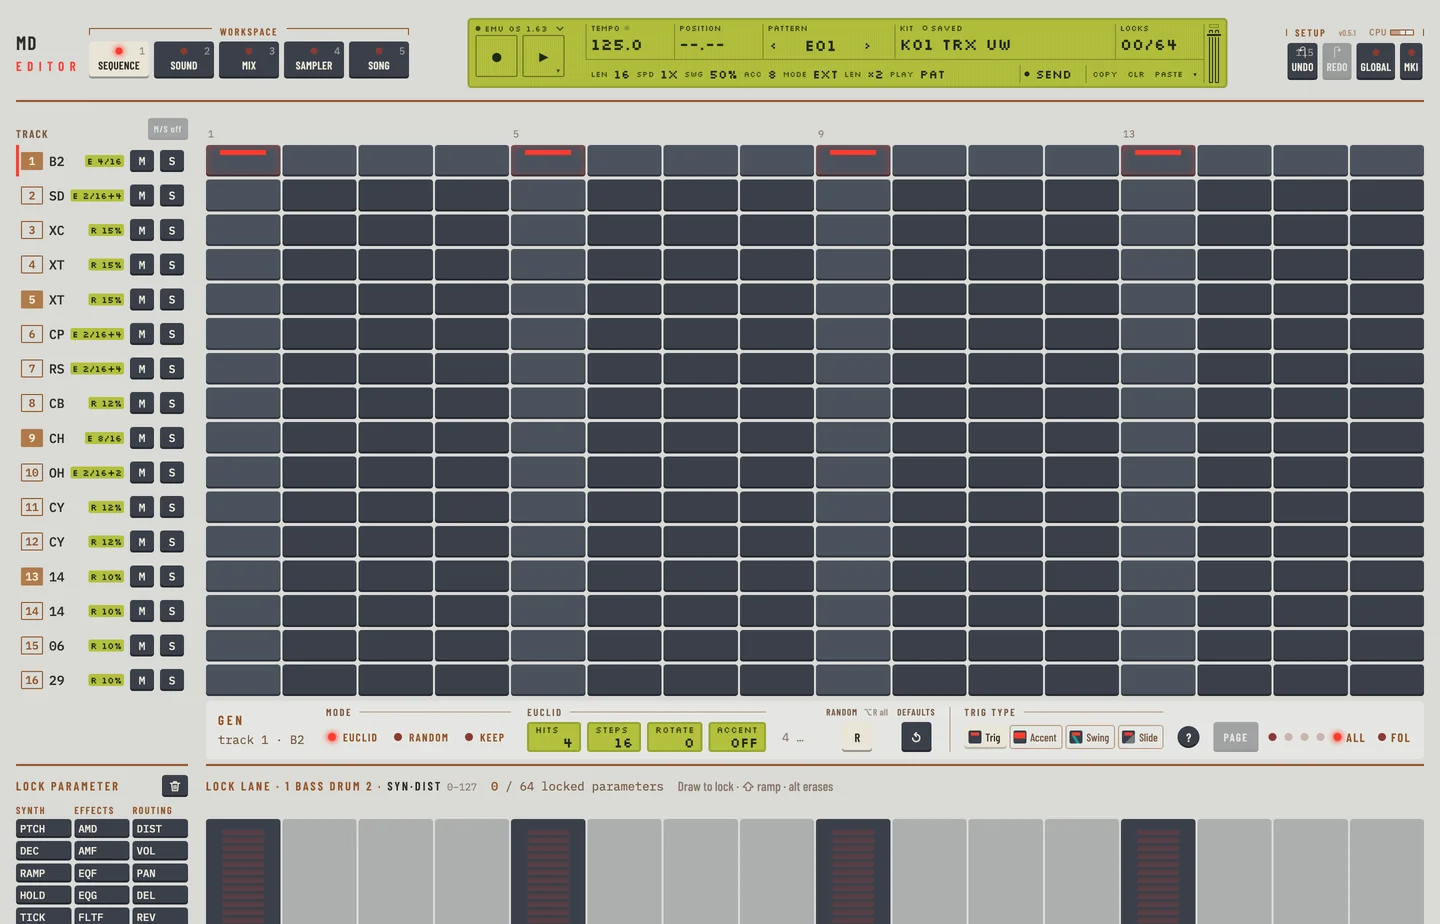
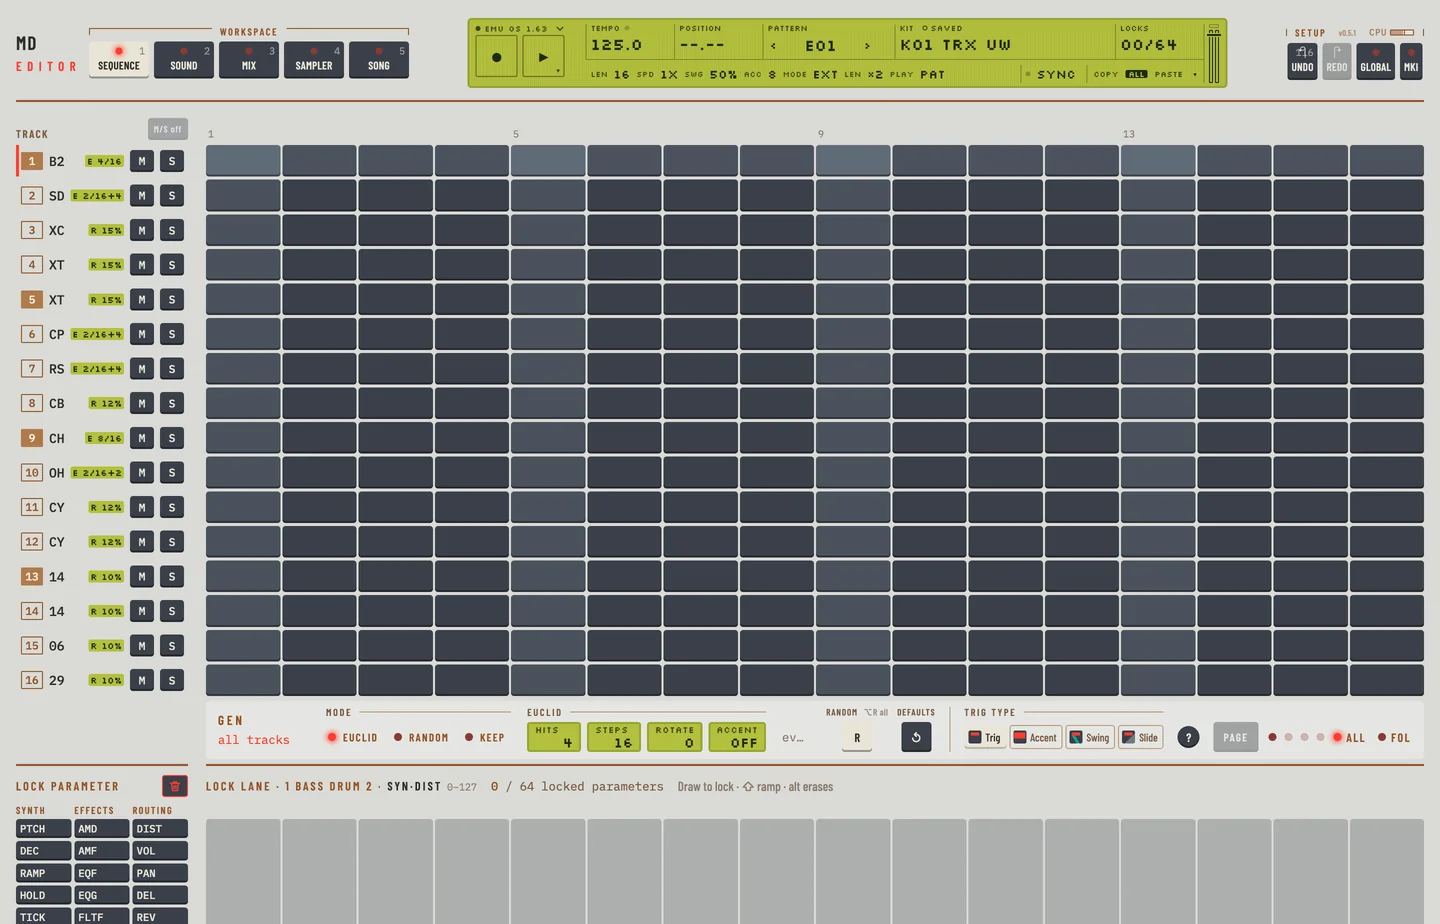
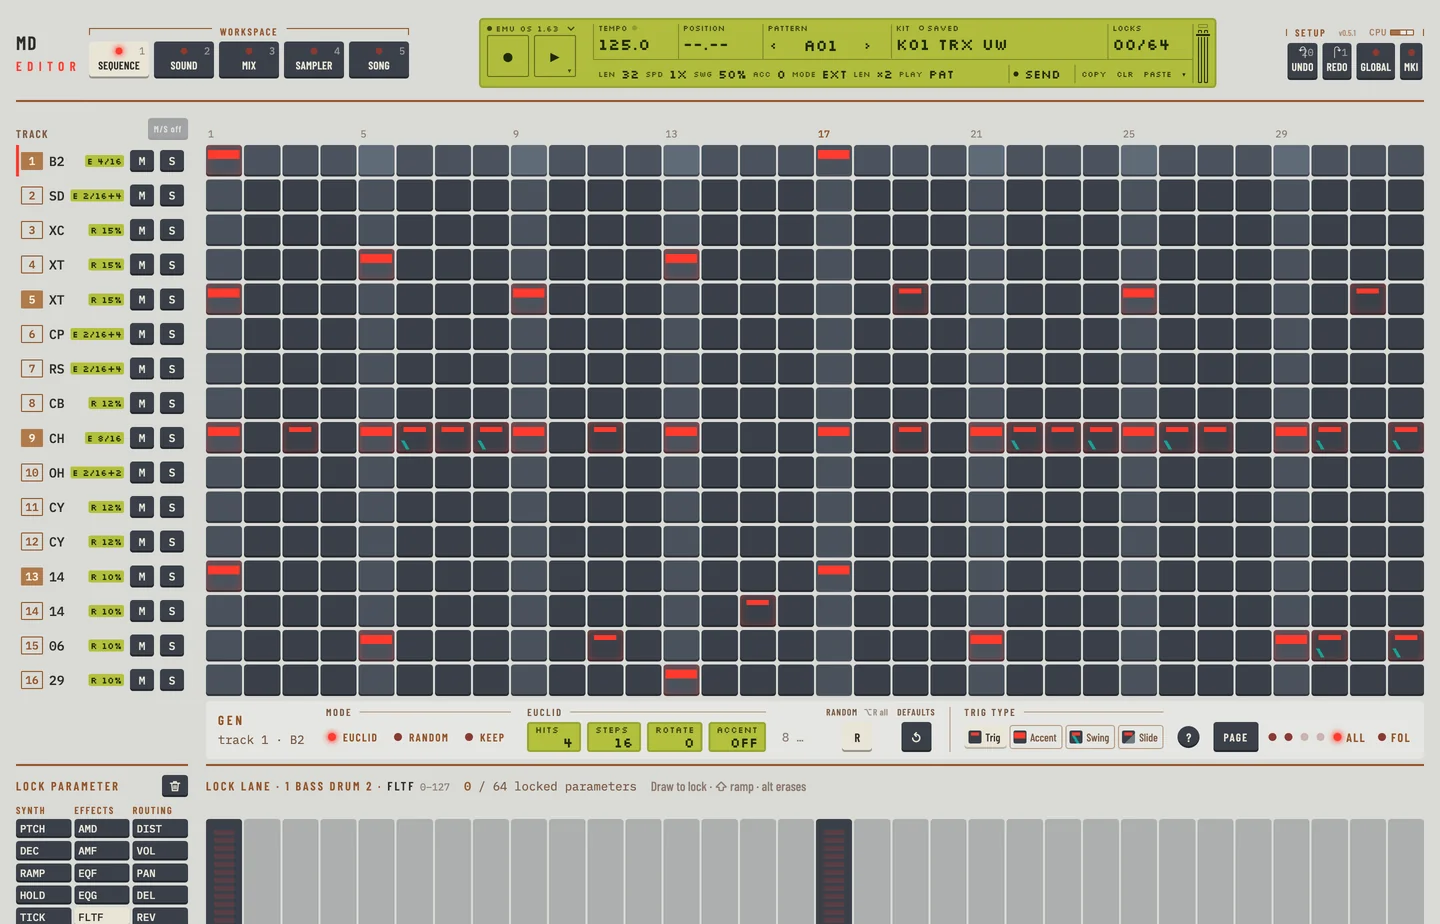
In the editor the sequencer is the Pattern workspace. Press [1], or click the Pattern tab. The 16 tracks run down the page, the steps across it, 16 steps to a page. The lock lane lies under the steps. The LCD keeps the tempo, the pattern, the kit and the lock count on every workspace. Its second line holds the pattern's own values: <LEN>, <SPD>, <SWG>, <ACC> and <MODE>.

The Pattern workspace

Keys are written as on a Mac. [⌘] is [CTRL] on Windows and Linux. [⌥] is [ALT]. The machine's [FUNCTION] key has no twin in the editor. Its second jobs follow [⌥] or have a control of their own, and each section says which.

CLASSIC VS EXTENDED

The machine edits patterns in one of two modes.

In CLASSIC a pattern has no kit of its own and no locks play. Locks that are in the pattern are kept. Patterns are 32 steps long at most.

In EXTENDED each pattern is linked to a kit, and the machine loads that kit when the pattern is chosen. Parameter locks play. Patterns can be 48 or 64 steps long.

To change the mode:

  1. Open the Pattern workspace.
  2. Click <MODE> on the second line of the LCD. It reads EXT or CLASSIC.

In CLASSIC the lock lane is greyed and says "CLASSIC: locks muted". The locks are all still there. The pattern chooser and the kit library say which mode is on. In EXTENDED the chooser shows the kit of each pattern as K01 to K64.

The pattern chooser in CLASSIC: no pattern shows a kit

TEMPO

The <TEMPO> field in the LCD is the tempo window of the machine. It reads in beats per minute with one decimal. The range is 30 to 300.

  • Drag the field up or down. A pixel is half a beat per minute. Hold [⇧] and a pixel is a tenth.
  • With the field focused, press the up and down arrow keys: one beat per minute, or a tenth with [⇧].

Click the field without dragging to open the TEMPO window. It holds what the machine's TEMPO menu holds:

  • − and + change the tempo by one beat per minute, or a tenth with [⇧].
  • TAP taps the tempo, as [⇧] + [B] does.
  • NUDGE shifts the tempo for a moment, as [LEFT] and [RIGHT] on the machine. Press and hold −10 % or +10 %. The tempo is 10 % slower or faster while you hold it, and goes back when you let go. The keys [-] or [=] do the same while held.
  • Change on release holds a dragged tempo back until you let go of the field, as [FUNCTION] held does on the machine. The field shows the new tempo while you drag and the machine takes it at the release.
  • Sync says whether the tempo comes from the machine or from MIDI clock. Sync in GLOBAL opens the GLOBAL page.

Press [Esc] or click outside the window to close it.

TAP TEMPO

Tap a key to the beat and the machine takes the tempo you tap.

  1. Press [T] or [B] twice or more in time. [⇧] + [B] taps on every workspace of both editors.
  2. A message reads "Tap tempo" and the new tempo.

The tempo is the average of your last taps, up to five. A pause of over two seconds starts the count again.

EXTERNAL SYNCHRONIZATION

In a DAW a new plug-in follows the host's tempo and transport. The <TEMPO> field is marked, and it cannot be edited. A drag, an arrow key or a tap says "The DAW sets the tempo. Change it there."

Tempo in in the GLOBAL panel is the switch. Set it to INT and the machine runs on its own clock in the DAW: <TEMPO> edits again, PLAY and STOP are the machine's, and the DAW's tempo and transport no longer reach it. Set it to EXT to follow the DAW again. The project keeps the choice.

To make the machine follow the MIDI clock of another device, set Tempo in to EXT in the GLOBAL panel. See "SYNC" in chapter 10.

PATTERN SELECTION

The pattern chooser shows all 128 patterns as eight banks of 16 slots. Each slot gives the pattern's name, its length in steps and, in EXTENDED, its kit. A slot with no pattern reads EMPTY.

The pattern chooser
The pattern chooser

To choose a pattern:

  1. Click the pattern name in the <PATTERN> field of the LCD. The chooser opens. The arrows beside the name step to the previous and next pattern without it.
  2. Click a bank letter, or press the key A to H, to go to that bank. The arrow keys move over the slots.
  3. Click a slot, or press [ENTER]. While the machine is stopped, the pattern changes at once. While it plays, the pattern is queued and starts at the end of the pattern that plays. The pattern name in the LCD and the queued slot blink until it does.
  4. Click a slot with [⇧] held, or click Now, to change at once, without waiting for the end of the pattern. While the machine plays, it stops, loads the pattern and plays again.
  5. Press [ESC] to close the chooser.

The button under Slot reads Go while the machine is stopped and Queue while it plays.

If the kit has unsaved edits and the new pattern links another kit, the editor asks before it changes.

On the machine you hold a bank key for two seconds so that you can choose the pattern with a second key. The editor has no such wait: you click the bank and the slot.

PATTERN CHAINING

A chain plays patterns of one bank in the order you pick them, and starts again at the first.

  1. Press [5] to open the Song workspace.
  2. Click CHAIN over the pattern palette.
  3. Click a bank letter.
  4. Click the patterns in the order you want. Each pad shows its number in the chain. After the second pad the machine plays the chain at once. While it plays, the chain starts at the end of the pattern. While it is stopped, [PLAY] starts at the first pad.
  5. Click a numbered pad to take it out. Back takes out the last pad. Clear ends the chain.
A chain of two patterns playing

A chain holds up to 16 patterns of one bank, each pattern once. The palette says which pattern plays now and which comes next. Choosing a pattern ends the chain. Editing the patterns in it does not.

A pattern queued while the machine plays starts at once when you stop:

  1. While a pattern plays, choose another one: click › next to the pattern on the LCD, or a pattern in the pattern chooser. The LCD shows its name, blinking: it is queued.
  2. Press [STOP] (click ▶ or press [SPACE]). The machine stops and the queued pattern is the current one.
  3. Press [PLAY] to start it from its first step.

PARAMETER TWEAKING

On the machine you hold [FUNCTION] and turn a knob to move that parameter on all 16 tracks. In the editor you hold [⌥] and drag a value on Kit or Mix. The same knob moves on every track by the same amount.

To sweep the filters of all tracks, hold [⌥] and drag the FLTF or FLTW value.

The ‹ and › keys beside the kit name in the <KIT> field of the LCD load the kit before or after, as a click in the kit library does. When the kit has unsaved edits the machine asks first.

To drop the tweaks of a kit and load its stored sound again:

  1. Click the kit name in the <KIT> field of the LCD. The kit library opens.
  2. Click Reload under Current. The button is available only when the kit has unsaved edits. The edits are lost and the kit is as stored.
The kit library with Reload

The machine keeps the edits you lose in its UNDO KIT.

SCALE SETUP

The scale of a pattern is its length and its speed.

Length

A pattern has a total length of 16, 32, 48 or 64 steps, and a length inside it, from 1 step up to the total.

  • Click <LEN> on the second line of the LCD to step through 16, 32, 48 and 64. Click with [⇧] to step back. You can also drag or scroll on it.
  • Hold [⌥] and click, drag or scroll on <LEN> to set the length inside the total. The field then reads the length and the total, for example 12/16.

Steps past the length are dimmed in the grid. In CLASSIC the total is 32 at most.

To double a pattern, click the <LEN> ×2 key. The new half is a copy of the steps and locks of the first half. This is one undo step. The editor refuses a pattern past 64 steps, and past 32 in CLASSIC, and says why.

When you make the total longer, the editor does what the machine does: if no track has a trig past the old total, the steps you had repeat into the new ones, with their accents, swings, slides and locks. From 16 to 64 steps the first page fills all four pages. If a track has a trig past the old total, nothing is copied. A message says what was copied. Press [⌘] + [Z] to take it back.

Speed

Click <SPD> to step through the tempo multipliers 1X, 2X, 3/4X and 3/2X. Click with [⇧] to step back. You can also drag or scroll on it: three notches of the wheel walk the four speeds.

The scale fields on the LCD

GRID RECORDING

In grid recording you place the trigs one step at a time. The pattern plays while you work, and each change is in the pattern at once.

  1. Click a step to put a trig on it. Click it again to take the trig off.
  2. To place several, press on a step and drag. Every step you cross becomes what the first one became.
  3. To reach the other steps of a long pattern, click Page or press [[] or []]. Click Page with [⇧] to go back. The four lights show the page you see.
  4. Click All to see every step on one screen. Click Fol to make the page follow the play position.
The step grid
The step grid

There is no save. Every change is in the pattern. To keep the original while you try something, copy the pattern to another slot first. See "PATTERN COPY".

Move the notes

Press [⌥] + [←] or [⌥] + [→]. The selected track moves one step earlier or later. Its trigs, accents, slides and locks move, and the steps at the ends wrap round. A run of presses while you hold [⌥] is one undo step.

PATTERN PAGE FUNCTIONALITY ON MKI UNITS

This is a feature of the MKI hardware. The editor offers the MKII model only (see chapter 13). Its Page control shows the pages as four lights, as described under GRID RECORDING.

LIVE RECORDING

In live recording you play the tracks and the machine puts the trigs on the steps.

  1. Press [SPACE].
  2. Click ● in the top bar, or press [⌥] + [SPACE] to start recording and playing in one press. The key lights.
  3. Click the steps of a track, or press the keys A to L, which play the selected track. The track sounds and the machine writes the trig on the step it plays. The machine quantises it.
  4. Click ● again to stop recording. The pattern goes on playing.

While recording is on, a click on a step plays the track, and the other edits of the pattern wait. A right-click on a step says "Wait until live recording stops."

Live recording
Live recording

To take trigs out while recording, as the machine does with [EXIT/NO] and a [TRIG] key:

  1. Select the track on the rail.
  2. Hold [DELETE] or [BACKSPACE]. The track's header is marked red. The machine removes the track's trigs on each step that plays while the key is down.
  3. Let the key go to stop erasing.

Only the selected track is erased. The erase ends by itself when recording stops.

NOTE COPY

You select steps, then copy, cut, paste or duplicate them. The copy carries the trigs, the accents, the slides and the locks.

To select steps:

  • [⌘]-click a step.
  • [⌘]-drag over steps and tracks. The selection is a block of steps by tracks.
  • Click or drag the step numbers above the grid. This selects steps of the selected track. Drag down over the grid to add tracks.
  • [⌘]-[⇧]-click a step to extend the selection. [⌘] + [A] selects every step of every track up to the length.

To use the selection:

  1. Press [⌘] + [C].
  2. Select the step where the block is to start, on the track where it is to start. A single [⌘]-click does it.
  3. Press [⌘] + [V]. The block lands with its first step on the step you chose.

[⌘] + [X] copies and clears. [⌘] + [D] copies the block to the steps right after it; press it again for one more copy. [⌘]-drag the selection to drop a copy where you let go. [ENTER] switches the trigs of the selection on, or off when each has one. [ESC] clears the selection.

Select a step or steps and click the small ⋯ on the selection for the step menu; a right-click on a step opens it too. It holds trig, accent, slide, copy, cut, paste, duplicate, clear, and Fill every 2nd and Fill every 4th from that step. On a selected step the menu acts on the whole selection.

The <COPY>, <CLR> and <PASTE> keys on the LCD do the same as the keys. They are marked when they act on a selection.

CLEAR NOTE PARAMETER LOCKS

To take locks off a step, use one of these:

  • Select the step and press [DELETE] or [BACKSPACE], or choose Clear in the step menu. This clears the trig and its locks together.
  • Hold [⌥] and drag over the bars of the lock lane. This erases the locks it crosses and leaves the trigs.
  • Press [⌘] + [⇧] + [BACKSPACE], tick Locks only and click Clear. The locks of the track go and the trigs stay.
  • Click the bin key above the parameter keys to clear every lock of the parameter on this track. Hold [⌥] and it clears every lock of the track.

Press [⌘] + [Z] to take a clear back.

TRACK COPY

  1. Select the track by its header. Drag across the step numbers above the grid, from the first step to the last.
  2. Press [⌘] + [C].
  3. Select another track. [⌘]-click its first step.
  4. Press [⌘] + [V].

To paste into several tracks at once, click their headers with [⇧] held. The headers are marked. [⌘] + [V] then fills every marked track, as one undo step. Press [ESC] to take the marks off.

To choose what goes with the track, as the machine's SUPER COPY does:

  1. Select the track.
  2. Click ▾ at the right of <COPY> <CLR> <PASTE> on the LCD, then Copy…, or press [⌘] + [⇧] + [C]. The Copy what window opens.
  3. Tick the parts to copy. Pattern has Trigs, Accent, Swing, Slide and Locks, each with the number of steps it holds. Kit has Machine + sound and LFO.
  4. Click Copy. Every step of the track is copied, not only the page you see.
  5. Select the track to paste into. Click ▾, then Paste…, or press [⌘] + [⇧] + [V].
  6. The parts copied are ticked. Untick any you do not want. Under To tracks the selected track is lit, or the tracks marked with [⇧]. Click a track key to light or unlight it.
  7. Click Paste into 1 track (the key says how many). Each lit track takes the ticked parts.

The paste is one undo step: press [⌘] + [Z] to take it back. The window remembers what you ticked the last time.

CLEAR TRACK

  1. Select the track.
  2. Click All so that every step shows, then click <CLR>.

Or select all the steps of the track by the step numbers and press [DELETE] or [BACKSPACE].

To clear only some parts of the track, as the machine's SUPER CLEAR does:

  1. Select the track.
  2. Click ▾ at the right of <COPY> <CLR> <PASTE>, then Clear…, or press [⌘] + [⇧] + [BACKSPACE].
  3. Tick the parts to clear and click Clear. Clearing Trigs clears their locks too. Machine + sound sets the sound's values to neutral and keeps the machine.

Press [⌘] + [Z] to take the clear back.

TRACK PAGE COPY

  1. Select the track and go to the page to copy.
  2. With no steps selected, press [⌘] + [C]. The page you see is copied.
  3. Go to the page and track where it is to land.
  4. Press [⌘] + [V].

CLEAR TRACK PAGE

Click <CLR> on the LCD. The page you see of the selected track is cleared. Hold [⌥] and the key reads <ALL>: it clears the whole pattern.

PATTERN COPY

A copy of a pattern takes its notes, its locks and its kit link.

  1. Open the pattern chooser.
  2. Click the slot to copy, then click Copy or press [⌘] + [C].
  3. Click the slot to copy to, then click Paste or press [⌘] + [V].

Or drag one slot onto another.

If you paste over the pattern that plays and it links another kit, the machine loads that kit. The editor asks first when the kit that plays has unsaved edits.

CLEAR PATTERN

To clear the pattern that plays, hold [⌥] and click <CLR>, which then reads <ALL>. Or press [⌥] + [DELETE] or [⌥] + [BACKSPACE].

To clear any pattern, click its slot in the pattern chooser and click Clear, or press [DELETE].

The chooser keeps the length, the speed, the swing, the accent and the kit link of the pattern. It takes out the trigs and the locks.

Press [⌘] + [Z] to take the clear back.

TRACK MUTING

Every track has an M key to mute it and an S key to solo it. They sit in the track rail and in the strips of Mix.

  • Click M to mute or unmute the track.
  • Press and drag across the keys. Every key you cross becomes what the first one became.
  • Press [M] to mute the selected track on any workspace. [⌥] + [M] mutes every track, or unmutes them all when none is audible. [0], or M/S off, unmutes and unsolos everything.

To prepare mutes and apply them together, as the machine's mute window does:

  1. Hold [⇧] and click M on the tracks. Each track shows + for a track it will unmute or X for a track it will mute.
  2. Let go of [⇧]. All the changes apply at once.
Mutes prepared with the shift key: nothing is sent until you let go

The mutes are the machine's. The editor reads them from the machine's memory, whoever set them, and they stay when you change pattern or switch between pattern and song mode. A solo is the editor's: it mutes the other tracks on the machine, and when you let the solo go it gives your mutes back.
On the machine you can minimise the mute window. In the editor the keys are always on the page.

ACCENT TRACK

An accent makes a step louder. The accent amount sets how much louder.

  • Click <ACC> on the LCD, or drag or scroll on it, to set the amount from 0 to 15. Click with [⇧] to go down.
  • Click a step with [⇧] held to put an accent on it. The step needs a trig. Do the same again to take it off.

The trig types

The keys Trig, Accent, Swing and Slide in the bar under the grid say what a click on a step paints. They are the machine's accent, swing and slide windows (FUNCTION + B/F, C/G and D/H). The lit key is the one in use.
  1. Click Accent. The key lights.
  2. Click a step with a trig. It gets an accent. Click it again to take the accent off.
  3. Drag across steps to paint accents on every step with a trig that you cross. The first step decides: on or off. The drag is one undo step.
  4. Press [ESC], or click Trig, to paint trigs again.

A step without a trig takes no accent. The editor says so.

All tracks or this track

A pattern holds one accent row for all tracks and one for each track. With Accent lit, All tracks and This track show over the keys.

  • All tracks: an accent on a step accents that step on every track. The step legend says "(all)".
  • This track: each track has its own accents. Click the steps of the track you want.

The pattern keeps both rows. Switch back and the other row is there again. This is the machine's [RIGHT] key in the accent window. Each of accent, swing and slide has its own setting.

The accent of a step

To copy, paste or clear the accents of a track, tick Accent in Copy…, Paste… or Clear… of the LCD's ▾ menu (see "Track copy"). A selection copy also takes the accents with the steps.

SWING

Swing delays the steps of the swing row. Click <SWG> on the LCD, or drag or scroll on it, to set the amount from 50 to 80 percent. Click with [⇧] to go down. At 50 percent nothing swings.

To choose which steps swing:

  1. Click Swing in the bar under the grid.
  2. Click a step with a trig. A teal mark shows on it: the step swings. Click it again to take the swing off.
  3. Drag across steps to paint swing on every step with a trig that you cross.
  4. Press [ESC] to paint trigs again.

With All tracks the swing row is shared: a mark on a step swings that step on every track. With This track each track has its own swing steps. Every track uses the same <SWG> amount.

The LCD with the accent and swing amounts, and the trig types under the grid

Tick Swing in Copy…, Paste… or Clear… of the LCD's ▾ menu to copy, paste or clear the swing steps of a track (see "Track copy"). A selection copy also takes the swing steps with the steps.

PARAMETER LOCKS

A parameter lock gives one parameter its own value on one step. The step has to hold a trig. A pattern holds 64 locked parameters. A track and a parameter with any lock count once.

Lock a parameter

  1. Select the track.
  2. In the rail under Lock parameter, click the key of the parameter. The keys are in three groups: Synth, Effects and Routing. A number on a key tells how many steps it has locked.
  3. Drag over the bars of the Lock lane. Each step with a trig takes the value where the pointer crosses it. Steps with no trig are hatched and take no lock.
  4. Hold [⇧] and drag to draw a ramp, a straight line from where you press to where you let go.
  5. To move one lock, scroll on its step. Four values a notch, or one with [⇧].
  6. To make a lock glide to the next trig, drag its dot sideways. See "Parameter lock slide".
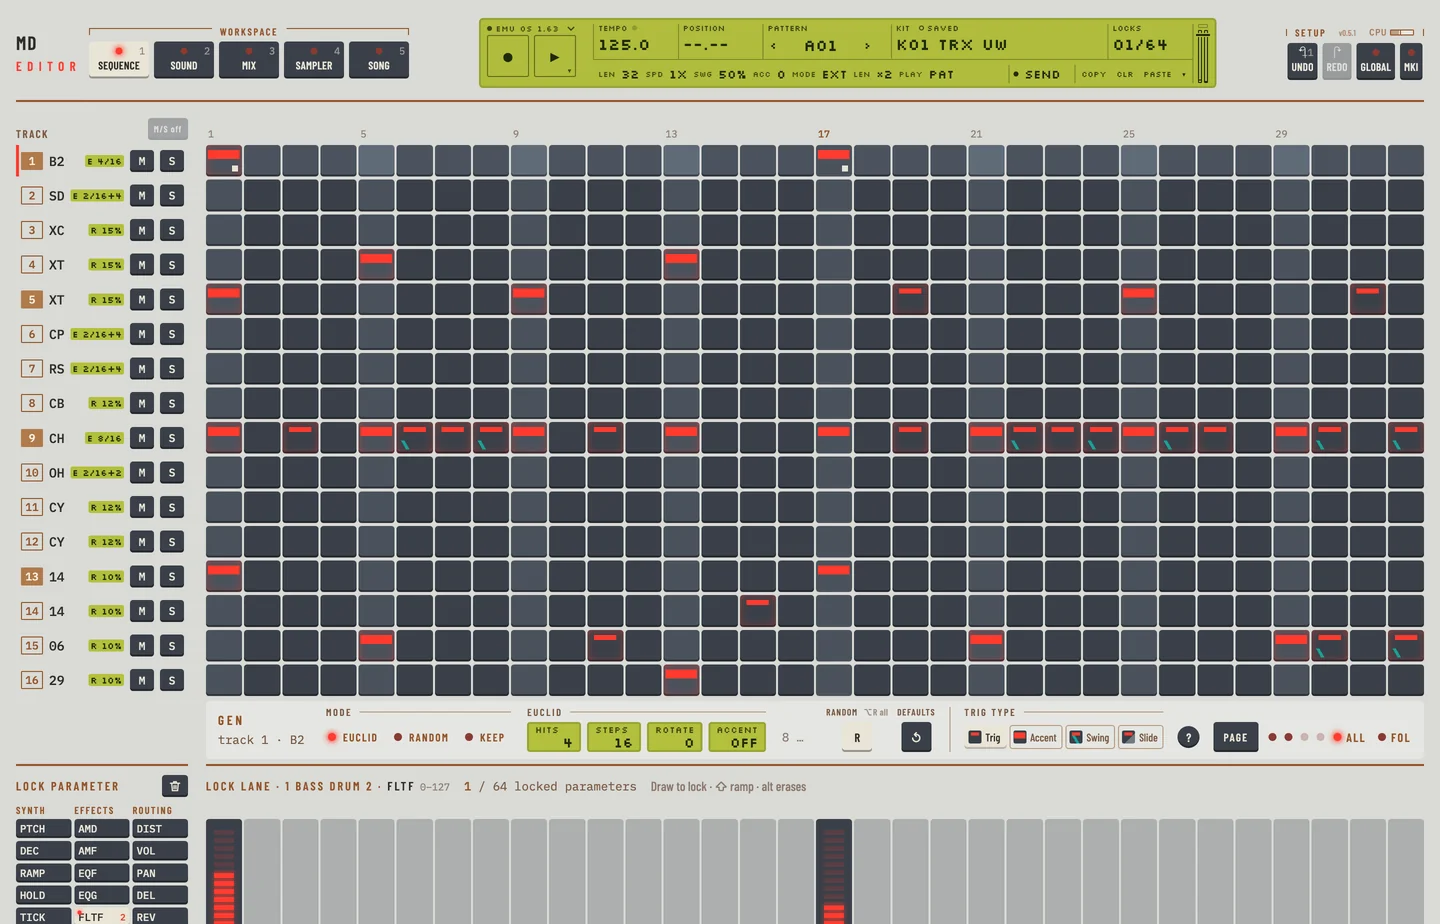
The lock lane
The lock lane

The lane shows the value locked on each step, and a solid line shows the value of the kit, with its number at the right end of the lane. Rest the pointer on a step, or select it, to read its lock as a number at the top of its bar. Drag the labelled KIT ↕ handle at the left of the lane header to change the kit value, or focus it and use the arrow keys. The whole drag is one undo step and draws no lock. The line across the steps is a reference: a plain click or vertical drag on a step edits its lock, even when its value equals the kit value. A bipolar parameter draws from the centre: up for right or boost, down for left or cut.

The lock count

The <LOCKS> field of the LCD and the header of the lane count the locked parameters, for example 41 / 64. The count turns to a warning from 52. At 64 the editor refuses a new lock and tells you to clear a lane first.

Locks in CLASSIC

Locks play only in EXTENDED. In CLASSIC they are kept and do nothing. The lane is greyed.

Remove locks

See "CLEAR NOTE PARAMETER LOCKS".

PARAMETER LOCKS IN LIVE RECORDING MODE

While you record live, a value you move is locked.

  1. Start live recording. See "LIVE RECORDING".
  2. Move a value, for example on Kit.
  3. The machine locks the next trig whose step has not started. The editor marks that step and says which value it locked. A trig that is playing is too late.

To take the locks of one value out while recording, as the machine does with [EXIT/NO] and a pressed DATA ENTRY knob:

  1. Select the track on the rail.
  2. Press the value and keep the mouse button down. The press is the knob held; it does not change the value.
  3. Hold [DELETE] or [BACKSPACE] as well. The track's header and the value are marked red. The machine removes the track's locks of that value on each step that plays while both are down.
  4. Let them go to stop.

The trigs and the locks of the other values stay. Press the value first, or within a moment of [DELETE] or [BACKSPACE]: the key on its own erases trigs. A value that cannot be locked, such as a master effect, removes nothing; the editor says so. If you let the value go while [DELETE] or [BACKSPACE] is still down, nothing more is removed until you let the key go. The value does not move while it is held for this, even after you let the key go, until you let the mouse go.

PARAMETER LOCK SLIDE

A slide makes a locked value glide instead of jump. Without a slide a lock changes the value exactly when its step plays. A step that slides takes its locks gradually to the next trig.

The rule, as the machine keeps it:

  • A slide is a mark on a step, and only the parameters locked on that step glide. A parameter without a lock on that step stays as it is.
  • The glide runs in a straight line from the lock to the value on the next trig of the track, and it arrives exactly when that trig plays. The speed follows the tempo.
  • The value on the next trig is its lock of the parameter. If that trig has no lock of the parameter, the glide ends at the kit value.
  • A lock further on is not the target. A glide always ends on the next trig, whether or not that trig locks the parameter.
  • The mark belongs to the track, or to the whole pattern when All tracks is on. With All tracks the step slides on every track that has a trig there.

To set a slide on the grid:

  1. Click a step with a trig, with [⇧] and [⌥] held. The step shows a slide mark.
  2. Do the same again to take it off.

You can also click Slide in the bar under the grid. Then a click or a drag on steps with a trig paints slides. Press [ESC] to paint trigs again.

With Slide lit, choose All tracks or This track. With All tracks the slide goes on the step of every track, and the step legend says "(all)". With This track each track has its own slides.

To draw a slide in the lock lane:

  1. Select the track and the parameter, as in "Lock a parameter".
  2. Press on the dot at the top of a lock bar and drag sideways to the right. A dashed ramp shows where the glide goes: to the next trig of the track, whatever further you drag. If that trig has a lock of the parameter the ramp ends at the top of its bar. If it has none the ramp ends on the kit line.
  3. Let go. The step slides, in one undo step.

Hold [⇧] on a lock bar and drag sideways out of its column for a rubber band instead. A line follows the pointer and the next trig is marked as the target. Drop on that step and it slides. Drop anywhere else, press [Esc], or move left of the start, and nothing is set. Dragging up and down inside the column is the ramp of locks, as before.

Click the line of a ramp to take the slide off. With All tracks that takes it off every track. Dragging up or down from the dot changes the lock, as before. A lock on a step without a trig is never played, so no ramp starts or ends there.

To copy, paste or clear the slides of a track, tick Slide in Copy…, Paste… or Clear… of the LCD's ▾ menu (see "Track copy"). A selection copy also takes the slides with the steps.

9. Song modeMachinedrum Editor

9

Song mode

MD manual pp.51-56

The song mode plays patterns in a set order. Each row of a song names a pattern and how it plays: how many times, the whole pattern or a part of it, with some tracks muted, at a tempo of its own. Command rows loop back, jump forward or halt the song.

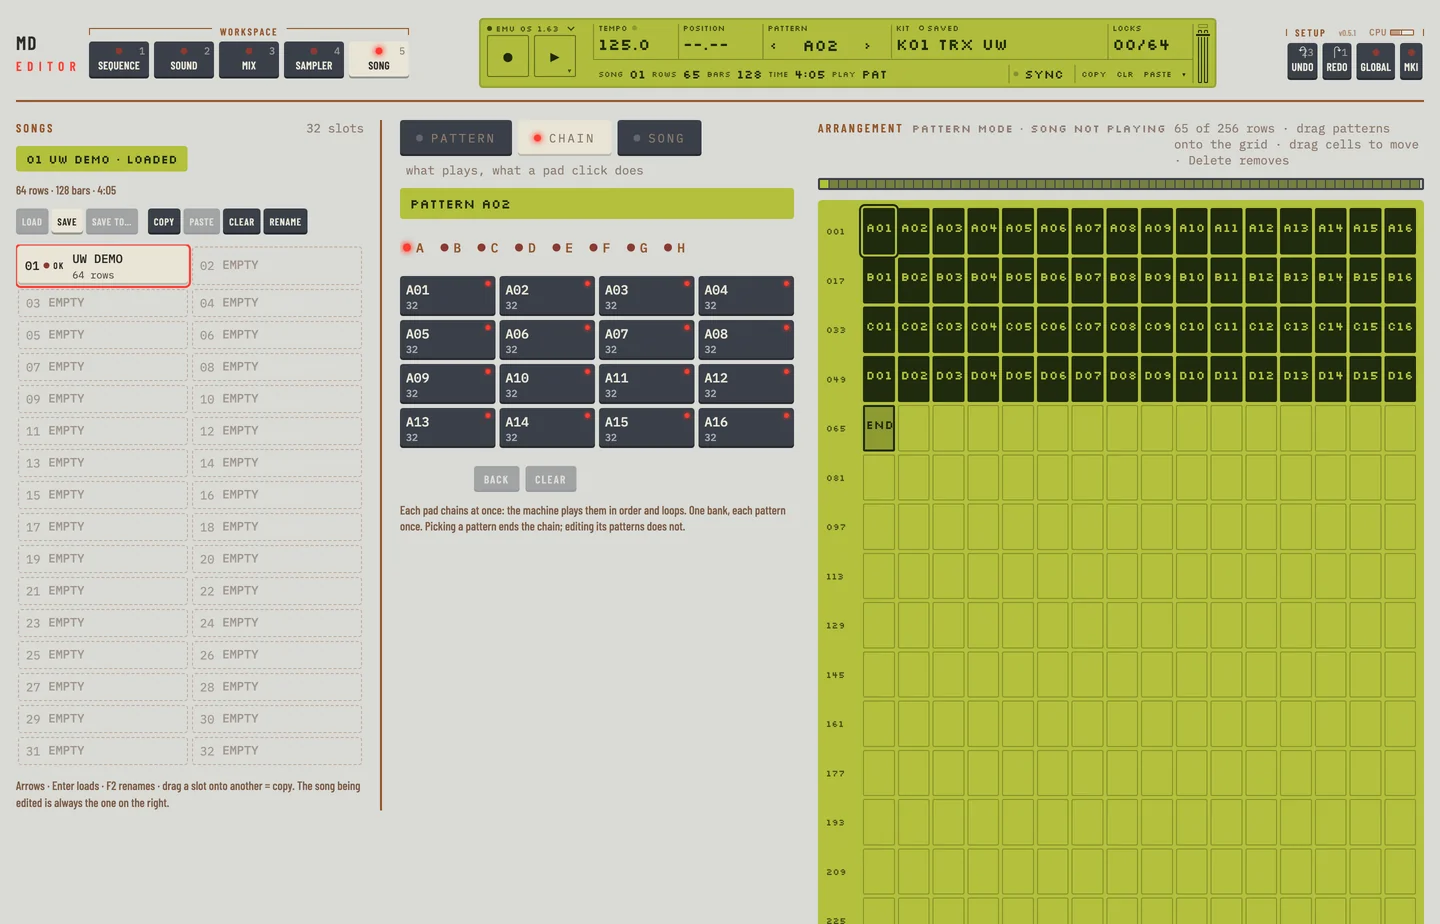
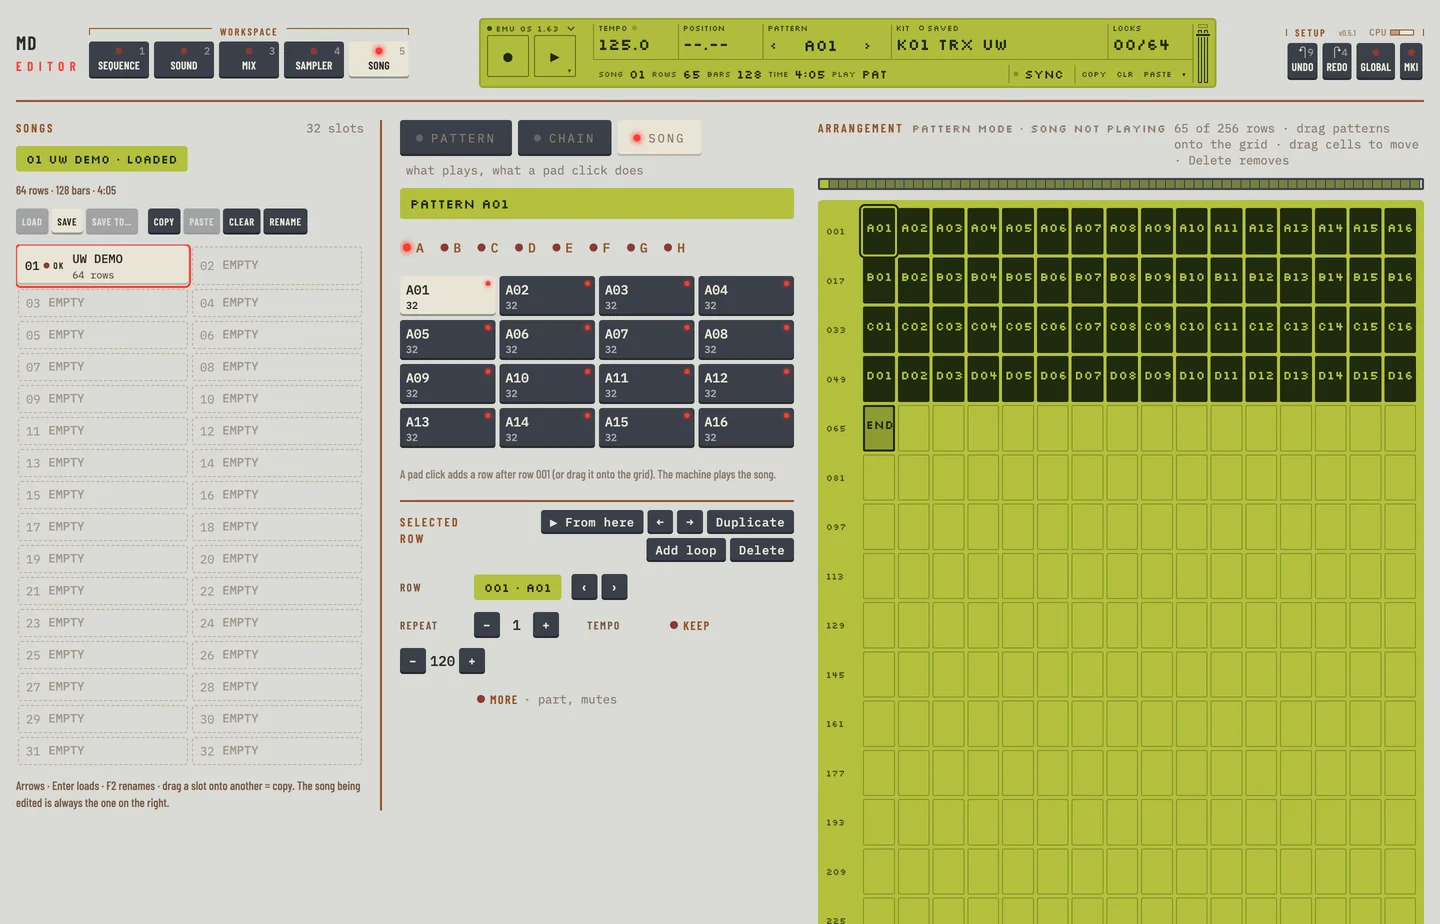
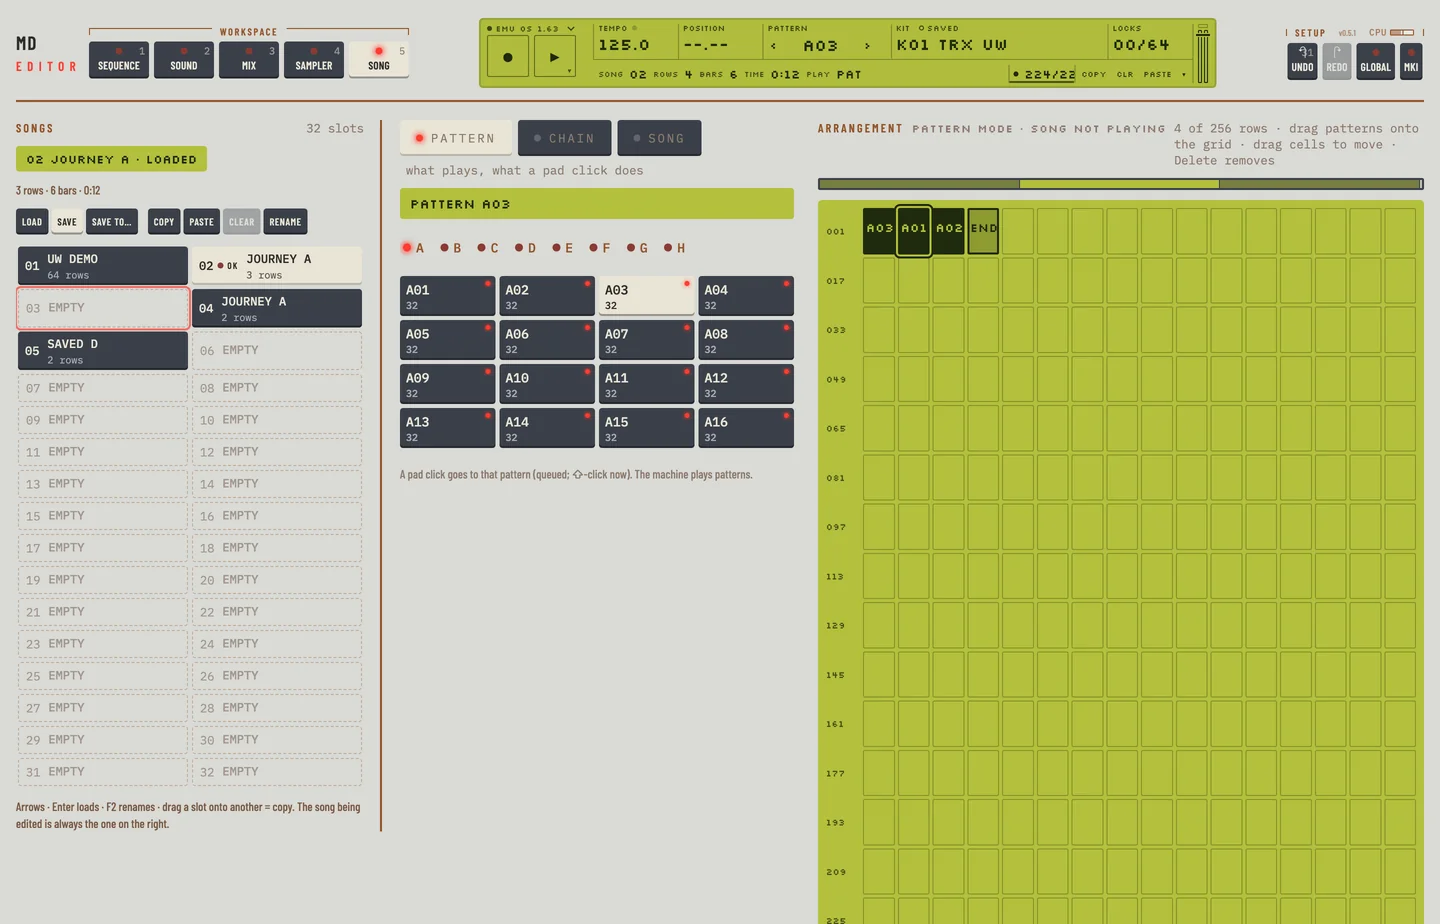
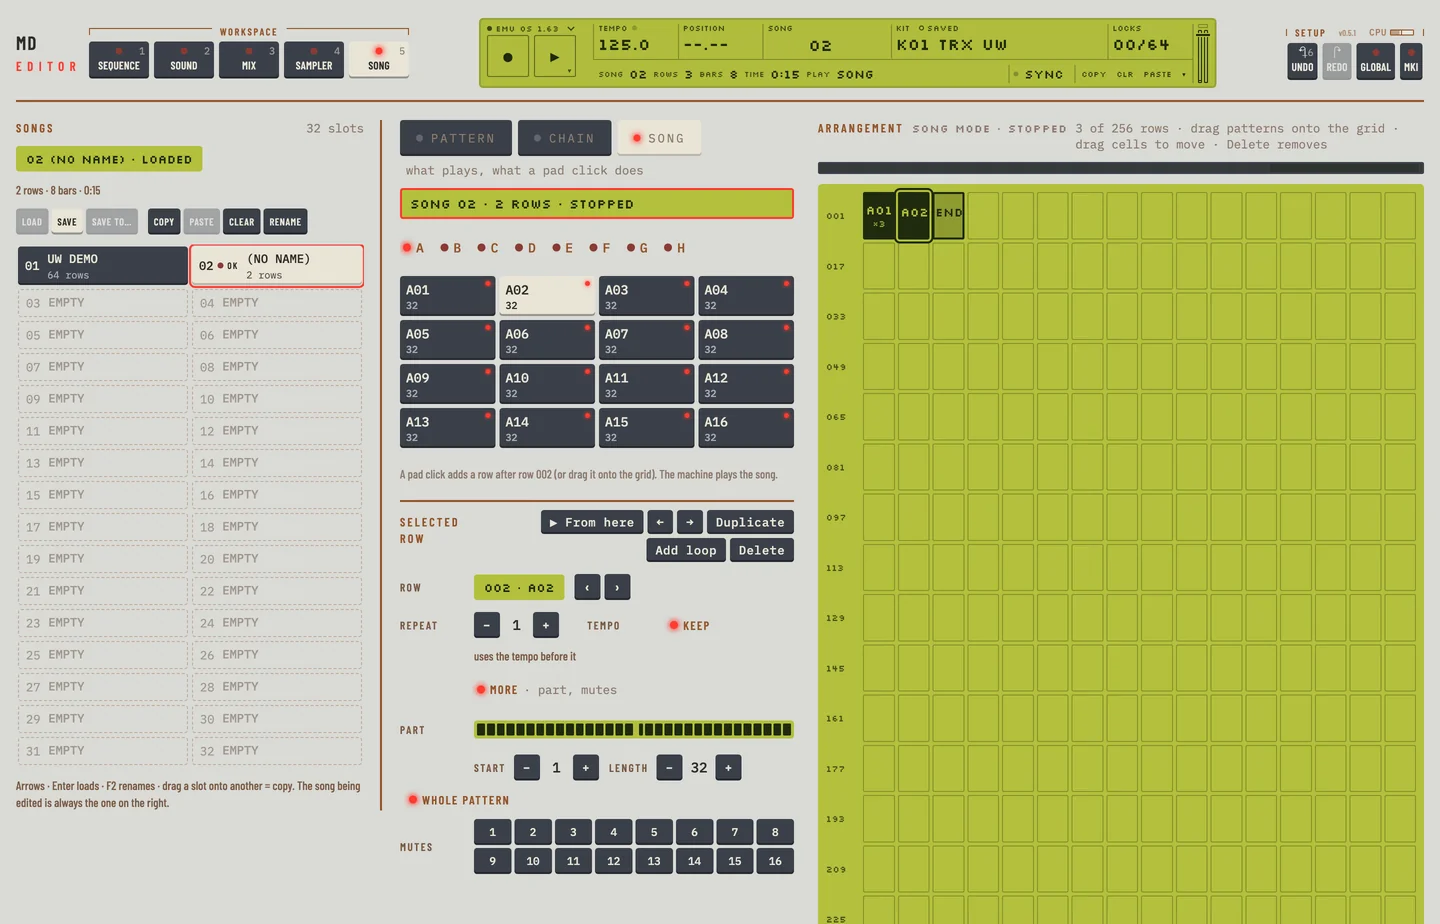
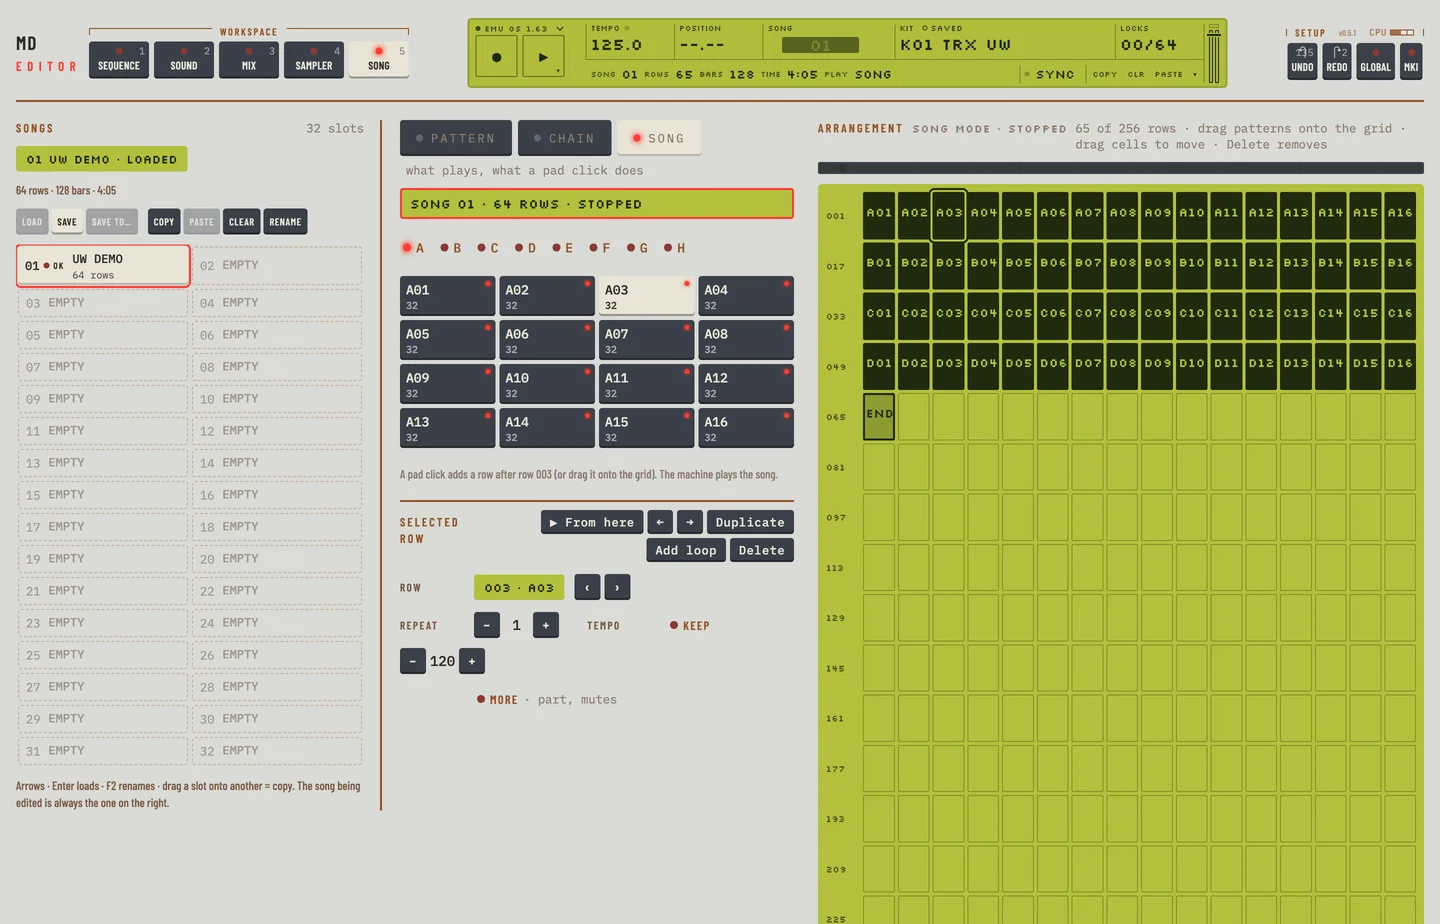
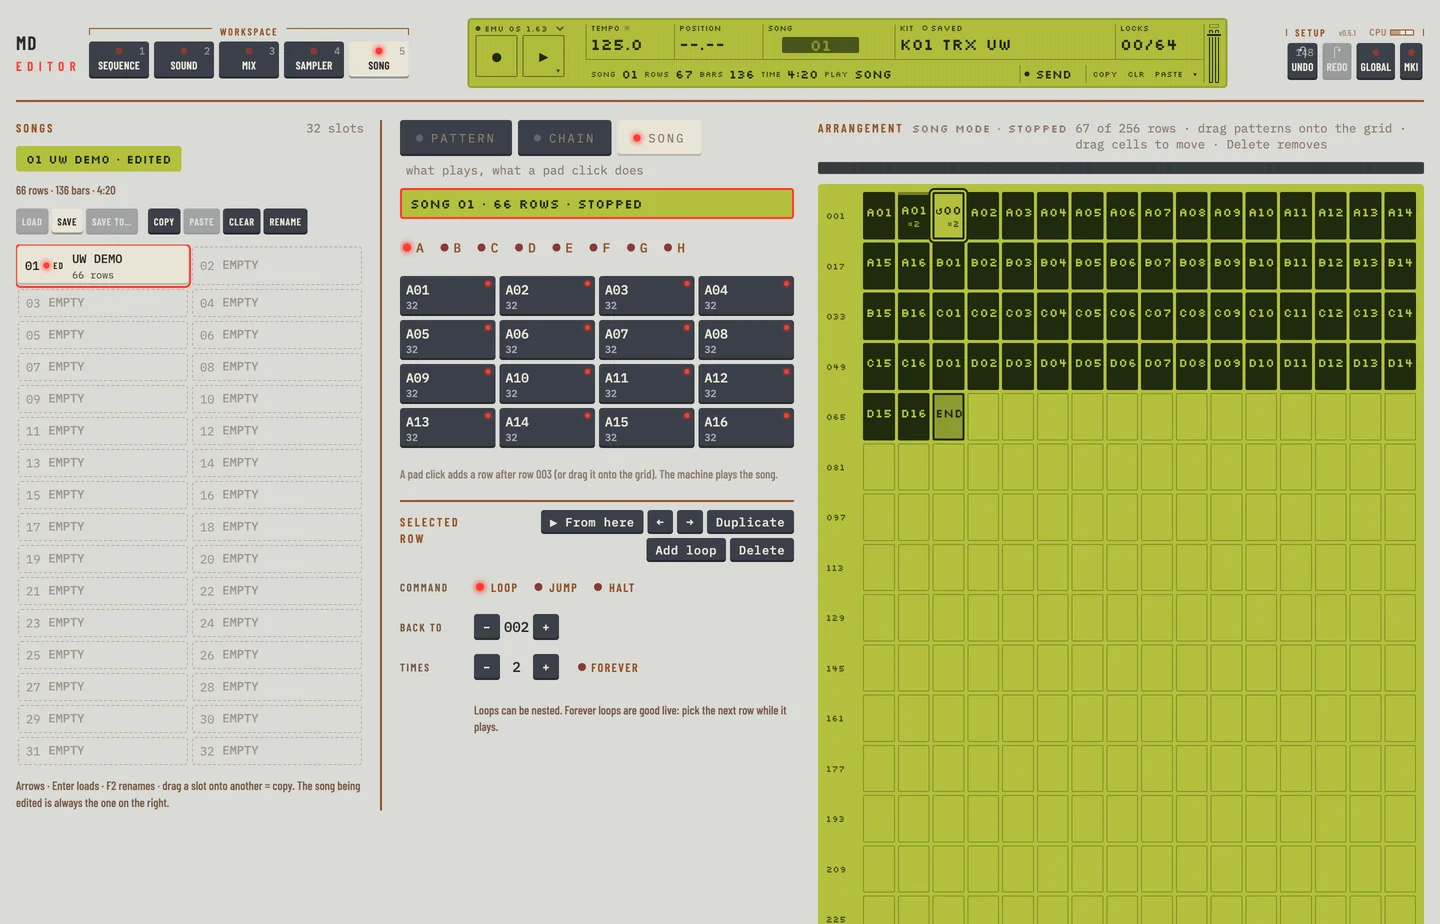
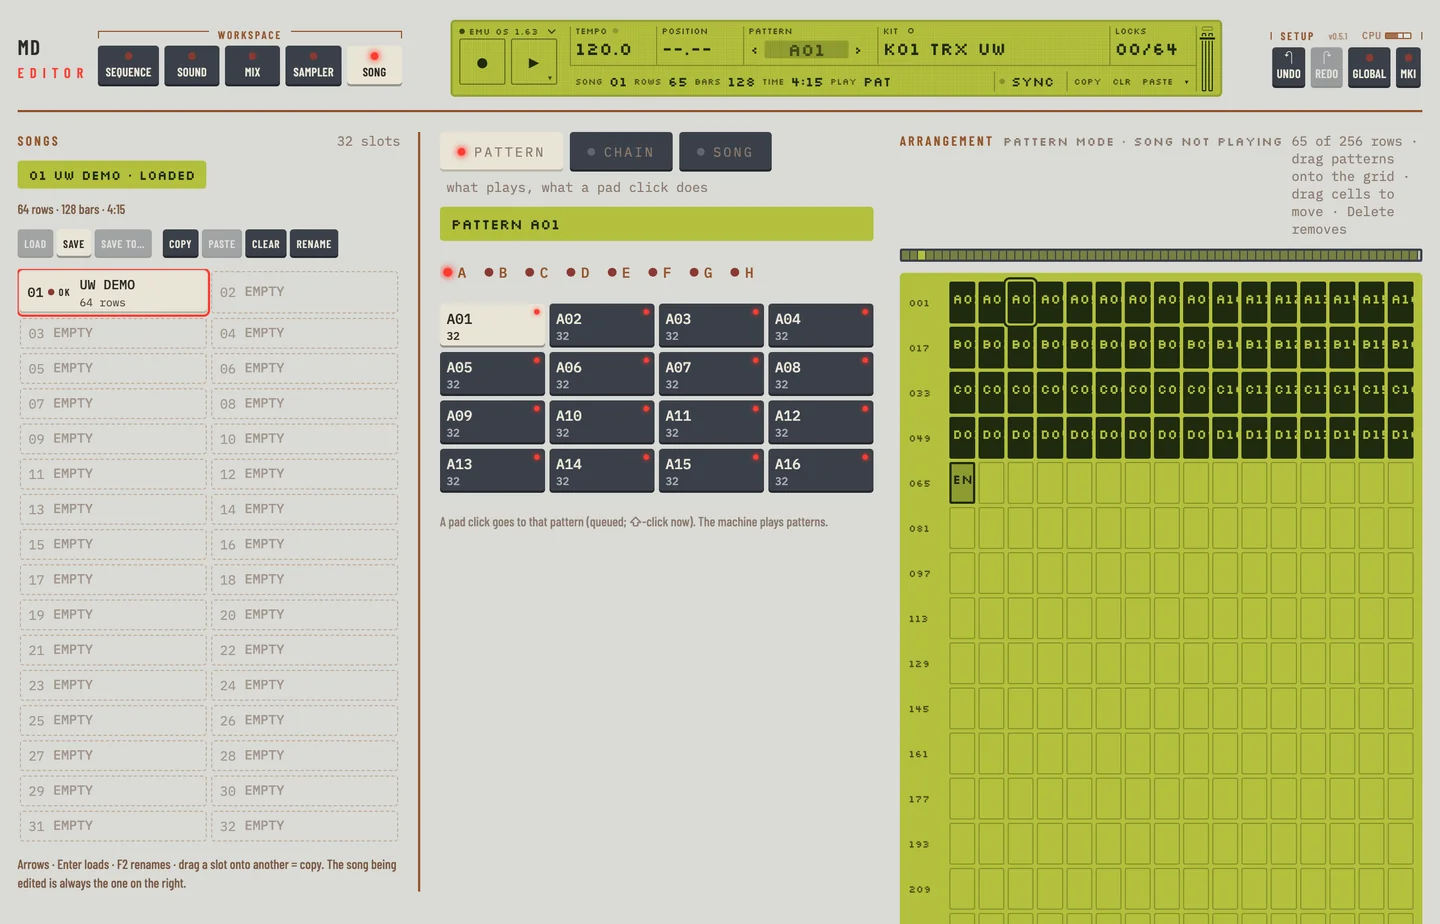
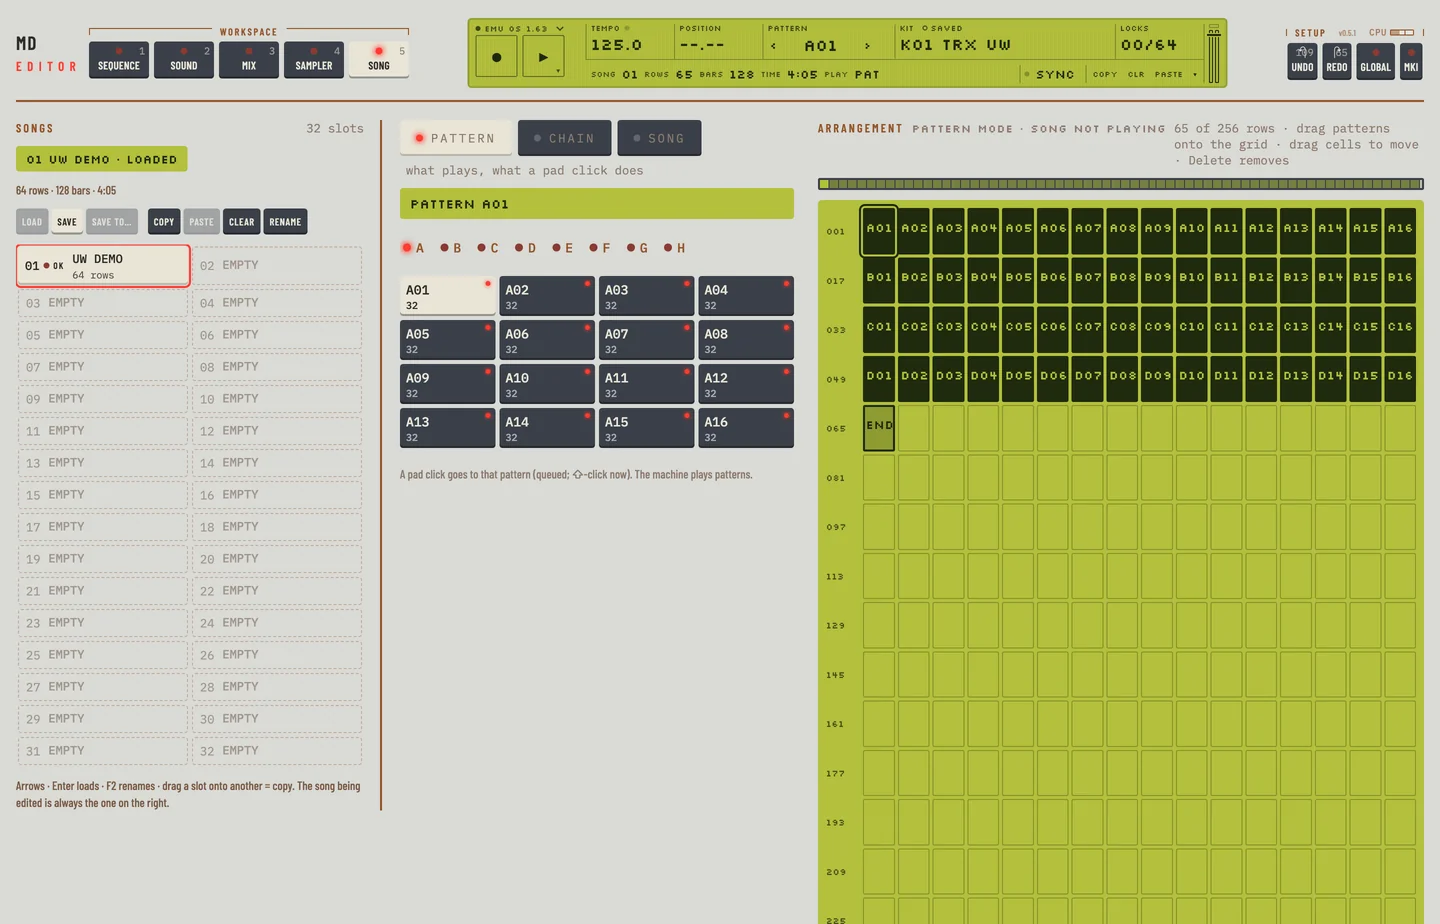
In the editor the song mode is the Song workspace. Press [5], or click the Song tab. The Songs column on the left holds the 32 song slots. The middle column holds the PATTERN, CHAIN and SONG keys over the pattern palette, and in song mode the Selected row. On the right, the Arrangement shows every row of the song as a cell, 16 cells to a line.

The Song workspace
The Song workspace

The machine plays the song. The editor writes the song into the machine and shows what the machine reports: the mode, the row that plays and the tempo.

The three keys over the palette say what the machine plays and what a click on a pad does:

  • PATTERN: the machine is in pattern mode. A pad click goes to that pattern.
  • CHAIN: the machine is in pattern mode and a pad click adds the pattern to its chain. See the pattern sequencer chapter.
  • SONG: the machine is in song mode. A pad click adds a row to the song.

To put the machine in song mode:

  1. Click SONG.
  2. The key lights when the machine reports song mode. Click PATTERN to go back.

You can also click <PLAY> on the second line of the LCD, on every workspace. It reads PAT in pattern mode and SONG in song mode, and each click switches.

LOAD SONG

The Machinedrum holds 32 songs. A song has up to 256 rows. The song you see in the Arrangement is the song the machine holds. Its slot is lit in the Songs column, and the chip at the top of the column reads its number and name.

  1. Stop the machine. Press [SPACE] if it plays.
  2. Click a slot in the Songs column. The slot is selected. The machine still holds its song.
  3. Click Load, or press [ENTER]. The machine loads the song, and its slot is lit.

You can also click <SONG> on the second line of the LCD, or drag or scroll on it, to load the next song. Click with [⇧] to go back.

Each slot shows its number, its name and its rows. An empty slot reads EMPTY and is drawn faint. Press the arrow keys to move the selection while a slot has the focus.

The Songs column
The Songs column

PLAYING A SONG

In song mode the machine plays the song from the first row, row by row, to the END row.

  1. Click SONG over the palette, or click <PLAY> on the LCD until it reads SONG.
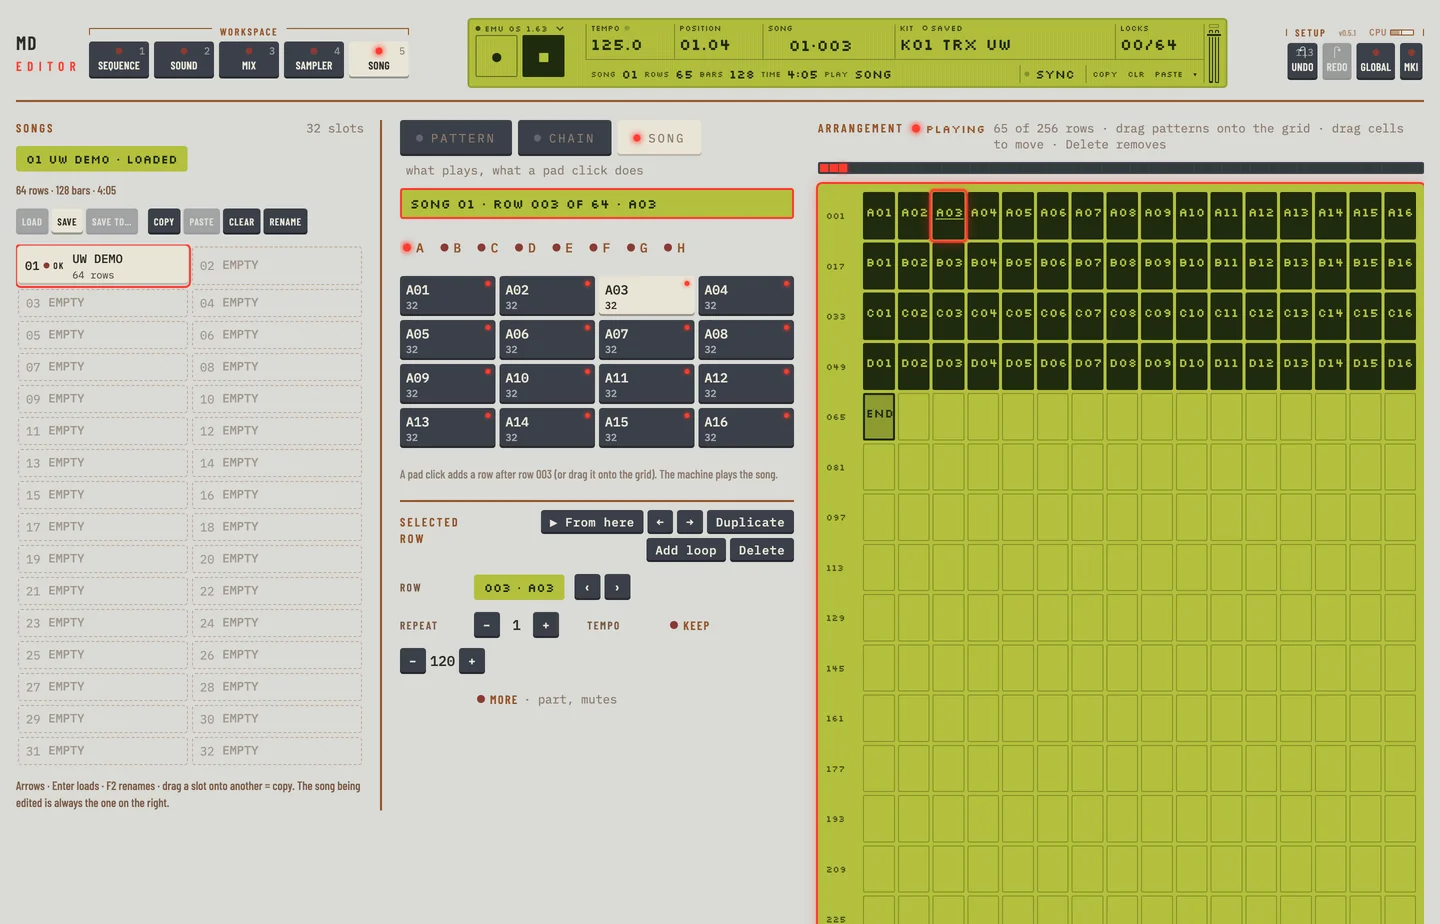
  2. Press [SPACE]. The song plays. The Arrangement header reads Playing and the arrangement is framed.
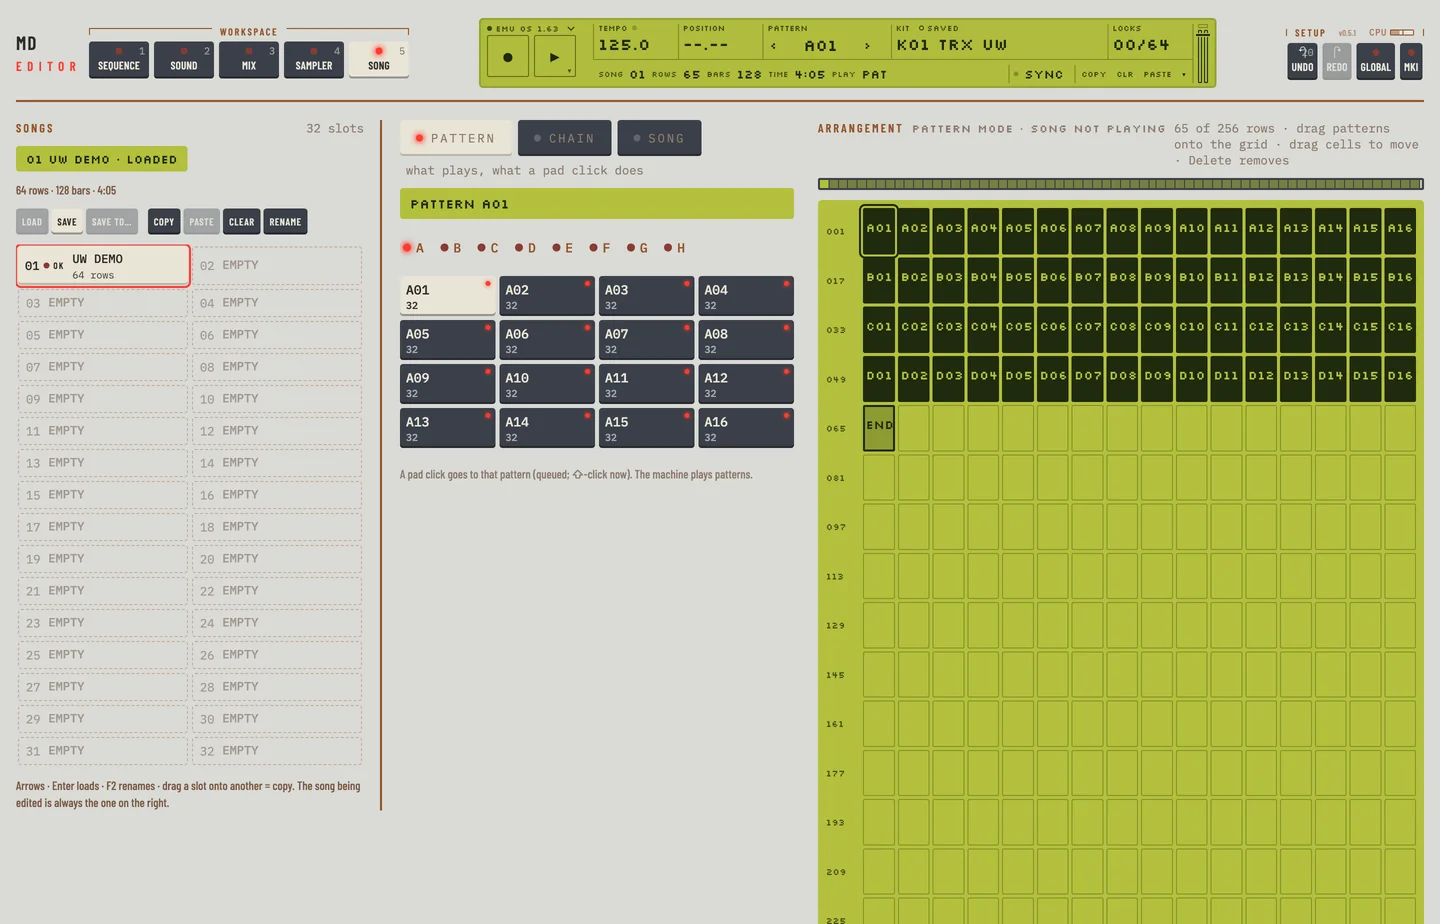
  3. Read what plays on the line over the bank letters: SONG 01 · row 017 of 65 · B01 means song 01, row 017 of 65 rows, pattern B01. The <PATTERN> field of the LCD reads the song and the row, for example 01·017.
  4. Press [SPACE] again to stop.

The playing row is marked in the arrangement, and the bar over it fills up to that row. When you press [SPACE] again, or the song ends, no row is marked.

What plays, in song mode: the line over the bank letters

You can go to pattern mode and back while the song plays. Click PATTERN: the machine plays a pattern. Click SONG to play the song again.

The line under the chip in the Songs column gives the length of the song as rows, bars and playing time at the current tempo. The time is an estimate. The LCD shows the same as <ROWS>, <BARS> and <TIME> on the second line of the Song workspace.

When the host sends a song position, the machine follows it. The editor has no control for this.

To pause a song, hold [⇧] and click the Play key, or press [⇧] + [SPACE]. The song holds its row and step. Click the Play key to go on from there.

A row that repeats shows how many more times it plays, as the machine counts them. The playing row reads +2, +1, then last, and the line over the bank letters ends with 2 more, 1 more or last. The next row shows no count.

A row that repeats, playing its first pass

SONG EDITING

Add patterns

The pattern palette shows the 128 patterns by bank. Click SONG over it. Each pad gives the pattern's name and its length, or "empty".

  1. Click a bank letter.
  2. Click a pad. The pattern goes into the song after the selected row, and the new row is selected.

You can also drag a pad onto the arrangement. It lands on the cell you drop it on. Drop it on the empty end of the arrangement and the row is added at the end. The <BARS> count on the LCD goes up with each row.

Set how a row plays

Select the row. The Selected row card shows its values.

  • Row shows the row number and the pattern. Click ‹ or › to choose another pattern.
  • Repeat sets how many times the row plays, 1 to 64.
  • Tempo reads Keep while the row plays at the tempo before it. Click Keep to give the row a tempo of its own, then click − or +, 30 to 300 beats per minute. Click Keep again to take it off.

Hold [⇧] and click − or + to change a value ten at a time.

Change the rows

The buttons in the header of the Selected row card are:

  • ← and → move the row one place.
  • Duplicate copies the row to the place after it.
  • Add loop adds a loop row. See "SONG LOOP".
  • Delete removes the row.

You can also drag a cell to move it.

Copy, paste and undo

Press [⌘] + [C] to copy the selected row. Press [⌘] + [V] to put it after the selected row. Press [DELETE] or [BACKSPACE] to delete the row. Press [⌘] + [Z] to undo the last edit, and [⌘] + [⇧] + [Z] to put it back.

Rows added and deleted in the arrangement

The END row

The last row of a song is END. The song stops there. New rows always go before it. The END row cannot be moved, duplicated or deleted.

Read the cells

The marks under a pattern name say what else the row does.

MarkMeaning
×4the row plays four times
~the row plays part of its pattern
↺ and a row numbera loop back to that row
×3 or ∞the loop plays three times, or for ever
→ and a row numbera jump to that row
HALTthe song halts
ENDthe song ends

A row that has a tempo of its own or muted tracks shows it in its cell as well. A tempo shows as a number, muted tracks as M and how many, for example 120 M3. When the cells are too narrow for words, letters stand for them: B for the tempo and M for the mutes. Hold the pointer over the cell to read them in full. Click the marks to open More for that row. A row with neither looks as before.

When the machine hears an edit

The editor writes each edit into the song on the machine. An edit is heard from the next start of the song. The editor loads the song into the machine again when the machine is stopped.

SONG ROW OFFSETS AND LENGTHS

A row can play a part of its pattern, from a step you choose and for a number of steps you choose.

  1. Select the row and click More.
  2. The Part bar shows the pattern's steps and lights the steps the row plays.
  3. Click − or + beside Start to set the first step.
  4. Click − or + beside Length to set how many steps play.
  5. Click Whole pattern to play the pattern from step 1 to its end again.

The cell of a row with a part shows ~.

SONG TRANSPORT

On the machine [STOP] holds the song where it is, and [PLAY] goes on from there. In the editor:

  1. Hold [⇧] and click the Play key, or press [⇧] + [SPACE]. The song holds its position. The Play key blinks.
  2. Click the Play key to go on from that position.
  3. To stop the song from the hold, choose Stop in the transport menu (right-click the Play key). The hold ends and the position goes.
The Play key blinking while the song is held

SONG LOOP

A loop row sends the song back to an earlier row, a set number of times. Loops keep a song short and its shape clear.

  1. Select the last row of the part to repeat.
  2. Click Add loop in the header of the Selected row card. A loop row goes in after it. Its cell reads ↺ and the row it goes back to.
  3. Click − or + beside Back to to set the first row of the part.
  4. Click − or + beside Times to set how many times the part plays, 2 to 64. Click Forever for a loop that never ends. The cell shows ∞.
A loop row
A loop row

SONG JUMP

A jump row sends the song forward to a later row. The rows between are not played.

  1. Select a command row, or add one with Add loop.
  2. Under Command, click JUMP.
  3. Click − or + beside Jump to to set the row to go to. It has to be later than the jump. The cell reads → and that row.

SONG HALT

A halt row stops the song where it stands. It waits there until you pick a row to go on from.

  1. Select a command row, or add one with Add loop.
  2. Under Command, click HALT. The cell reads HALT.

SONG MUTE

A row can mute tracks while it plays.

  1. Select the row and click More.
  2. Under Mutes, click the keys 1 to 16. A muted track's key is dark. Click it again to unmute.

SAVE SONG

The editor writes each edit into the slot of the song the machine holds as you make it. Save is the machine's SAVE SONG: the machine stores the song it holds into that slot, with its name.

Save a song

  1. Click Save.
  2. If the machine has not loaded your latest edits yet, the editor asks first. Click Load the edits, then save to store the song as you see it.

Save a song into another slot, with a name

  1. Select an empty slot, or a slot to write over, in the Songs column.
  2. Click Save to…. The slot shows a name field with the name of the machine's song.
  3. Type a name, up to 16 characters, and press [RETURN]. Press [ESC] to cancel.

The slot now holds the song, with the new name. The machine still holds the song it had.

Name a song

  1. Select the slot.
  2. Click Rename, press [F2], or double-click the slot.
  3. Type the name and press [RETURN].

Names are in capitals. The editor keeps to letters, digits, spaces and a few signs.

Copy, paste and clear a slot

  1. Select a slot and click Copy, or press [⌘] + [C].
  2. Select another slot and click Paste, or press [⌘] + [V]. The slot holds a copy of the song, with its name.

You can also drag a slot onto another. The song is copied there.

To empty a slot, select it and click Clear, or press [DELETE] or [BACKSPACE]. The rows and the name are removed. The slot reads EMPTY.

When a paste, a copy or Clear would write over a song, the editor asks first. Click Clear song to answer the question of a clear: the slot is empty and quiet. Press [⌘] + [Z] to undo a paste, a copy, a name or a clear, and [⌘] + [⇧] + [Z] to do it again.

10. Global settingsMachinedrum Editor

10

Global settings

MD manual pp.57-78

The global settings are the machine's own settings. They hold the MIDI channels, the map of notes to tracks and patterns, program change, the output of each track and the sync. They belong to the machine, not to a pattern or a kit.

In the editor they sit on the GLOBAL page. It opens over the workspace, which dims behind it.

The GLOBAL page
The GLOBAL page

GLOBAL SETTINGS

The machine keeps 8 globals. One is active. On the machine you open the settings with [FUNCTION] and [PATTERN/SONG].

To open the page:

  1. Click GLOBAL in the top bar. Or choose GLOBAL… in the engine menu, the menu you open from the engine name on the LCD.
  2. The page opens in the middle of the window. Its head reads GLOBAL and the number of the active global. The keys 1 to 8 are the 8 globals. The lit key is the active one.
  3. Click a key to make that global the active one.
  4. Press [ESC], or click the key at the right of the head, to go back to the workspace. A click beside the page does not close it.

Every change is stored in the active global and made active at once. There is nothing to save.

The page has five cards: Control, Sync, Trig in A / B, Map editor and Routing.

Copy, paste and clear a global

The head has the keys Copy, Paste and Clear. They act on the active global.

  1. Click Copy. The editor keeps all the settings of the active global. Paste is now on.
  2. Click the key of another global to make it active.
  3. Click Paste. The editor asks first, because the settings of that global are replaced. Click Paste to go on, or Cancel.
The Copy, Paste and Clear keys

To put the active global back to how the machine shipped, click Clear. The editor asks first. Click Clear to go on, or Cancel.

Undo takes back a paste or a clear, as any other edit.

TURBO MENU

The turbo menu is for the speed of the MIDI link. The emulated machine and the editor pace their link themselves, so the editor has no turbo setting.

BASE CHANNEL

The base channel is the first of four MIDI channels the machine listens and sends on: channel n to channel n+3.

In the Control card, click − or + beside Base channel. The value reads the four channels, for example 1 to 4. It steps one channel at a time, up to 13 to 16.

The machine takes notes, program changes and controllers on these four channels only. A DAW drum track on another channel, for example channel 10, plays nothing until the base channel puts that channel among the four or the notes are sent on channels 1 to 4.

MAP EDITOR

The map editor says which MIDI note plays what. A note can play a track, start a pattern, or start or stop the machine. The Map editor card has the sixteen track keys and the controls for the other notes.

Notes for the tracks

Each of the sixteen keys is named TRACK 1 to TRACK 16. It shows the note that plays the track, or -- when the track has none. Click ‹ or › on a key to move the note down or up. Notes are named as C4, C#4 and so on, from 0 to 127.

The Map editor card
The Map editor card

When a MIDI keyboard plays a track's note on the base channel, the track's number in the track rail glows for a moment, and so does its light on the Mix workspace. A note on another channel lights nothing.

Notes from a DAW or a port

A note from the host, a MIDI port or a keyboard goes to the firmware's MIDI input through this map, as it does on the real machine. It plays the track the map gives it, on any of the four channels from the base channel. After you change a track's note, the new note plays it and the old one plays nothing. With GRID RECORD on, notes from the host do not write steps into the pattern.

Notes for patterns and the transport

  1. Beside Map a note, click ‹ or › to choose the note.
  2. Choose from the menu what the note plays: nothing, a track, a pattern A01 to H16, START or STOP.

A note plays one thing. If you give it a new job, it leaves the old one. The line beside Pattern trig lists the notes that play patterns or the transport.

How a pattern note starts

Beside Pattern trig, click one of:

  • GATE: the pattern plays while the key is held.
  • START: the pattern starts at once.
  • QUE: the pattern starts at the end of the pattern that plays.

Learn a note from a keyboard

You can give a track its note by playing the note on a MIDI keyboard, as you do on the machine.

  1. Connect the keyboard to the MIDI input of the editor: the MIDI input of the standalone, or the MIDI track of the plug-in in your DAW.
  2. Click the round dot beside the name of a track key, for example TRACK 3. The dot lights. The head of the card reads LEARN and the track.
  3. Play a note on the keyboard. The note now plays the track, and the dot goes out. The key shows the note.

Click the lit dot again to stop without a note. Going back to the workspace stops it too.

Reset the map

  1. Click Reset map in the head of the Map editor card.
  2. The editor asks first. Click Reset map to go on, or Cancel.

The map goes back to the one Elektron gives the machine: the tracks from C2, the patterns from E4. The rest of the global stays. Undo brings your map back.

LOCAL CONTROL

Local control sets whether the keys and the sequencer of the machine play its own sounds. In the Control card, click ON or OFF beside Local ctrl. With OFF the keys and the sequencer do not play the internal sounds.

PROGRAM CHANGE

In the Control card:

  • Prg change in: ON makes a MIDI program change choose a pattern.
  • Prg change out: ON makes the machine send a program change when a pattern is chosen.
  • Prg channel: click − or + to choose the channel, 1 to 16. BASE means the four base channels for the messages in, and the first of them for the messages out.

In a DAW a clip's program change, or one sent by a MIDI track, reaches the machine on the channel the host chose and picks the pattern when Prg change in is ON. With Prg change out ON the pattern you choose in the editor sends one to the DAW or the standalone's output.

MECHANICAL SETTINGS (MKII UNITS ONLY)

The machine sets the resolution of its knobs here: 24 or 32 steps. The editor has no knobs, so it has no such setting.

OUTPUT

Each track plays on the main output, through the master effects, or on one of the individual outputs A to F, which skip the master effects.

In the Routing card the sixteen keys show the output of each track: MAIN, or A to F. Click a key to go to the next output: MAIN, A, B, C, D, E, F, then MAIN again.

The Routing card
The Routing card

You can also click OUT on the strip of the track in the Mix workspace. Delay and reverb sends reach only the main outputs, so a track on an individual output keeps those values but does not use them.

TRIG

The two trig inputs of the machine turn the pulses of a pad into notes. On the machine they are in the ROUTING menu. The Trig in A / B card has a row for each input, A and B, with five values:

  • Gate, Sens, Vmin and Vmax: 0 to 127.
  • Dest: the track a pulse plays, T1 to T16, or - for none.

To change a value, click ‹ or › beside it. Hold [⇧] and click to move it by 10. Dest runs from - to T1, T2 and up to T16, as the knob of the machine does.

ALL DATA SYSEX SEND

On the machine you send SysEx to another device. In the editor you write it to a .syx file on your computer.

  1. Open the engine menu (the engine name at the left of the LCD) and choose EXPORT SYSEX…. The Export SysEx panel opens.
  2. All is ticked. The line at the foot says how many kits, patterns, songs and globals the editor holds.
  3. Click Save .syx… and choose where to put the file. The name starts as the product name and "backup.syx", in your Documents folder.

The file holds every pattern, kit and song the editor has, and the globals. It is one file.

GLOBAL SYSEX SEND

  1. Open Export SysEx… as above and untick All. Each kind shows its own row with a range.
  2. Tick Globals. Untick the kinds you do not want.
  3. Set the first and the last global of the range. Click a value to step it up, [⇧]-click to step it down, or turn the wheel, drag up or down, or use the arrow keys. G1 to G1 sends one global, G1 to G8 sends them all.
  4. Click Save .syx….

Globals are not ticked until you tick them. They hold the MIDI channels and the sync settings.

SONG + PATTERN (+ KIT) SYSEX SEND

  1. Open Export SysEx… and untick All.
  2. Tick Songs and set the range of songs.
  3. Tick Patterns and Kits too, with their ranges, if the file must play on its own.
  4. Click Save .syx….

PATTERN (+ KIT) SYSEX SEND

  1. Open Export SysEx… and untick All.
  2. Tick Patterns and set the range, for example A01 to B16.
  3. Tick Kits and set their range if you want the kits of those patterns too.
  4. Click Save .syx…. The line at the foot names each kind and its range before you save.

KIT SYSEX SEND

  1. Open Export SysEx… and untick All.
  2. Tick Kits only and set the range, for example K01 to K12.
  3. Click Save .syx….

The editor writes the kits it holds. A message at the end says how many of each kind went into the file.

GENERAL SYSEX RECEIVE

The machine takes SysEx at any time. In the editor you open the file first and choose what to send.

  1. Choose IMPORT SYSEX… in the engine menu. Or drop the .syx file on the window. Drag and drop works on macOS only.
  2. Choose the file. The Import SysEx panel opens. Its header names the model and says "full backup" when the file is one.
  3. Read the tabs: Kits, Patterns, Songs, Globals and Other. A tab shows the slots of the machine as a grid, and the number of items of that kind in the file. Each tab has a box: tick it to send that kind.
  4. A slot in the grid is marked when it overwrites a slot that holds data on the machine. A slot marked ▶ plays now. Click a slot to leave it out. Click it again to take it back. Click with [⇧] to change a range.
  5. Click All, Empty slots only or None to set the whole tab.
  6. Read the line at the foot. It says how many slots on the machine are overwritten.
  7. Click Import. The button says how many items it sends.

The tick Read back and compare, beside Verify only, is on at first and stays as you set it. With it on, the import reads every slot back after Send and compares it with the file. With it off, the import ends after Send. The report then says how many items were sent and that they were not read back.

While the import runs, the panel shows three steps: Read the slots, Send and Read back, and a bar for each kind. Click Stop to cancel or Hide to put the panel away. The import goes on: IMPORT SYSEX… in the engine menu shows the panel again, with its report when it is done. While it runs, [ESC] and a click beside the panel leave it open. The panel keeps one size from the preview to the report.

At the end the panel gives a report, slot by slot:

MarkMeaning
✓taken as in the file
≈converted
✕ignored
≠different from the file
→sent, not read back
~not comparable
?no answer, or not known

Click Show problems only to list only the slots that did not go as in the file. Click Done to close the panel.

ORIGINAL PLACE SYSEX RECEIVE

The import puts each item in the slot it came from, as the machine does with ORIG. This is the default: Original place is lit in the Place row under the grid.

SPECIFIC PLACE SYSEX RECEIVE

With SPEC the machine writes the items from a slot you choose. In the editor each kind has its own first slot.

  1. Open the file with Import SysEx….
  2. Click Specific place in the Place row. A value appears for the kind of the tab shown, for example Kits from K01. It starts at the file's first slot, so nothing moves yet.
  3. Set the first slot: click it to step it up, [⇧]-click to step it down, or turn the wheel, drag or use the arrow keys. The grid moves the items to the slots they land in. Each item keeps its place after the first, gaps included. Hover over a slot to see where it came from in the file.
  4. Choose another tab to set the first slot of that kind.
  5. Click Import. When an item lands on a slot that holds data, the editor asks first and names the slots. Click Import in the question to go on, or Cancel.

An item that would land past the last slot of the machine is not sent. Original place puts every item back where it came from.

SYSEX VERIFY

VERIFY compares a file with the machine and writes nothing.

  1. Open the file with Import SysEx… and choose the kinds and slots as for an import. Specific place works here too.
  2. Click Verify only, beside Import.
  3. The editor reads each slot the items land in and compares it with the file. The bar shows how far it is.

The report marks each slot:

MarkMeaning
=the same as the file
≠different from the file
?no answer

The line at the foot says how many slots are the same. Nothing was written to the machine.

An import reads every item back as well, unless you have turned off Read back and compare. Its report lists the items that differ from the file, marked ≠.

SYNC

The Sync card sets how the machine takes and sends the MIDI clock and the transport.

Tempo in

Beside Tempo in, click:

  • INT: the machine runs at its own tempo.
  • EXT: the machine follows the MIDI clock it receives. MIDI Start waits for the clock.

In a DAW, EXT follows the tempo and transport of the host, and a new plug-in starts so. INT runs the machine on its own clock there: no clock from the host reaches it and the host's Play does not start it. The project keeps the choice. In the standalone, EXT follows the clock that arrives at a MIDI input. See "EXTERNAL SYNCHRONIZATION" in chapter 8.

Ctrl in

Beside Ctrl in, click ON to make the machine react to MIDI Start, Stop and Continue. Click OFF to make it ignore them.

Tempo out

Beside Tempo out, click ON to make the machine send the MIDI clock. Click it again to put it back. The clock goes to the standalone's MIDI output, or to the plug-in's MIDI output in a DAW.

Ctrl out

Beside Ctrl out, click ON to make the machine send MIDI Start, Stop and Continue.

11. Sample manager, UW onlyMachinedrum Editor

11

Sample manager, UW only

MD manual pp.70-75

The sample manager is a feature of the UW models, which have sample memory. In the editor it is the Sampler workspace. Press [4], or click the Sampler tab.

The rail on the left lists the slots: four RAM slots and 48 ROM slots. The page shows the selected slot. On the second line of the LCD, <MEM> gives the share of the sample memory in use, <KIT> the number of tracks in the kit that play a ROM slot, and <SLOT> the selected slot.

The Sampler workspace

SAMPLE MANAGER

The slots

The ROM slots are in the rail as a grid of 48 keys. A key that is lit holds a sample the kit uses. A faint key is an empty slot. Point at a key to see its number, its name, its size and the tracks that play it.

With a ROM slot selected, the page shows under it every ROM slot as a tile: its waveform, its number and name, and a key to hear it. An empty slot offers Load…. Click a tile to select the slot.

Point at a key or a tile to see the size of the sample: its length in seconds, in kilobytes and in samples, and its rate. A kilobyte count is the sample as the machine stores it, 16-bit and mono.

Memory left

The header of the ROM slots card gives the sample memory in seconds: how much the samples hold, how much is free, and the free share in per cent. The ROM slots and the four RAM buffers share the memory, so the figure counts both. Point at the <MEM> field for the same figures in samples. The machine does not report its own figure over MIDI, so the editor works it out from the samples it reads.

Hear a sample

Click the play key on a tile, or the play key by the waveform of the selected slot. !A tile with its play key

The sample plays once, from the start, on the output of the plug-in. Click the key again to stop it. A line moves over the waveform as it plays.

Name a sample

  1. Select the ROM slot. It must hold a sample.
  2. Click Rename.
  3. Type a name of up to four letters and click Rename.

The Machinedrum renames a sample only when it receives the sample. So the editor sends the new name, then the slot's own sample again into the same slot. A bar shows the sending, as when you load a file, and the sample is the same as before: only the name changes. The slot's loop points are not sent again.

Rename needs the editor to read the slot's audio, so it works with the emulated machine. A real Machinedrum does not send its samples back, so the Rename key is greyed out, with the reason. Rename the sample in SAMPLE MGR on the machine, or load the file again.

Put a sample on a track

  1. Select a track.
  2. Select the ROM slot on the Sampler workspace.
  3. Click Put on track. The track now plays the sample.

Under it, the playback controls of the track that plays the slot set the pitch, the decay, the start and the end.

Limits

The editor makes every sample it loads mono and 16-bit, at 44.1 kHz at most, and cuts it to the memory left.

The editor takes WAV and AIFF files. It does not receive a sample sent over MIDI by another program.

Copy, paste and undo

  1. Select a slot that holds a sample, ROM or RAM.
  2. Click Copy. A line beside the keys names what is copied.
  3. Select the ROM slot that is to take it.
  4. Click Paste. A bar shows the sending, as when you load a file.

The copy is a snapshot taken when you click Copy. A RAM take that is recorded over afterwards is still pasted as it was. The paste replaces what the slot holds. The slot takes the name of the copy.

Undo sample sends back the sample that the last paste, RAM to ROM copy, rename or file load replaced. It goes back 16 steps, one at a time. The editor has no redo for samples. An erase of one slot can be undone the same way. A step that filled an empty slot cannot be undone yet.

To clear a sample slot, use Erase on it.

THE DIFFERENCE BETWEEN ROM AND RAM MACHINES

The ROM slots keep their samples when the power is off. A ROM machine plays a sample from a ROM slot. The rail marks the ROM slots "kept".

The RAM slots lose their samples at power-off. A RAM-R machine records into a RAM slot. A RAM-P machine plays what the slot holds. The rail marks the RAM slots "lost at power-off" and says for each whether it is live, frozen, capturing or not in the kit.

To start sampling into a RAM slot:

  1. Select a RAM slot in the rail.
  2. In the Set up sampling card, choose the recorder track and the player track with the ‹ and › keys.
  3. Click Set up sampling. The recorder takes the machine RAM-R and records the main mix. The player takes RAM-P and plays the slot. This is one undo step.
  4. Press [SPACE].
  5. Click Capture next loop. The recorder records one whole loop from the next start of the pattern, then the editor mutes it to keep the take.

Click Live to record again on every loop. Click Freeze to mute the recorder and keep the take. Main mix, Input A, Input B and A + B choose what the recorder takes.

A RAM slot with a take

RAM TO ROM COPY

To keep a RAM take when the power is off, copy it to a ROM slot:

  1. Select the RAM slot that holds the take.
  2. Click Keep as ROM….
  3. Type the ROM slot, 1 to 48. The first empty slot is offered.
  4. Click Keep. A bar shows the sending.

The take is sent as it is now. The ROM slot takes the name RAM1 to RAM4 and replaces what it held; Undo sample brings that back. The other RAM slots stay as they are. On the machine the copy empties them after a prompt, and the editor does not.

GENERAL SAMPLE RECEIVE

The machine takes a sample sent over MIDI at any time. The editor does not wait for a sender. You choose the file and the slot. See "SPECIFIC PLACE SAMPLE RECEIVE".

SPECIFIC PLACE SAMPLE RECEIVE

  1. Select the ROM slot in the rail or on its tile.
  2. Click Load sample… or, on an empty tile, Load….
  3. Choose a WAV or AIFF file.
  4. A bar shows the sending. Click Stop to cancel. When it ends, a message says the sample is loaded.
A sample sent to ROM slot 33

You can also drop the file on the waveform of an empty ROM slot. The slot takes it.

The sample replaces what the slot holds. The plug-in gives it a name of four letters from the file name.

ORIGINAL PLACE SAMPLE RECEIVE

Drop several WAV or AIFF files on the window with the Sampler open. They go into ROM slots one after another, one file at a time.

  1. Select the first ROM slot, or drop on the tile you want it to start from.
  2. Drop the files. The editor asks "Load 3 samples into ROM-05 to ROM-07?" and tells you each replaces what its slot holds.
  3. Click Load.

ROM-48 is the last slot. Files past it are not loaded, and a message says how many. Drag and drop works on macOS only. On Windows and Linux, load the files one at a time with Load sample….

SEND SAMPLES

The Machinedrum ignores requests for its samples over MIDI, so the editor does not ask it to send. It reads the samples from the emulated machine and writes them as files instead.

  1. Select the slot, ROM or RAM.
  2. Click Export WAV.
  3. Choose where to save the file.

To save every ROM slot that holds a sample, click Export all… in the header of the ROM slots card and choose a folder. A file is written for each slot, named by its slot and its name, such as "ROM-04 SNR". On a RAM slot, Export all RAM… does the same for the four RAM slots.

The files are 16-bit mono WAV at the slot's own rate. They hold exactly the samples the machine holds, with no loop points.

To get the file the machine's own SEND makes, click Export SysEx on a ROM slot, or Export all SysEx… in the header of the ROM slots card. The file is a MIDI Sample Dump with the slot's position in it. When you send it back with the ORG method, the sample lands in the slot it came from. A RAM slot has no SysEx file: keep it as a ROM slot first, or export it as WAV.

ERASE SAMPLES

Click Erase on a ROM slot to empty it. The editor asks first, then presses the machine's own keys for you: FUNCTION + PATTERN/SONG, the third icon of GLOBAL 1 EDIT, SAMPLE MGR, ERASE, the slot, and ENTER twice. It looks at the machine's screen after every key. If the screen is not the one it expects, it stops, leaves the menu with EXIT and tells you that nothing was erased. When the keys are through, the editor reads the sample memory again and says so once the slot is empty. Leave the machine alone while this runs. Undo sample sends the erased sample back.

Click Erase all… in the header of the ROM slots to empty every ROM slot the same way. The editor asks twice as plainly, because this cannot be undone with Undo sample: export what you want to keep first.

12. Early start-up menuMachinedrum Editor

12

Early start-up menu

MD manual pp.79-81

On the machine you hold a key while you switch it on to open the early start-up menu. It holds the test mode, three resets and the firmware upgrade. The editor starts the machine for you, with the firmware you gave it, and has no such menu.

TEST MODE

The test mode checks the hardware of the machine: its keys, knobs, memory and outputs. The editor runs on the emulated machine and has nothing to test.

EMPTY RESET

The empty reset clears the memory of the machine. In the editor it is in the engine menu.

  1. Choose RESET MACHINE… in the engine menu (the engine name at the left of the LCD). A question says what each reset clears. Cancel is the default: [ESC] answers it. A click beside the question does nothing.
  2. Click Empty reset…. The editor asks a second time.
  3. Click Clear everything. The Empty reset panel opens. The editor writes an empty kit, pattern and song into every slot, then reads each one back.
  4. Read the report and click Done.
After the Empty reset: an empty kit and an empty pattern

The globals and the samples stay. A global is reset in its own slot in GLOBAL (chapter 10).

FACTORY RESET

The factory reset brings back the kits, patterns and songs the machine had when it left the factory. The editor takes them from your own ROM: it starts a second machine with it, in the background, and reads that machine's memory.

  1. Choose RESET MACHINE… in the engine menu.
  2. Click Factory reset…. The editor asks a second time.
  3. Click Factory reset. Preparing the factory data takes a few seconds. Then the Factory reset panel sends every kit, pattern and song and reads each one back. This takes a few minutes.
  4. Read the report and click Done. Kits 1 to 4 are named TRX UW, EFM UW, E12 UW and P-I UW.
After the Factory reset: the factory kit and song are back

The globals and the samples stay. Undo takes the reset back in one step, as it does for the Empty reset. Export SysEx… in the question keeps a copy in a file.

SOFT RESET

You cannot soft reset the machine in the editor. Restart the editor.

MIDI UPGRADE

The firmware upgrade runs on the real machine. The editor does not upgrade the firmware. It runs the Machinedrum OS 1.63 that you give it as a ROM.

13. Technical information, MKI vs MKIIMachinedrum Editor

13

Technical information, MKI vs MKII

MD manual pp.82-83

SPECIFICATIONS

The editor keeps to the limits of the machine. It refuses what the machine cannot hold, and says why.

ItemLimit
Tracks16
Patterns128, in 8 banks of 16
Pattern length16, 32, 48 or 64 steps
Kits64
Songs32, of up to 256 rows each
Globals8
Parameter locks64 locked parameters in a pattern
Control change messages384, which is 24 for each of the 16 tracks
Sample slots48 ROM slots and 4 RAM slots
The limits as the editor shows them

DIFFERENCES BETWEEN THE MKI AND MKII MODELS

Pattern length

The MKII model holds patterns of up to 64 steps. The editor offers these lengths.

The editor does not offer the MKI model, whose patterns are 32 steps long at most.

Sampler specifications

The editor's Sampler has 48 ROM slots and 4 RAM slots.

The MKI model has 32 sample slots. The editor offers the MKII model only.

Design

The MKI machine is silver, the MKII black. The editor gives its panel either colour: the MKI has a reddish-orange LCD with black pixels, the MKII an orange one. A note appears when you switch. Open the engine menu (the EMU OS entry in the LCD) and choose PLATE: MKI or PLATE: MKII to switch. The choice is kept for next time.

The PLATE entry in the engine menu

The choice is kept for the next time. It changes the colour only.

14. Appendix A: machine referenceMachinedrum Editor

14

Appendix A: machine reference

MD manual pp.A-1 to A-16

A machine is the sound engine of one track. The Machinedrum holds 16 tracks and each one carries one machine at a time. This chapter lists the machines by family, as the machine's own appendix does.

In the editor you choose a machine on the Kit workspace. Pick a track on the rail, click the machine key, choose a family, then choose a machine in it. The track takes the machine and the Kit page shows its knobs. [⌘] + [Z] takes the choice back. A machine has up to eight knobs, as on the LCD, and the Kit page shows each one in a group with its value box.

TRX MACHINES

The TRX family models classic analogue drum voices. Each machine is one drum sound. The Kit workspace shows its knobs in groups, each knob with its own value box. Pitch, decay and ramp sit in the first groups, and tone and clip in the last.

TRX-BD on the Kit workspace, its knobs in groups with a box under each.
MachineSound
TRX-BDBass drum
TRX-B2Bass drum 2
TRX-SDSnare
TRX-XTTom
TRX-CPClap
TRX-RSRim shot
TRX-CBCow bell
TRX-CHClosed hi-hat
TRX-OHOpen hi-hat
TRX-CYCymbal
TRX-MAMaracas
TRX-CLClaves
TRX-XCCongas

EFM MACHINES

The EFM family makes drum sounds by frequency modulation. The knobs sit in groups on the Kit workspace.

MachineSound
EFM-BDBass drum
EFM-SDSnare
EFM-XTTom
EFM-CPClap
EFM-RSRim shot
EFM-CBCow bell
EFM-HHHi-hat
EFM-CYCymbal

E12 MACHINES

The E12 family is a set of drums and percussion that follow the sound of a 12 bit sampler. The knobs sit in groups on the Kit workspace.

E12-SD on the Kit workspace with its pitch, envelope, tone and retrig groups.
MachineSound
E12-BDBass drum
E12-SDSnare
E12-HTHigh tom
E12-LTLow tom
E12-CPClap
E12-RSRim shot
E12-CBCow bell
E12-CHClosed hi-hat
E12-OHOpen hi-hat
E12-RCRide
E12-CCCrash
E12-BRBrushed snare
E12-TATambourine
E12-TRTriangle
E12-SHShaker
E12-BCBongo conga

P-I MACHINES

The P-I family is a set of percussion and instrument voices of its own. The knobs sit in groups on the Kit workspace.

MachineSound
P-I-BDBass drum
P-I-SDSnare
P-I-MTTom (PI-XT)
P-I-MLMetallica
P-I-MAMaracas
P-I-RSRim shot
P-I-HHHi-hat
P-I-RCRide
P-I-CCCrash

GND MACHINES

The GND family holds plain sources: a sine, noise, an impulse, and an empty machine that makes no sound. The empty machine is in the machine picker.

MachineSound
GND-SINSinus
GND-NSNoise
GND-IMImpulse
GND-EMPTYEmpty machine

INP MACHINES

The INP family does not make a sound of its own. It reacts to the audio that enters the machine at input A or B. A gate opens when the input is loud enough, a filter follower and an envelope follower turn the input level into a moving sound.

MachineSound
INP-GA/GBInput gate A/B
INP-FA/FBInput filter follower A/B
INP-EA/EBInput envelope A/B

MID MACHINES

The MID family turns a track into a MIDI controller, one machine for each of the 16 MIDI channels. The Kit workspace shows its knobs as plain knob boxes, with no picture. The routing and effects pages show as groups.

CTR MACHINES

The CTR family does not play a sound. It moves the parameters of other tracks or of a master effect. Control all and Control 8 parameters move parameters of the other tracks, and their knobs show as plain knob boxes. The other four, Rhythm Echo, Gate Box, Master EQ and Dynamix, move the knobs of that master effect, and their groups show on the Kit workspace.

CTR-RE on the Kit workspace, with the delay, modulation, filter and output groups of the Rhythm Echo.
MachineSound
CTR-ALControl all
CTR-8PControl 8 parameters
CTR-REControl Rhythm Echo
CTR-GBControl Gate Box
CTR-EQControl Master EQ
CTR-DXControl Dynamix

ROM MACHINES

The ROM machines play the samples held in the machine's own memory. The first 24 play a sample as a one shot, and the second 24 play a sample as a loop, with a linear start and end. The Kit workspace shows a sample screen with <STRT> and <END>, and the Sampler workspace shows the slots as tiles.

ROM-01 on the Kit workspace, with the sample screen and the <STRT> and <END> knobs.
MachineSound
ROM-1 to ROM-24ROM sample player
ROM-25 to ROM-48ROM loop player (linear STRT, END)

RAM MACHINES

The RAM machines play and record samples in the four RAM slots of the machine.

  • RAM-R1 to R4 record. A recorder writes audio from an input or from the main mix to a RAM slot. You set one up on the Sampler workspace, or on the Kit workspace.
  • RAM-P1 to P4 play the sample that is in the slot. The Kit workspace shows a sample screen with <STRT> and <END>, and the Sampler workspace shows the slot as a tile.

RAM MACHINES TUTORIAL

To record the main output and play it back in a track:

  1. Click the Sampler tab.
  2. Click an unused RAM slot.
  3. Click Set up sampling. The editor makes a recorder of the main mix in one track, takes that track out of the mix (its <VOL> is 0), and adds a player.
  4. Click Input A to record from input A instead. The recorder's <VOL> comes back. Click Main mix and it is 0 again.
  5. Click an empty step of the RAM view to put a recorder trig there. Click Freeze to mute the recorder on the machine. Click Live and it records again.

Press [⌘] + [Z] three times to put everything as it was before the set up.

15. Appendix B: MIDI control referenceMachinedrum Editor

15

Appendix B: MIDI control reference

The Machinedrum is played and edited over MIDI. This chapter says which notes play which track and pattern, which control changes move the sound parameters, and which move the level and the mute of a track. The editor keeps to the machine's own messages, so a keyboard or a DAW that plays the machine plays the editor.

NOTE MAP

By default the 16 tracks answer to the white keys from C2 to D4, one note a track, on the four channels from the base channel. The 128 patterns answer to notes from E4 upwards, one note a pattern.

To see or change the map:

  1. Choose GLOBAL… in the engine menu.
  2. Find the map editor in the panel. Each track has a note.
  3. Click the note of a track up or down. The track plays from the next note.
  4. Click a track's LEARN dot to set the note by playing it. The head of the panel asks you to play a note. Play it on a MIDI keyboard. The track takes that note and the dot goes out.
  5. Click Reset map. The editor asks first. Answer, and the tracks play from C2 and the patterns from E4 again.
  6. Press [ESC] to close the panel.

CONTROL CHANGES

The sound parameters of the 16 tracks are reached by control change messages. The machine uses four MIDI channels, starting from its base channel, and each channel serves a group of four tracks. Every parameter of a track has its own control change number.

In the editor you do not type these numbers. When you move a value on the Kit workspace, the editor sends the control change for it. A move on a track of each group of four, tracks 1, 5, 9 and 13, reaches the machine through its own channel.

A DAW reaches the same parameters by host automation. Each track has host parameters for synthesis, effects, routing, level and mute, and a lane of automation sends the control change the knob would send.

A controller knob learned on the Control tab (chapter 17) takes over its control change on its channel: the machine's own target of that number no longer moves.

LEVEL AND MUTE

Each track has its own control change for its level. The mute of a track is a control change of its own too.

  1. Click the Mix tab.
  2. Drag the <LEV> box of a track. The level control change goes out with each move.
  3. Double-click the box. It reads 100.
  4. Click Undo until the level is back.

The mute keys of the editor act on the machine's own memory of the mutes.

PROGRAM CHANGE

A program change on one of the four channels selects a pattern when Prg change in is ON (chapter 10). With Prg change out ON the machine sends one when you choose a pattern.

MIDI OUT

The machine's MIDI out carries notes, controllers, program changes, pitch bend, pressure, clock, start, stop and continue. It never carries SysEx.

16. Appendix C: sysex referenceMachinedrum Editor

16

Appendix C: sysex reference

The Machinedrum is also edited by system exclusive messages. A message has a number, which the machine's own appendix lists in hexadecimal. A dump carries a whole object, a kit, a pattern, a song or a global. A request asks the machine for one. The other messages change one thing, such as a tempo or a routing.

You never send these by hand. The editor sends and reads them for you, and this chapter says where. The numbers are written for reference.

KITS

A kit dump is 0x52 and its request 0x53. The kit library and the whole page use them. A kit moves between the editor and the machine as a dump.

Set kit name is 0x55. Rename in the kit library sends it.

To see the kit messages work:

  1. Click <KIT> on the LCD. The kit library opens.
  2. Alt-click a slot. It is selected, not loaded.
  3. Click Copy, Alt-click another slot and click Paste. Answer Overwrite when the editor asks. Press [⌘] + [Z] and the slot is back as it was.
  4. Double-click the current kit, type a name and press [Enter]. The working kit is renamed and not saved yet.
  5. Click Save. The slot holds the new name.

GLOBALS

A global dump is 0x50 and its request 0x51. The GLOBAL panel shows the global the machine reported: its slot, its base channel and its sync settings.

Set active global is 0x56. The slot keys in the GLOBAL panel send it.

  1. Choose GLOBAL… in the engine menu.
  2. Click another global slot key. The active global of the machine is that one.
  3. Click the key of the first slot again to put it back.

LOADING AND SAVING

Load pattern is 0x57, load kit is 0x58 and save kit is 0x59. The pattern chooser and the kit library send them.

Save song is 0x6d. Save in the Songs column sends it.

  1. Click <KIT> on the LCD. Click another kit. It loads at once.
  2. Alt-click a third kit. It is selected, not loaded.
  3. Click Save as. The editor asks before it overwrites. Click Overwrite and the kit is saved into that slot.
  4. Click the pattern on the LCD, then another pattern. With the machine stopped, it switches.

NOTE MAP

Set MIDI note mapping is 0x5a. The map editor in the GLOBAL panel sends it when you change the note of a track.

Reset MIDI note map is 0x64. Reset map sends it. The editor asks first, and [⌘] + [Z] takes it back.

SOUND SETTINGS

These messages change one part of the sound.

  • Assign machine is 0x5b. The machine picker on the Kit workspace sends it.
  • Set track routing is 0x5c. The OUT key of a track on the Mix workspace sends it, and so does the routing in the GLOBAL panel.
  • The Rhythm Echo, Gate Box, Master EQ and Dynamix messages are 0x5d to 0x60. The cards of the Mix workspace send them.
  • Set tempo is 0x61. Dragging the <TEMPO> field in the LCD sends it.
  • Set LFO is 0x62. The LFO cards of the Kit workspace send it.
  • Trig group is 0x65 and mute group is 0x66. Mute and Trig in the relations of the Kit workspace send them.

PATTERNS AND SONGS

Pattern dump is 0x67 and its request 0x68. The editor uses them for the whole page, and the pattern chooser shows what they hold.

Song dump is 0x69 and its request 0x6a. Load song is 0x6c. The Song workspace uses them. A song slot you click is only selected. Load puts the machine's song in the editor.

Status request, set and response are 0x70 to 0x72. The editor reads the machine's mode with them. Click <PLAY> on the second line of the LCD and the machine's mode is SONG. Click it again to go back to PATTERN.

NOT IN THE EDITOR

Set receive position is 0x6b. The editor does not send it. When you import a SysEx file, the editor places the items itself.

The TurboMIDI speed messages are 0x10 to 0x17. They belong to the hardware link and the editor has no control for them.

17. Beyond the hardwareMachinedrum Editor

17

Beyond the hardware

The editor runs the real Machinedrum operating system and adds a few things around it. This chapter describes them.

MACHINE MEMORY

A Machinedrum keeps what you save when you switch it off: its kits, patterns, songs, globals and samples stay in its memory. The editor does the same. When you save on the machine, the editor writes what you saved to a file on your computer, slot by slot. A new session starts from factory memory with the saved slots put back in.

Only a save writes the file: a kit, pattern, song or global stored into its slot. That is SAVE KIT, a change to a pattern (the machine stores pattern edits as you make them), SAVE SONG, a change to a global, a SysEx dump the machine takes in. A sample you load in the Sampler is a save too, written once the machine has stored it. It makes no difference whether you save in the editor or on the machine's own keys. The editor writes the file a second or two after the save. Turning a knob, automation from a DAW and changes to the kit that plays that you have not saved write nothing, and neither does playing. A tempo change is saved with its global, as on the machine; in a DAW, where the machine follows the DAW's tempo, the tempo is never saved.

A new session is a new plug-in in a DAW project, a new DAW project, or a start of the standalone editor. It has every slot you saved, wherever you saved it. The standalone editor also keeps the kit that played when you quit it, with its unsaved changes.

Start from factory memory

  1. Choose RESET MACHINE… in the engine menu, the drop-down at the left of the LCD.
  2. Click Start from factory memory…. The editor asks a second time. Cancel leaves the saved memory as it is.
  3. Click Start from factory memory. The machine restarts with its factory memory, as on a new install, and the saved memory file is deleted. This takes a few seconds.

New sessions now start from factory memory until you save again. The reset has no undo: click Export SysEx… in the question first to keep a way back.

Turn it off

Choose KEEP MEMORY: ON in the engine menu. It reads KEEP MEMORY: OFF, and new sessions start from factory memory. The editor no longer writes the file. The file stays, so when you turn it on again, new sessions start with the memory you saved before.

Two editors at once

Two Machinedrum editors open at the same time, in one DAW project or in two, share the same file. Each writes the slots it saves and leaves the others. When two editors save the same slot, the last save wins.

When the file cannot be used

The file is written in one step, so a crash leaves the old memory or the new one. If the file is damaged, the machine starts from factory memory and the editor says so. It keeps the file beside the new one as machine-memory.unusable with the date and time in its name, and your next save writes a new memory file. If the file was written by a newer editor, the editor leaves it as it is and saves nothing over it. It says so; move the file away to save again.

If the editor cannot write the file, because the disk is full or the folder is read only, it says so and keeps the old file. It tries again at your next save and when it closes. Your saves stay in the session. The standalone editor starts with them next time, not with the old file, and writes them then.

The file is machine-memory.bin in the memory folder of the editor's data folder: Documents/Gearmulator Preview/Machinedrum/memory. It holds the slots you saved and the samples you loaded, nothing else. Samples saved with another ROM are kept in a file of their own when you save a sample with this one. It holds no firmware.

FACTORY SONGS PLAY

The songs of factory memory are in the editor, and they play. The arrangement follows what the machine plays. See "LOAD SONG" in chapter 9.

  1. Click the Song tab.
  2. Click a slot that holds a song, such as UW DEMO, and click Load.
  3. Click SONG over the pattern palette. The machine is in song mode.
  4. Press [SPACE]. The step moves, and the song goes on from row to row. The output is not silent.
  5. Press [SPACE] again. The song stops.

FACTORY PATTERNS PLAY

The patterns of factory memory are in the editor, and they play. See "PATTERN QUEUE AND CHOOSER" below.

  1. Click the pattern on the LCD. The chooser opens.
  2. Click a pattern that holds trigs. The kit of the pattern loads with it.
  3. Press [SPACE]. The step moves through the pattern and the output is not silent.
  4. Press [SPACE] again, and choose another pattern the same way.

WHAT YOU DRAW PLAYS

What you draw in the grid is what the machine plays. Four trigs drawn in an empty pattern sound when you press play, a cleared pattern plays silence, and an undo brings the trigs back.

Four trigs drawn on track 1 of an empty pattern
  1. Click the Pattern tab.
  2. Click the pattern on the LCD and choose a pattern with no trigs.
  3. Pick a track on the rail.
  4. Click four steps on that track. Each becomes a trig.
  5. Press [SPACE]. The position moves through the pattern and the track sounds.
  6. Press [⌥] [DELETE]. The pattern is cleared.
The same pattern after the clear
  1. Press [SPACE] again. The position moves and nothing sounds.
  2. Press [⌘] [Z] once. The four trigs are back, and they play again.

GEN ROLLS A RHYTHM

The machine has no such function: you set every hit by hand. The GEN bar on the Pattern workspace rolls a rhythm for the selected track from a few settings. Random rolls a new one, Defaults sets the generator the track's sound suits, and Hits says how many hits it holds. The key [R] rolls too. A whole roll is one undo step.

MUTATE CHANGES A SOUND

The machine has no such function. MUTATE in the GEN bar nudges the sound of the tracks at random. The scope chips choose what moves, and the amount says how far. A mutation is one undo step.

MUTATE on the Kit workspace with only the effects chip lit
  1. Click the Kit tab and pick a track on the rail.
  2. In MUTATE, switch the FX chip on and the SYN chip off. Only the effects move.
  3. Raise the amount by one step.
  4. Click Random. The effect values of the track change and the synth values stay.
  5. Press [⌘] [Z]. The sound is as it was.

To mutate and roll together, pick a drum track on the Pattern workspace and click Random in the GEN bar until the rhythm changes. Then click the Kit tab and Random in MUTATE. Click UNDO once: the sound is back. Click it again: the rhythm is back.

CLEAR

When you play with a sound, Clear puts the selected track back as the kit's slot stores it. It restores the machine, every value, the level, the LFO and the two relations of that track. The other tracks, the master effects and the kit name stay as they are. The kit library's Reload loads the whole kit again. Clear does one track.

  1. Click the Kit tab and pick a track on the rail.
  2. Turn a few knobs. Clear turns on.
  3. Click Clear. The values are the stored ones, and the key is off again.
  4. Press [⌘] + [Z]. Your edits are back, and the key is on.

Clear is off while the track is as stored. Saving the kit makes the saved sound the stored one.

SOLO

Solo plays one track alone. The mutes you had come back when you let go.

The Mix workspace with some tracks muted and one soloed
  1. Click the Mix tab.
  2. Drag across the M keys of four tracks. All four are muted.
  3. Click S on another track. That track plays alone.
  4. Click S again. The solo ends, and the four mutes are still set.

The solo is saved with the project, in the DAW and in the standalone editor. Open the project again and the solo is on, the other tracks are muted, and the mutes you had before the solo come back when you end it.

UNDO AND REDO

The machine cannot take an edit back. In the editor every edit can be taken back and done again, across kits, patterns and songs.

The UNDO and REDO keys in the top bar
  1. Click an empty step on the Pattern workspace. It becomes a trig.
  2. Press [⌘] + [Z]. The trig goes.
  3. Press [⌘] + [⇧] + [Z]. The trig is back.
  4. Click UNDO in the top bar to take it back again, and REDO to put it back.

A drag, a paint or a run of rotates is one step. Each typed value is one step. A SysEx import and the Empty reset are one step each: Undo writes back the kits, patterns and songs they overwrote. A global is not put back (chapters 10 and 12).

TYPED VALUES

Type a value into a knob instead of turning it.

A typed value in the Kit workspace
  1. Click the Kit tab and pick a track on the rail.
  2. Click a value box with [⌘] held, or focus it and press [ENTER]. A field opens over the box with the value it shows.
  3. Type a value and press [ENTER]. The box shows it, and the machine has it.
  4. A value out of range, such as 128, is refused. The field stays open and nothing is sent.
  5. Press [ESC] to close the field. The value is as it was.

With a value focused, the up and down arrow keys step it. Each typed value is one undo step.

THE STEP MENU

Right-click a step, or select it and click the ⋯ on it, for its menu: accent or slide, copy, paste and fill.

  1. Click the Pattern tab and pick a track on the rail.
  2. Click an empty step to make a trig.
  3. Right-click the step. Its menu opens. The ⋯ on the selected step opens the same menu.
  4. Choose Accent. The step is an accent.
  5. Right-click the step again and choose Copy.
  6. Right-click an empty step and choose Paste here. The trig lands there.
  7. Right-click an empty step and choose Fill every 2nd from here. Every second step from there comes on. [⌘] + [Z] takes it back.

SELECT, COPY AND PASTE STEPS

Select steps with the mouse, then copy, paste and clear them, on one track or on several. [⌘] click a step to select it, [⌘] drag to select a block. Use Copy, Paste and Clr in the top bar, or [⌘] + [C] and [⌘] + [V] on the keyboard. See "NOTE COPY" in chapter 8.

  1. Click the Pattern tab and pick a track on the rail.
  2. [⌘] click a step with a trig. It is selected.
  3. Press [⌘] + [C], or click Copy in the top bar.
  4. [⌘] click an empty step of the same track.
  5. Press [⌘] + [V], or click Paste. The trig lands on the selected step.
  6. [⌘] drag from step 1 of a track to step 4 of the next. The block is selected.
  7. Press [⌘] + [D]. The block appears again on steps 5 to 8.
  8. Click Clr. The selected block is cleared and nothing else.
  9. Press [ESC]. The selection goes.
  10. Press [⌘] + [Z] three times. Both tracks are as they were.

To paste into several tracks, copy a track and click the headers of two other tracks with [⇧] held. Press [⌘] + [V]: both tracks get the steps, and one [⌘] + [Z] takes both back.

COPY, PASTE AND CLEAR WHAT

A copy, a paste or a clear can take only part of what a step holds. The what menu on Copy, Paste and Clear chooses: trigs, locks, the sound, or the whole track. The keys [⌘] + [⇧] + [C], [⌘] + [⇧] + [V] and [⌘] + [⇧] + [BACKSPACE] open it from the keyboard.

DROP A FILE ON THE WINDOW

Drop a SysEx file on the editor to open it in the import preview. On the Machinedrum you can drop a WAV or AIFF sample on the Sampler too. Drag and drop works on macOS only. See "GENERAL SYSEX RECEIVE" in chapter 10 and "SPECIFIC PLACE SAMPLE RECEIVE" in chapter 11.

To open a SysEx file:

  1. Drag the .syx file onto the editor window. The Import SysEx panel opens with the preview of the file.
  2. Click Cancel. The panel closes and nothing is sent.

To load a sample:

  1. Click the Sampler tab.
  2. Click an empty ROM slot.
  3. Drag the WAV file onto the waveform of the slot. The editor sends it, and the slot holds the sample.
A sample dropped on ROM slot 33

SYSEX IMPORT WITH A PREVIEW

Choose IMPORT SYSEX… in the engine menu to look inside a SysEx file before you send it. You tick the kinds, choose where each goes and read the report. The steps are in "GENERAL SYSEX RECEIVE" in chapter 10. The tick Read back and compare at the foot of the panel decides whether the import reads the slots back after it sends them.

MIDI NOTE LIGHTS

The track you play from a MIDI keyboard lights on the track rail and in the mixer.

The track rail and the mixer light of a track that plays
  1. Click the Kit tab.
  2. Play the note of track 3 from a MIDI keyboard on a channel other than the base channel. No track lights.
  3. Play it on the base channel. The number of track 3 on the rail lights for a moment, then goes out.
  4. Click the Mix tab and play track 3 again. Its light on the strip lights and no other does.

The notes that play each track are set in "MAP EDITOR" in chapter 10.

THE SELECTED TRACK FOLLOWS THE LAST TRACK PLAYED

The machine has no such function. With it on, the track you select changes to the last track you played from a MIDI keyboard. It is off until you turn it on, and the project keeps the choice.

  1. Open the engine menu and choose FOLLOW PLAYED TRACK: OFF. It reads FOLLOW PLAYED TRACK: ON.
  2. Play the note of track 5 from a MIDI keyboard on the base channel. Track 5 is selected.
  3. Play the note of another track on a channel outside the four base channels. The selection stays where it was.
  4. Choose the entry again to turn it off.

The notes that play each track are set in "MAP EDITOR" in chapter 10. The keys of the computer keyboard and the audition of a sample never move the selection. Following replaces a selection of several tracks with the one track played. While a question is open, or LEARN waits for its note, the selection stays where it is.

MIDI LEARN: A CONTROLLER KNOB MOVES A VALUE

The machine has no such function. A knob or fader on a MIDI controller can move any sound parameter of any track. The mappings belong to the project. They are saved with it and come back when you open it.

  1. Click the Control key in the Setup group, right of Learn, or press [6]. Click it again to leave. The matrix lists the eight knob rows, every learned CC and the app modulators against the 16 tracks.
  2. Click LEARN in the top bar, or press [L].
  3. Click any value on the page, for example DEC on the Kit page. The value shows the learn mark.
  4. Turn a knob on your controller both ways. The line in the inspector on the Control page counts the values seen: 0 of 2, then 1 of 2.
  5. The second value completes it. A message names the CC, its channel and the target. The Control page opens the row of that CC with the new mapping.
  6. Press [ESC] to leave LEARN.

A button is learned the same way: press it and release it. It sends its highest value when pressed and its lowest when released. Inv turns that round. Notes are not learned. The notes that play each track are set in "MAP EDITOR" in chapter 10.

Values that belong to no track

Every value the page lets you edit can be learned. That includes the four master effects on the Mix page (Rhythm Echo, Gate Box, Master EQ and Dynamix, eight values each), the tempo, in the Pattern tab the SWG and ACC values of the playing pattern and, on the Kit tab, the LFO page of the selected track: the two shapes SHP1 and SHP2, UPDTE and the LFO's target, a track and one of its parameters. Click one in LEARN, as you would a sound value. On the Control page they have a column of their own, FX, at the right of the matrix. To add one without learning, choose Global values in the first list under Add, then the value in the second.

A learned CC moves the value as a click on the page does: the machine, the page and Undo agree. A turn of a knob is one undo step. The CC spreads over the value's own range, so a knob covers 30 to 300 on the tempo, 50 to 80 on the swing and 0 to 15 on the accent. A relative knob steps by one.

A choice is learned the same way: the CC spreads over the entries of the list. A knob turned through its travel steps an LFO through its six shapes, or through FREE, TRIG and HOLD. The LFO's speed, depth and shape mix are sound values of the track and are learned as before.

You cannot learn names, or a machine, a mute group or an output.

Add a mapping without learning

Select a row of the matrix. Under Add choose a track and a parameter, then click Add target. The same row can move several targets. A knob row listens on any channel. A CC learned from a controller listens on the channel it came on, and its row says which. The stepper on a knob row changes the CC that knob sends. Its targets follow in the same edit.

Knob 1 to 8 in a DAW

The plug-in has eight host parameters, Knob 1 to Knob 8, after the tracks' parameters. Each is one knob row. Map one to a Rack macro or a control surface such as Push 2, or draw its automation: it moves the row's targets as the knob's CC would. A CC on a knob row moves the host parameter too, so the DAW can learn it from a turn and record it. The value of a knob is not saved with the project. Its targets are.

When a mapping hides the machine's own CC

The machine answers many CCs on the four channels from its base channel. A mapping on the same channel and CC wins: the machine no longer hears that CC. The inspector says so under the mapping, for example: Overrides the machine's CC 21 on channel 1: T1 DEC. Remove the mapping and the machine's CC works again. A mapping on a channel the machine does not use hides nothing.

The count and what was left out

The line under the matrix header counts the mappings against the most a project holds, 128. At 128 Add target is off until you remove one. When a project opens with mappings that could not be kept, for example a track that no longer exists, a message says how many, and the Control page lists each reason under the matrix header.

With the HW MIDI engine

With the HW MIDI engine the plug-in's MIDI in is the machine's own MIDI out, so there is nothing to learn from. The Control page says so under the matrix header, LEARN stays off, and the mappings are kept for when you choose the emulator again.

THE CPU METER AND THE SPEED-UPS

The machine has no such function. A meter after the version in the top bar shows how much of the audio time the emulation takes. Click the meter for its details: the average, the worst block, the machine's speed and the speed-ups. The speed-ups are switched in the Developer menu.

  1. Look at the meter after the version in the top bar. It reads a share of the audio time.
  2. Press [SPACE]. While the machine plays, the meter moves.
  3. Click the meter. Its details open under it: the average, the worst block, the machine's speed, the rate and block size, and the speed-ups.
  4. The details follow the meter while they are open. Press [ESC] to close them.
  5. Open Developer and choose Speed-ups. The tick turns, and the machine runs with the speed-ups off. Choose it again to turn them on.
  6. In the details of the meter, Speed-ups (each)… lists every lever. Switch one off and on again.

THE OUTPUT METER AND VOLUME

Two bars and a volume line sit at the right end of the LCD. The bars show the left and right peaks of the output. The line sets the volume of the editor.

The output meter and volume at the end of the LCD
  1. Drag the meter down. The volume falls, and the readout under the LCD says so while it changes. The readout goes a moment after.
  2. Scroll up one notch to raise it by 1 dB.
  3. Drag it to the foot to turn the output off.
  4. Double-click the meter to go back to 0 dB.
  5. Press [SPACE]. The bars follow the sound.

THE EDITOR'S MENU

A right-click menu holds the zoom, the updates and the developer switches.

  1. Right-click an empty part of the header, or the track rail. The menu opens with the editor's name and version.
  2. Focus Zoom and press the right arrow key. Its steps open.
  3. Click a step. The menu closes and the page zooms. Open the menu again: Zoom names the new step.
  4. Click Updates, then Check Daily. Open Updates again: the tick has turned.
  5. Press [ESC] to close a submenu, and [ESC] again to close the menu.

THE KEYBOARD VIEW

The keyboard view draws the computer keyboard with the words of each key and a search.

  1. Press [?], or click ? in the top bar. The keyboard view opens.
  2. Click the [⌥] / [FN] layer to see the keys of that layer.
  3. Click a key on the drawn keyboard. Its job is written in words.
  4. Type "undo" in the search. The key [⌘] [Z] is marked and the list keeps the undo keys.
  5. Press [ESC] to close it.

THE COMPUTER KEYBOARD PLAYS

The two rows of letter keys play the selected track, on any workspace.

  1. Pick a track on the rail.
  2. Press [A]. The track plays.

TAP TEMPO

Tap a key to the beat to set the tempo.

  1. Press [B] or [T] five times in time. Or press [⇧] + [B], which taps on every workspace.
  2. The tempo field takes the tempo you tapped. Taps half a second apart read about 119 beats per minute.

See "TAP TEMPO" in chapter 8.

PATTERN QUEUE AND CHOOSER

Pick any of the 128 patterns from the chooser. A pattern chosen while the machine plays waits for the end of the pattern that plays.

The pattern chooser
The pattern chooser
  1. Click the pattern on the LCD. The chooser shows 8 banks of 16. A slot with no trigs says EMPTY. Every other slot gives its length and kit.
  2. Press a bank letter, or click the key of a bank. The selection moves to that bank.
  3. Click a pattern. With the machine stopped, it switches at once.
  4. Press [SPACE]. While it plays, click › on the LCD. The next pattern is queued, and it starts at the end of the one that plays.
  5. Move to a pattern with trigs and click Copy. Move to another and click Clear. Its tile says EMPTY. Click Paste. The slot has the steps and the kit link of the copy.
  6. Press [⌘] + [Z] twice to bring the slot back. Press [ESC] to close the chooser.

KIT AND SONG SLOTS

The kit library and the song slots load, copy, paste, rename and clear a slot. Each is one undo step.

The kit library
The kit library

Kit slots

  1. Click KIT on the LCD. The kit library opens.
  2. Click a slot with [⌥] held. It is selected and not loaded.
  3. Click Copy. [⌥] click another slot and click Paste. Answer Overwrite when the editor asks.
  4. Press [⌘] + [Z]. The slot is back.
  5. To rename, click Rename, type a name, press [ENTER] and answer the question.
  6. To clear, select a slot and press [DELETE]. It is cleared as the machine clears it. [⌘] + [Z] brings it back.

Song slots

  1. Click the Song tab. Click an empty song slot. It is selected, and the machine's song stays.
  2. Click Load to make the machine play that slot's song.
  3. Press [F2], type a name and press [ENTER]. The slot is named.
  4. Click Copy, select another slot and click Paste. The song is there, with no question.
  5. Drag a slot onto an empty one to copy it.
  6. Select a slot and click Save to…, type a name and press [ENTER]. The machine's song is saved there.
  7. Click Clear. The editor asks first. Answer Clear song. The slot is empty and quiet.
  8. Press [⌘] + [Z]. The song is back. Press [⌘] + [⇧] + [Z] to empty it again.