Introduction, front panel and connectors
The Machinedrum Editor runs the Elektron Machinedrum firmware (OS 1.63) behind one web page. You work on the page. It has no picture of the machine's front panel and no LCD with menus to step through: every function is a control on the page. The firmware does the work underneath, so the sound and the sequencer are the machine's.
This chapter maps the machine's front panel and rear connectors to the page. Later chapters follow the manual's order and say how to do each job.
FRONT PANEL #
MD manual pp.4, 5
The page has three parts. The top bar holds the workspace tabs, the LCD and the Undo, Redo and GLOBAL keys. The track rail runs down the left side. The workspace fills the rest.
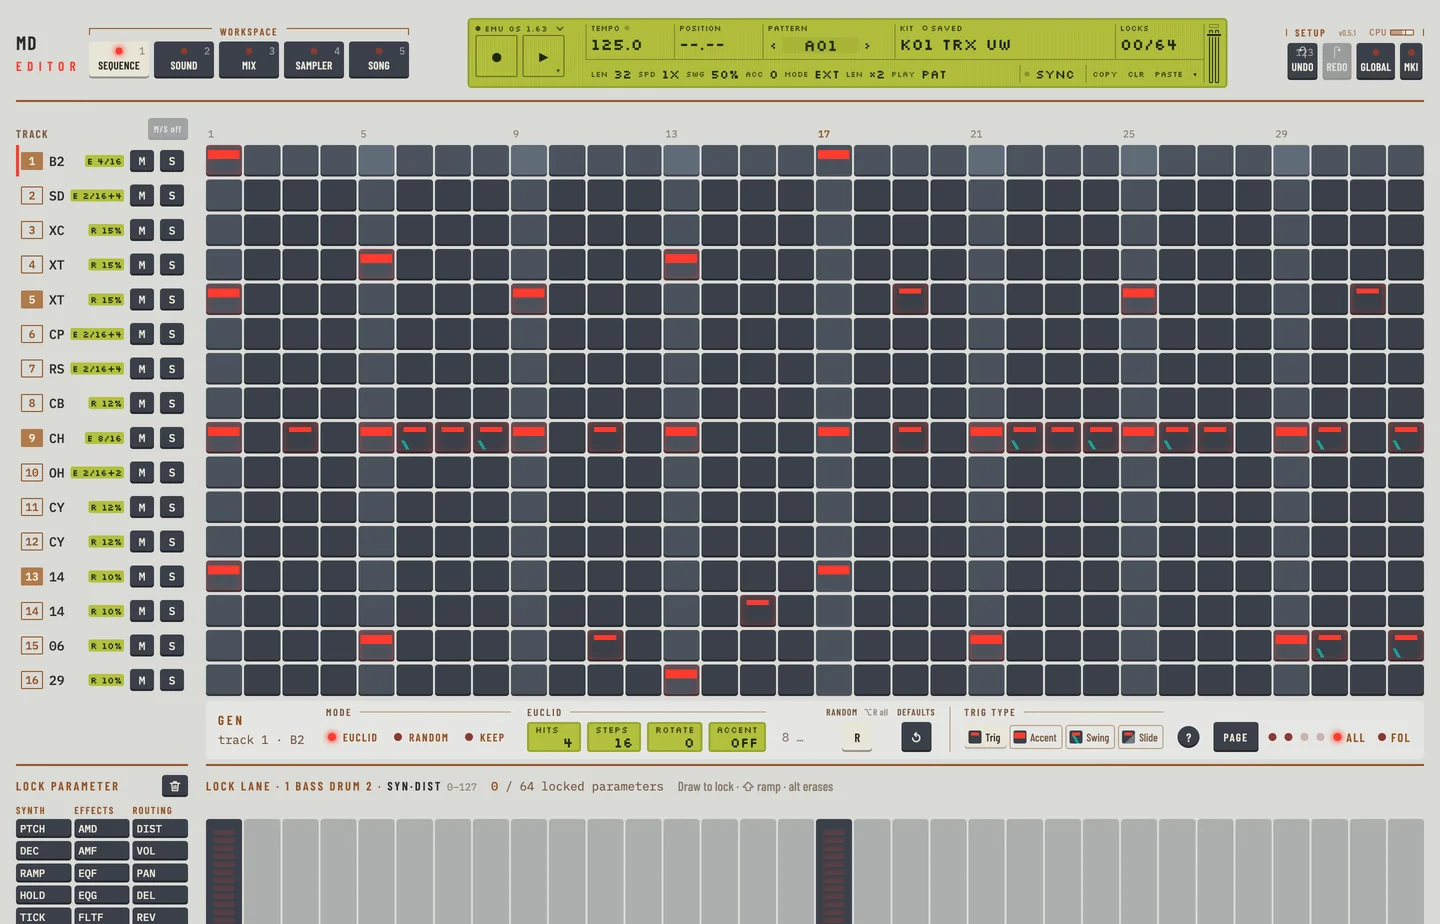
The workspaces
The machine has pages that you reach with keys. The editor has workspaces that you reach with the tabs in the top bar.
| Workspace | Key | What it holds |
|---|---|---|
| Pattern | [1] | the step grid, the lock lane and the generators |
| Kit | [2] | the selected track's machine, effects, routing and LFO |
| Mix | [3] | one strip a track, and the four master effects |
| Sampler | [4] | the sample slots and the RAM machines |
| Song | [5] | the song arrangement |
The PLATE entry in the engine menu (the EMU OS entry in the LCD) switches the page between the silver MKI look and the black MKII look. It changes the colours only.
From the front panel to the page
| On the machine | In the editor |
|---|---|
| Master volume knob | the volume of your DAW or system |
| SOUND SELECTION wheel and LEDs | the track rail |
| TRIG keys 1 to 16 | the steps of the grid, and the piano keys |
| SYNTHESIS, EFFECTS and ROUTING key | groups on the Kit workspace, all in one view |
| DATA ENTRY knobs A to H | the value boxes |
| SCALE SETUP key and page LEDs | the Page key and four LEDs on the Pattern workspace |
| RECORD, PLAY, STOP | REC and the Play and Stop key in the LCD |
| TEMPO key | the Tempo field of the LCD |
| KIT key | the Kit field of the LCD |
| BANK key and the A to H keys | the pattern chooser |
| FUNCTION key | the [⌥] key |
| CLASSIC/EXTENDED key | MODE on the Pattern workspace's second LCD line |
| PATTERN/SONG key | PLAY on the LCD's second line |
| ENTER/YES, EXIT/NO and the arrow keys | not needed: every menu is a control, and [ESC] closes a window |
On the machine you move through menus with ENTER/YES, EXIT/NO and the arrow keys. In the editor you click the control. The firmware still takes those keys, but only a real machine's panel (the hardware MIDI engine) can send them.
Select a track
The track rail lists the 16 tracks. Each entry shows the track number, the machine on it, and an M and an S key for mute and solo.
- Click a track in the rail to select it.
- Press [↑] or [↓] to select the track before or after.
On the machine you hold FUNCTION and press a TRIG key to select a track. In the editor a plain click selects it.
On the Mix workspace a light on each strip flashes when its track plays a trig. This is the editor's version of the SOUND SELECTION LEDs.
Classic and extended mode
- Open the Pattern workspace.
- Click MODE on the LCD's second line.
- The field reads CLASSIC or EXT. Each click switches.
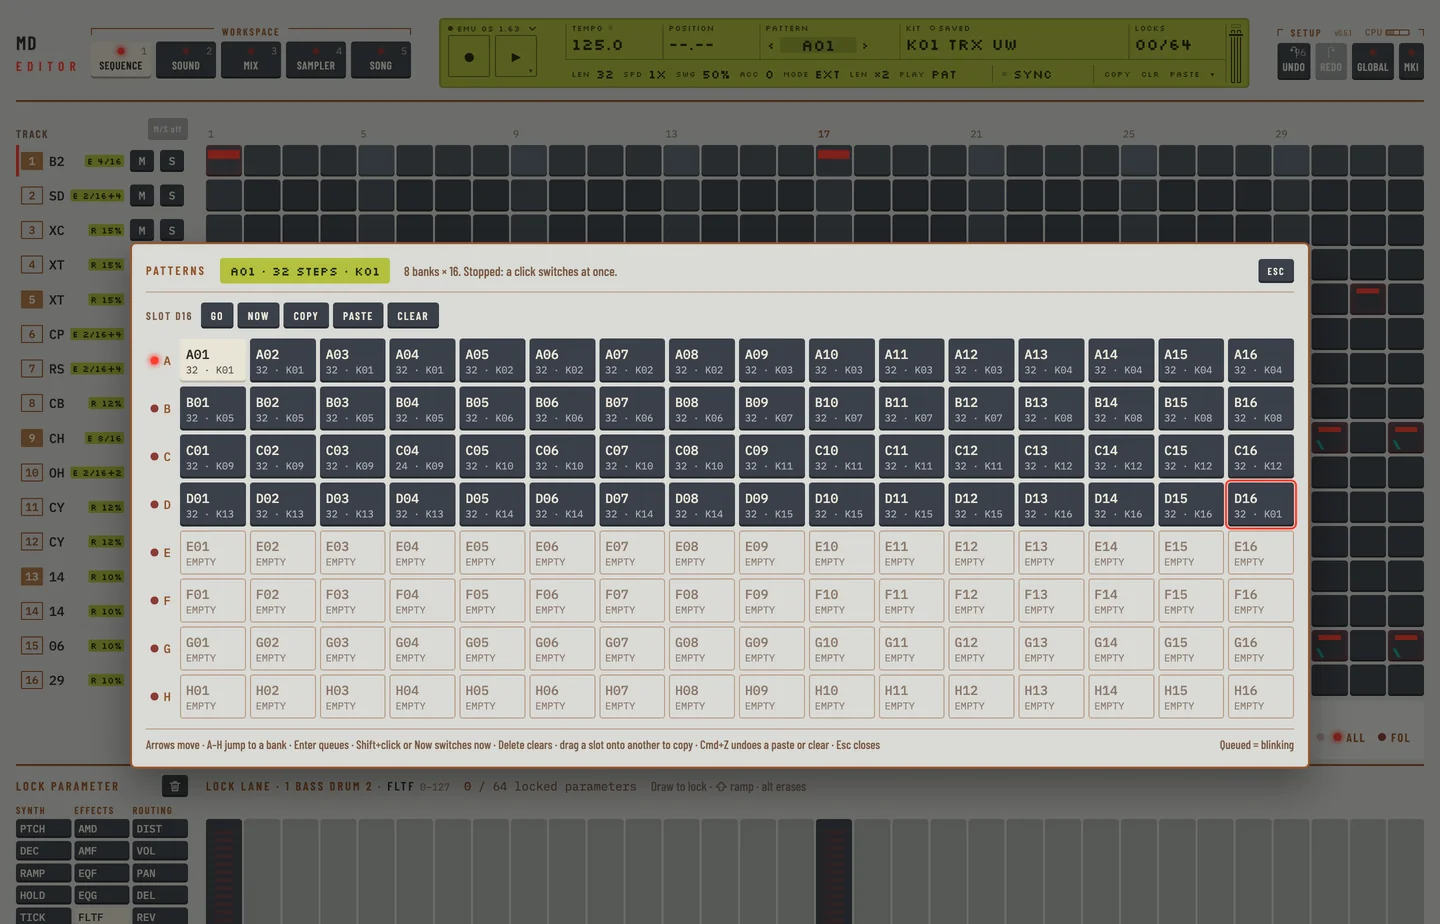
In CLASSIC mode a pattern holds trigs only. In EXTENDED mode a pattern also holds its kit link and its parameter locks, and locks play only in EXTENDED mode.
In CLASSIC mode the lock lane says that its locks are muted. The locks are not lost: they come back when you switch to EXTENDED. In CLASSIC the pattern chooser shows no kit under any pattern.
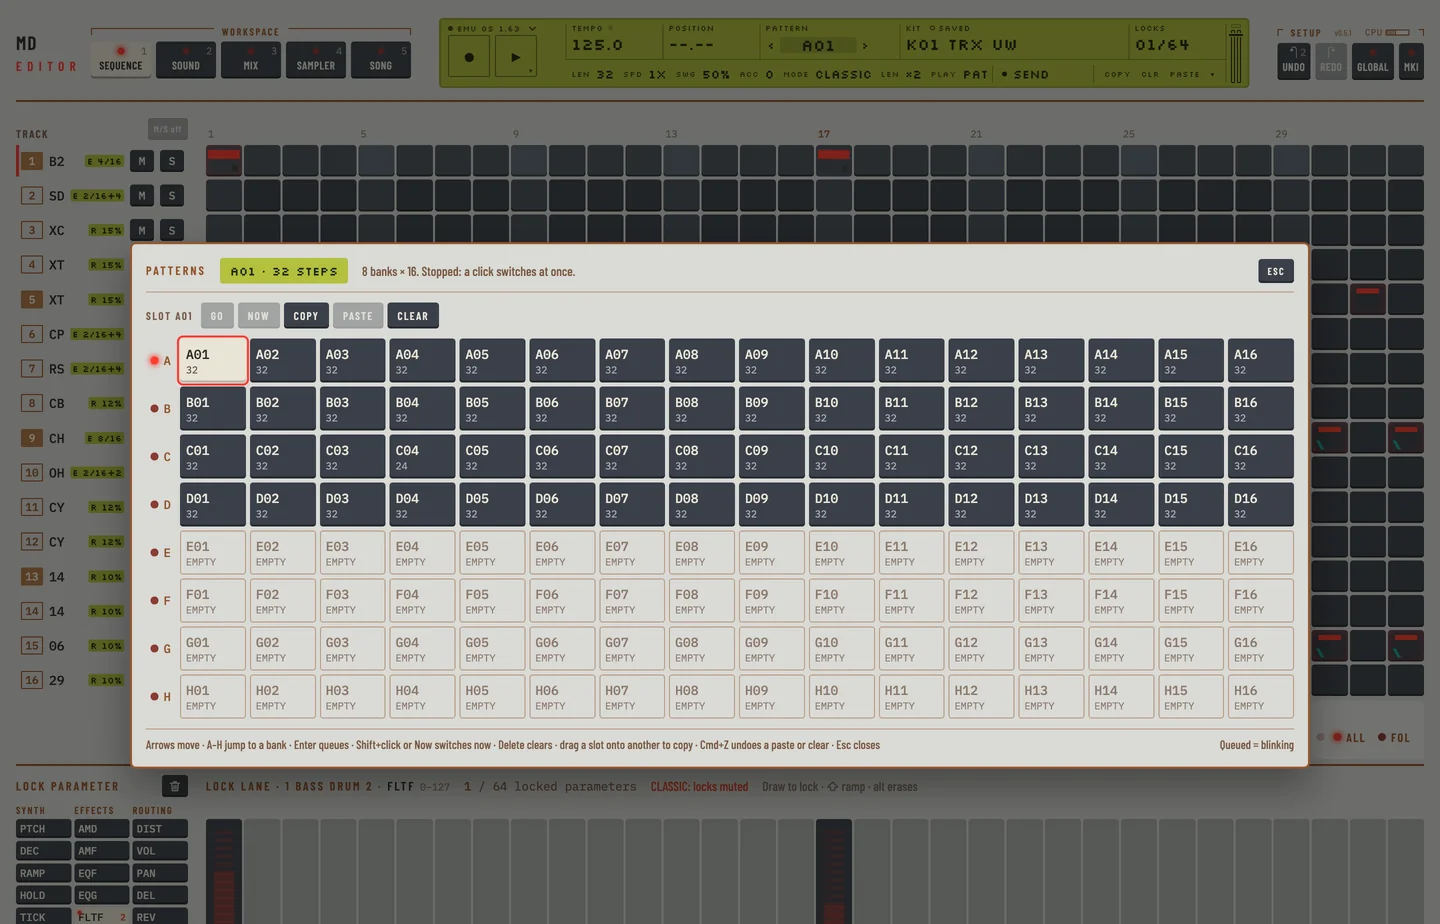
- Click the pattern name in the LCD to open the pattern chooser. In EXTENDED it shows each pattern's kit, in CLASSIC it does not.
- Press [ESC] to close it.
The FUNCTION key
The machine's FUNCTION key is the [⌥] key of the computer. Hold it while you press a key or drag a control, and the action reaches every track, or a wider range.
- [⌥] and drag a value: move the same knob on every track.
- [⌥] + [R]: randomise every track.
- [⌥] + [M]: mute every track.
- [⌥] + [SPACE]: live recording.
- [⌥] + [DELETE] or [⌥] + [BACKSPACE]: clear the whole pattern.
While you hold [⌥], the keys it changes say what they do then. Clr becomes All.
Not in the editor yet: The editor has no single key for every FUNCTION combination of the machine. Each combination is a control of its own, and the chapter for its job names it.
Pattern banks
Patterns are in eight banks, A to H, of 16 patterns each.
- Click the pattern name in the LCD. The pattern chooser opens.
- Press a letter from [A–H] to jump to that bank, or click a bank key.
- Click a pattern. While the machine plays, it starts the pattern when the current one ends. When it is stopped, the pattern changes at once.
- Press [ESC] to close the chooser.
Every slot shows its name and its length in steps. A slot with no trigs reads EMPTY. To copy a pattern:
- Select a pattern that has trigs and click Copy.
- Select another slot and click Paste. The slot takes the steps and the kit link of the copy.
- To empty a slot, select it and click Clear. Its tile reads EMPTY.
- Press [⌘] + [Z] to take a paste or a clear back, once for each.
The ‹ and › keys beside the pattern name step to the pattern before or after.
Level
The machine's LEVEL knob sets the overall level of the selected track. It is stored in the kit, and it cannot be locked or modulated by an LFO. In the editor it is the LEV box at the top of each strip on the Mix workspace.
- Press [3] for the Mix workspace.
- Drag the LEV box of a track up or down, or scroll the wheel over it. The kit that plays takes the new level at once.
- Double-click the box to set it back to 100.
- [⌘] + [Z] takes each change back.
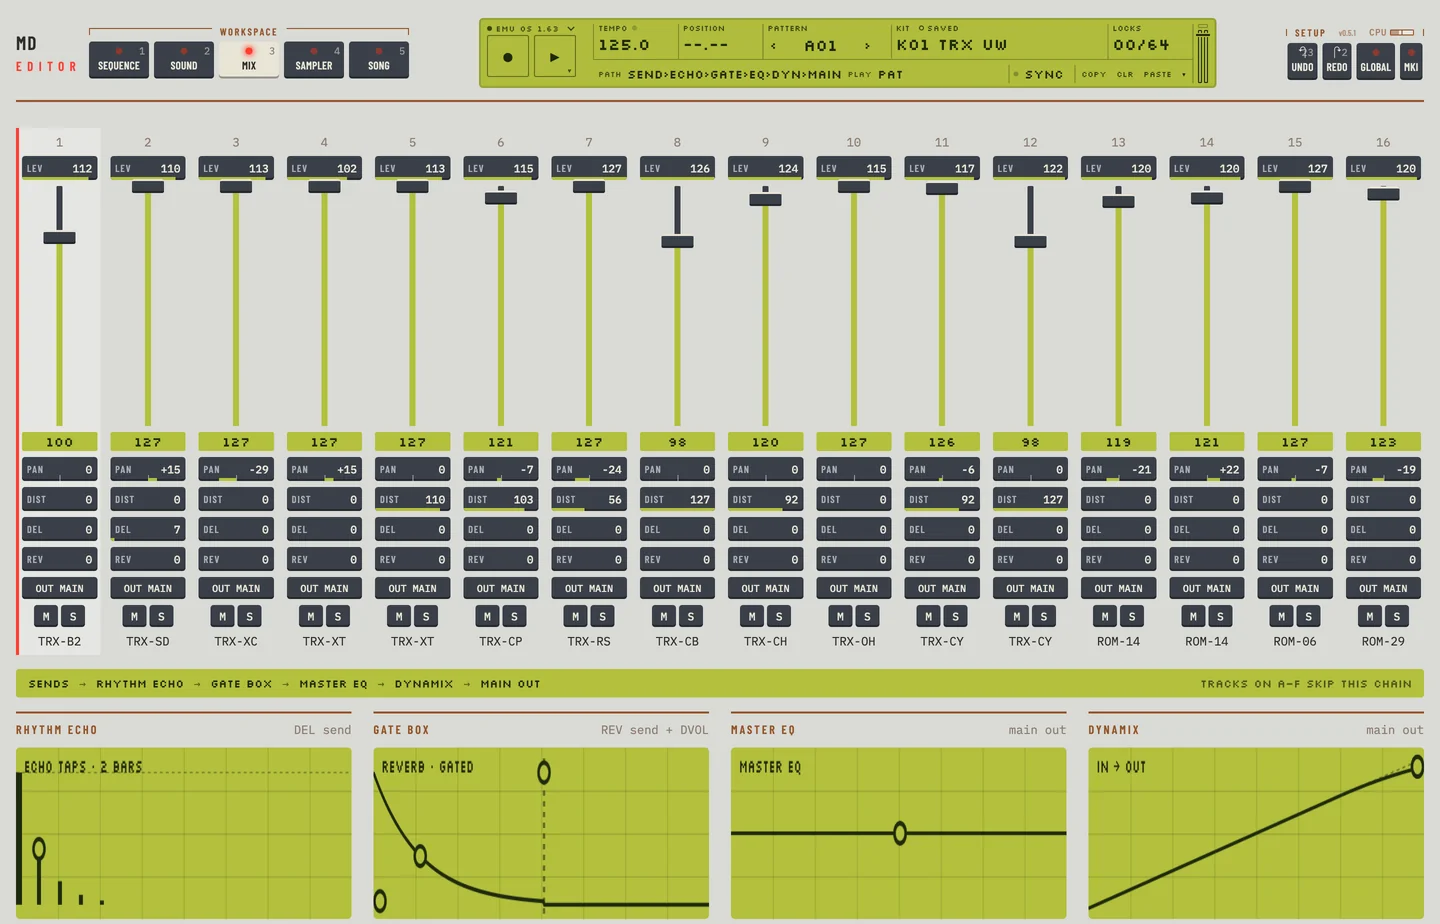
VOL under it is the track's volume on the routing page. It is a different value: VOL can be locked, LEV cannot.
Tempo
- Drag the Tempo value in the LCD up or down. Each pixel is half a BPM; hold [⇧] for a tenth of a BPM a pixel.
- Or press [T] or [B] in time with the beat. The tempo is the average of your last taps.
To set the tempo in single steps, click the Tempo value without dragging:
- A TEMPO window opens.
- Click + to go one BPM faster and - to go one BPM slower.
- Hold +10 % to play 10 % faster for as long as you hold it. The LCD says so. The tempo you set is not changed, and it returns when you let go.
- Press [ESC] to close the window.
In a DAW the machine follows the host's tempo. The Tempo field is marked and does not edit; change the tempo in the DAW, or set Tempo in to INT in GLOBAL for the machine's own clock.
Data entry
Each parameter is a value box. A box shows the name and the value.
- Drag a box up or down, or sideways, to change it.
- Hold [⇧] and drag for fine steps, a quarter as fast.
- Scroll the wheel over a box: one step a notch, ten with [⇧].
- Double-click a box to set it to 64, or to 100 for VOL.
- Hold [⌘] and click a box to type its value. A field opens over the box. Type the value and press [ENTER], or press [ESC] to leave it as it was. A box that has the focus opens the field with [ENTER] too.
On the machine you press a DATA ENTRY knob in to turn it in coarse steps. In the editor the wheel with [⇧] does the same.
The three parameter pages
The machine shows the synthesis, effects and routing parameters one page at a time. The Kit workspace shows all three at once, in groups. A small word at the right of a group's title names the machine's page that holds its knobs.
Recording and the transport
There is no record mode to switch on. The step grid is always open for editing, so the machine's RECORD key has no counterpart.
To record live, click REC or press [⌥] + [SPACE]. Click the steps of a track to play and record it, and move a value to lock it. Click REC again to stop recording and go on playing.
Press [SPACE] to start. The key shows ▶ while the machine is stopped and ■ while it plays. Press it again to stop.
On the machine a second press of [PLAY] pauses. In the editor you pause with [⇧]:
- Hold [⇧] and click the Play key, or press [⇧] + [SPACE]. The machine holds its step. The Play key blinks and <POSITION> keeps the step.
- Click the Play key, or press [⇧] + [SPACE] again. The machine goes on from the step it held.
- To end the pause instead, choose Stop in the transport menu. <POSITION> reads --.--.
The transport menu has Play or Stop, Pause or Continue, Record and Panic, each with its key. Right-click the Play key to open it. With the Play key focused, Shift+F10 or the menu key opens it too.
On the machine a double press of [STOP] silences every voice. In the editor this is Panic: press [⌘] + [.], or choose Panic in the transport menu. The editor presses the machine's [STOP] twice, and the machine stops.
Not in the editor yet: There is no key that restarts the pattern from the top while it plays. Stop, then play.
Pattern or song
The LCD's second line has a PLAY field on every workspace. It reads PAT in pattern mode and SONG in song mode, and each click switches. On the Song workspace the PATTERN, CHAIN and SONG keys over the pattern palette set what plays. PATTERN and CHAIN keep the machine in pattern mode: in PATTERN a click on a pad queues that pattern, in CHAIN the pads number the chain. SONG puts the machine in song mode, and the pads add rows to the arrangement. The field shows what the machine reports.
Kits and songs
Click the Kit field of the LCD to open the kit library. Chapter 3 describes it. The ‹ and › keys beside the kit name load the previous and the next kit, and go round from K64 to K01. If the kit has unsaved edits, the editor asks first.
The machine's song menu is the Songs column of the Song workspace: load, save, save to another slot with a name, copy, paste, clear and rename. Chapter 9 describes it.
TRIG keys
The steps of the grid are the TRIG keys. Click an empty step to draw a trig. Click a trig to select it, and it stays selected: [DELETE] or [BACKSPACE] removes it and the arrows move the selection. Double-click a trig to remove it. Select more steps with ⌘-click, then click the small ⋯ on a selected step for its menu, or right-click the step.
To play a first beat:
- Open the Pattern workspace and select a track in the rail.
- Click four empty steps of that track. Each lights as a trig.
- Press [SPACE]. The pattern plays with your trigs.
- Press the same key to stop.
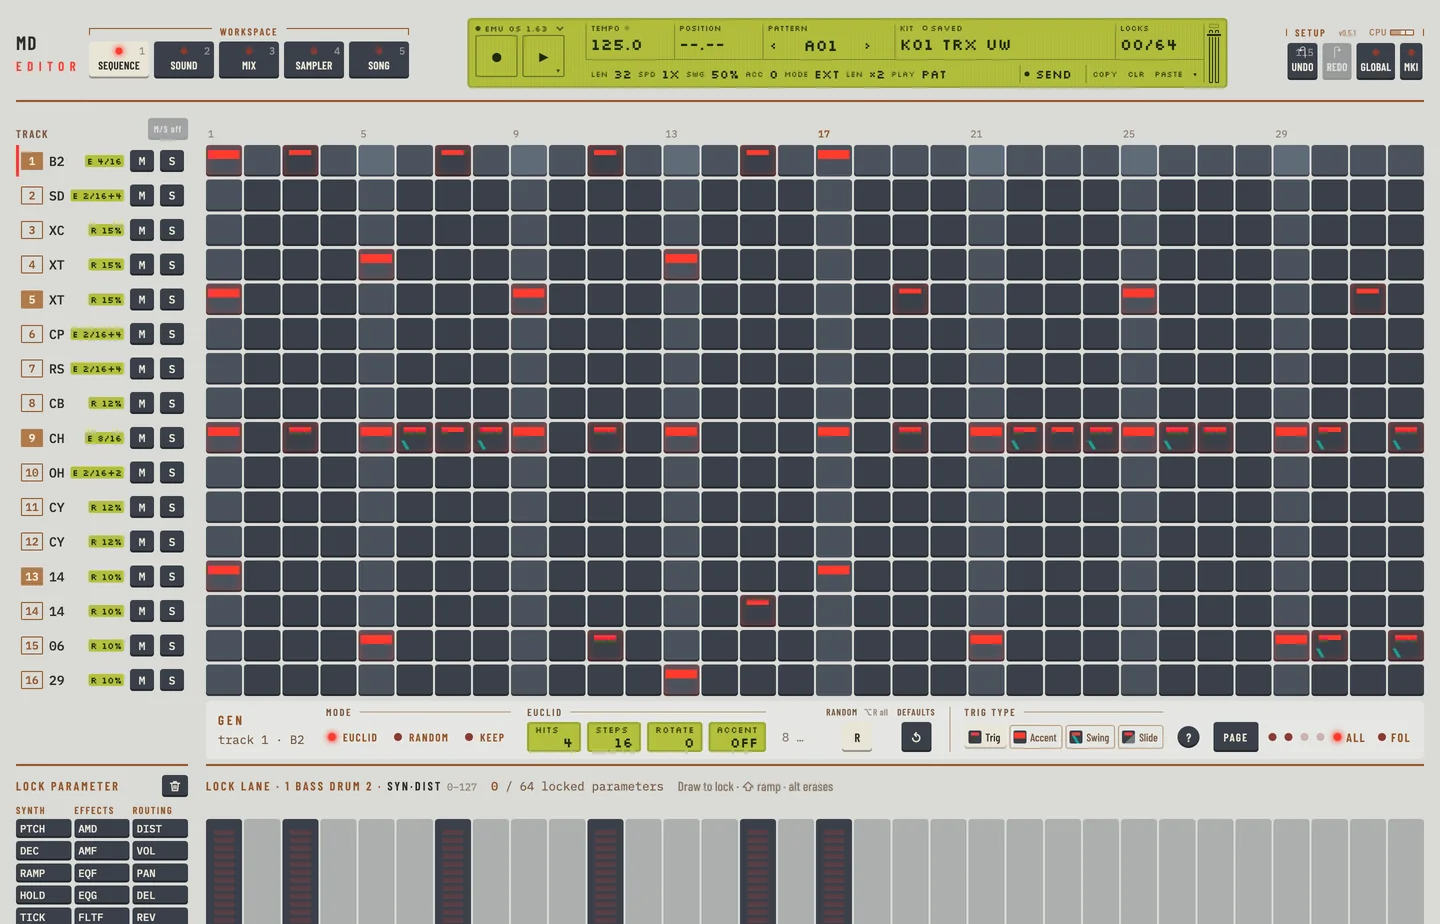
The piano keys play the selected track from any workspace: [A S D F G H J K L] play the white keys C to D. [Z] or [X] moves the octave, two up or down (the PTCH range of the machines) and [C] or [V] sets the velocity.
Pattern pages
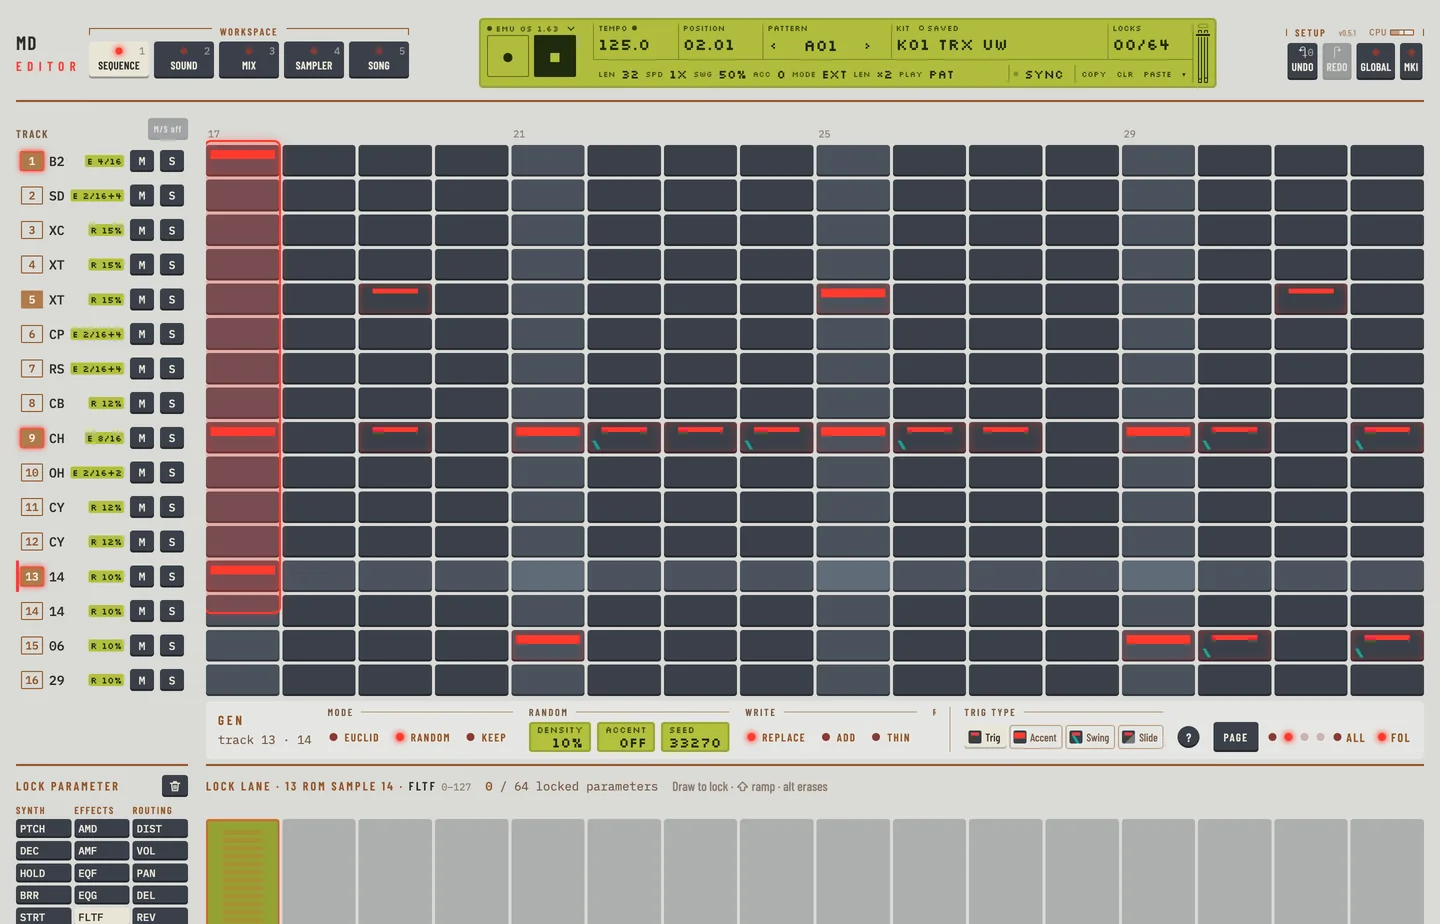
A pattern of 64 steps has four pages of 16.
- Click Page to show the next page. Hold [⇧] and click to show the previous one. The left and right square bracket keys do the same.
- Four LEDs beside the key show the pages the pattern has. The page that plays is lit. Click an LED to show that page.
- If the pattern has one page, click ×2 on the LCD to double its length. The LEDs then show the pages of the new length.
- All shows every step at once. It is on when the editor starts.
- Fol makes the page follow the play position. With Fol on and the machine playing, the lit LED moves to the second page when the position passes step 16.
REAR CONNECTORS #
MD manual pp.6, 7
The editor has no power switch or power input. It runs as a plug-in in your DAW, or as a standalone program. It has no rack mount, no battery and nothing to care for.
MIDI
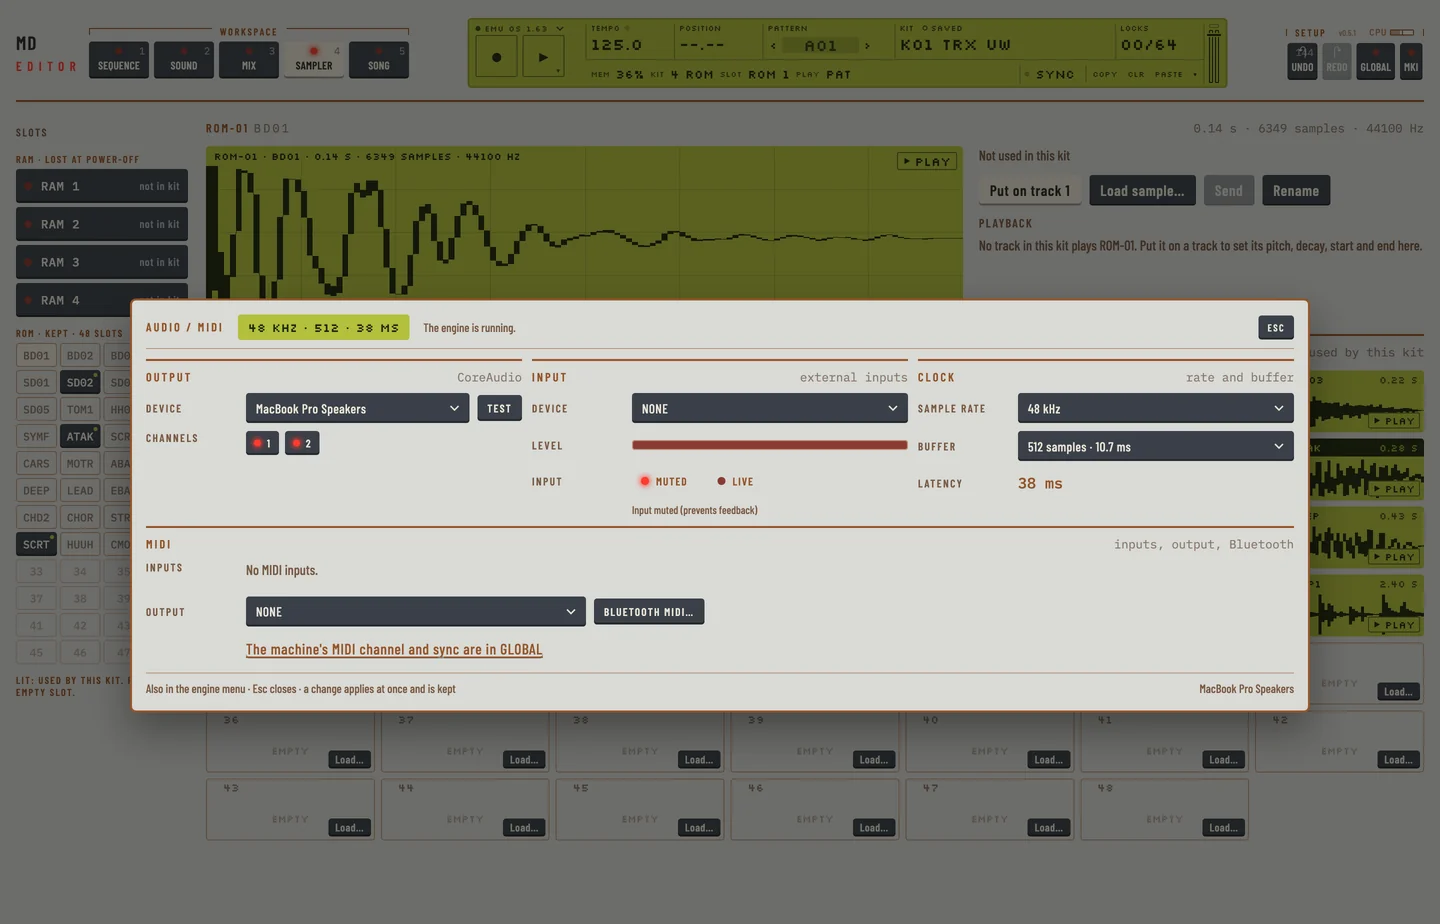
In a DAW the plug-in takes MIDI from the host, and the AUDIO / MIDI panel only tells you that the host owns audio and MIDI. In the standalone, open the AUDIO / MIDI settings with [,]. The MIDI card lists the MIDI inputs, the output and Bluetooth devices. No MIDI input is on until you switch it on. The list follows the system: a device plugged in or out appears or goes at once, and an input or output you had chosen comes back when its device returns. The Monitor row counts what came in and went out. A red line under the output warns when a virtual bus, such as an IAC bus, is both an input and the output: switch the input off or send to another bus. See "MIDI and sync" in the installation guide.
The machine's own MIDI out reaches your DAW through the plug-in's MIDI output, and the standalone's MIDI output. It carries notes, controllers, program changes, pitch bend, pressure, clock, start, stop and continue. It never carries SysEx.
The machine's MIDI channels, sync and the rest of its global settings are on the GLOBAL panel. Click GLOBAL in the top bar, or choose GLOBAL… in the engine menu of the LCD.
Not in the editor yet: MIDI Thru has no meaning in the editor.
Audio inputs A and B
The Input card of the AUDIO / MIDI settings sets where the external audio comes from.
- Choose a device under Device.
- Watch Level for the signal.
- Click LIVE to pass the input to the machine.
The input starts MUTED, so that a microphone and speakers cannot feed back. Keep speakers away from a microphone when it is live.
A track plays the input when its machine is one of the External input machines (INP). Choose one with the machine key on the Kit workspace.
Outputs
The machine has a main output and six individual outputs, A to F. Each track goes to one of them.
- Open the Mix workspace.
- Click OUT at the foot of a track's strip. The key reads OUT MAIN, OUT A, and on to OUT F, and each click goes to the next.
A track on A to F skips the master effects. The Routing card of the GLOBAL panel has the same 16 keys.
In a DAW the individual outputs appear as output buses of the plug-in, as far as the host offers them. The editor has no headphone output; use your DAW's or your system's.