Beyond the hardware
The editor runs the real Machinedrum operating system and adds a few things around it. This chapter describes them.
MACHINE MEMORY #
A Machinedrum keeps what you save when you switch it off: its kits, patterns, songs, globals and samples stay in its memory. The editor does the same. When you save on the machine, the editor writes what you saved to a file on your computer, slot by slot. A new session starts from factory memory with the saved slots put back in.
Only a save writes the file: a kit, pattern, song or global stored into its slot. That is SAVE KIT, a change to a pattern (the machine stores pattern edits as you make them), SAVE SONG, a change to a global, a SysEx dump the machine takes in. A sample you load in the Sampler is a save too, written once the machine has stored it. It makes no difference whether you save in the editor or on the machine's own keys. The editor writes the file a second or two after the save. Turning a knob, automation from a DAW and changes to the kit that plays that you have not saved write nothing, and neither does playing. A tempo change is saved with its global, as on the machine; in a DAW, where the machine follows the DAW's tempo, the tempo is never saved.
A new session is a new plug-in in a DAW project, a new DAW project, or a start of the standalone editor. It has every slot you saved, wherever you saved it. The standalone editor also keeps the kit that played when you quit it, with its unsaved changes.
Start from factory memory
- Choose RESET MACHINE… in the engine menu, the drop-down at the left of the LCD.
- Click Start from factory memory…. The editor asks a second time. Cancel leaves the saved memory as it is.
- Click Start from factory memory. The machine restarts with its factory memory, as on a new install, and the saved memory file is deleted. This takes a few seconds.
New sessions now start from factory memory until you save again. The reset has no undo: click Export SysEx… in the question first to keep a way back.
Turn it off
Choose KEEP MEMORY: ON in the engine menu. It reads KEEP MEMORY: OFF, and new sessions start from factory memory. The editor no longer writes the file. The file stays, so when you turn it on again, new sessions start with the memory you saved before.
Two editors at once
Two Machinedrum editors open at the same time, in one DAW project or in two, share the same file. Each writes the slots it saves and leaves the others. When two editors save the same slot, the last save wins.
When the file cannot be used
The file is written in one step, so a crash leaves the old memory or the new one. If the file is damaged, the machine starts from factory memory and the editor says so. It keeps the file beside the new one as machine-memory.unusable with the date and time in its name, and your next save writes a new memory file. If the file was written by a newer editor, the editor leaves it as it is and saves nothing over it. It says so; move the file away to save again.
If the editor cannot write the file, because the disk is full or the folder is read only, it says so and keeps the old file. It tries again at your next save and when it closes. Your saves stay in the session. The standalone editor starts with them next time, not with the old file, and writes them then.
The file is machine-memory.bin in the memory folder of the editor's data folder: Documents/Gearmulator Preview/Machinedrum/memory. It holds the slots you saved and the samples you loaded, nothing else. Samples saved with another ROM are kept in a file of their own when you save a sample with this one. It holds no firmware.
FACTORY SONGS PLAY #
The songs of factory memory are in the editor, and they play. The arrangement follows what the machine plays. See "LOAD SONG" in chapter 9.
- Click the Song tab.
- Click a slot that holds a song, such as UW DEMO, and click Load.
- Click SONG over the pattern palette. The machine is in song mode.
- Press [SPACE]. The step moves, and the song goes on from row to row. The output is not silent.
- Press [SPACE] again. The song stops.
FACTORY PATTERNS PLAY #
The patterns of factory memory are in the editor, and they play. See "PATTERN QUEUE AND CHOOSER" below.
- Click the pattern on the LCD. The chooser opens.
- Click a pattern that holds trigs. The kit of the pattern loads with it.
- Press [SPACE]. The step moves through the pattern and the output is not silent.
- Press [SPACE] again, and choose another pattern the same way.
WHAT YOU DRAW PLAYS #
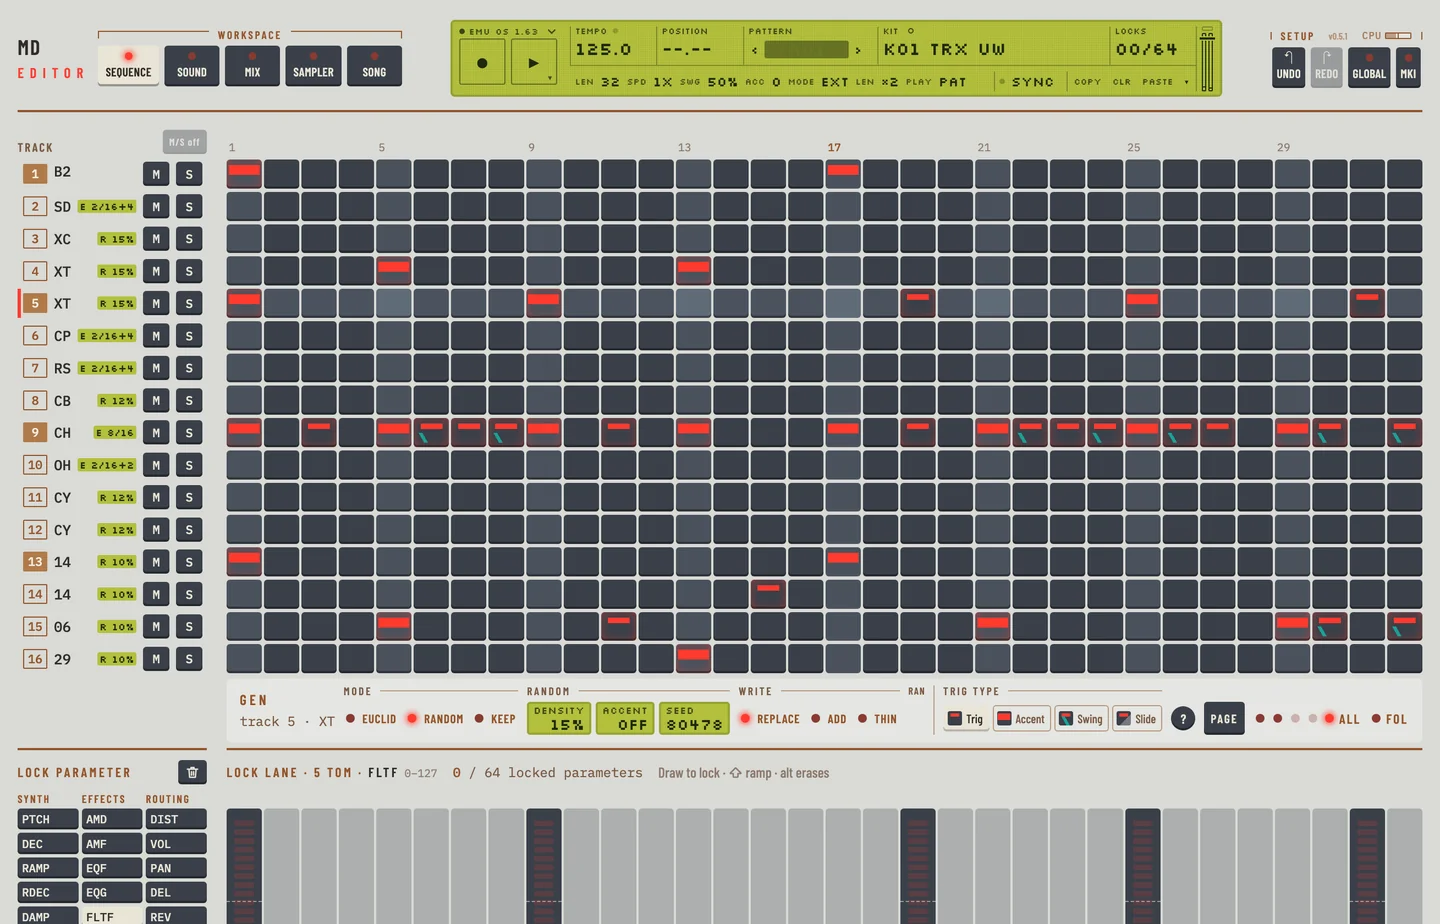
What you draw in the grid is what the machine plays. Four trigs drawn in an empty pattern sound when you press play, a cleared pattern plays silence, and an undo brings the trigs back.
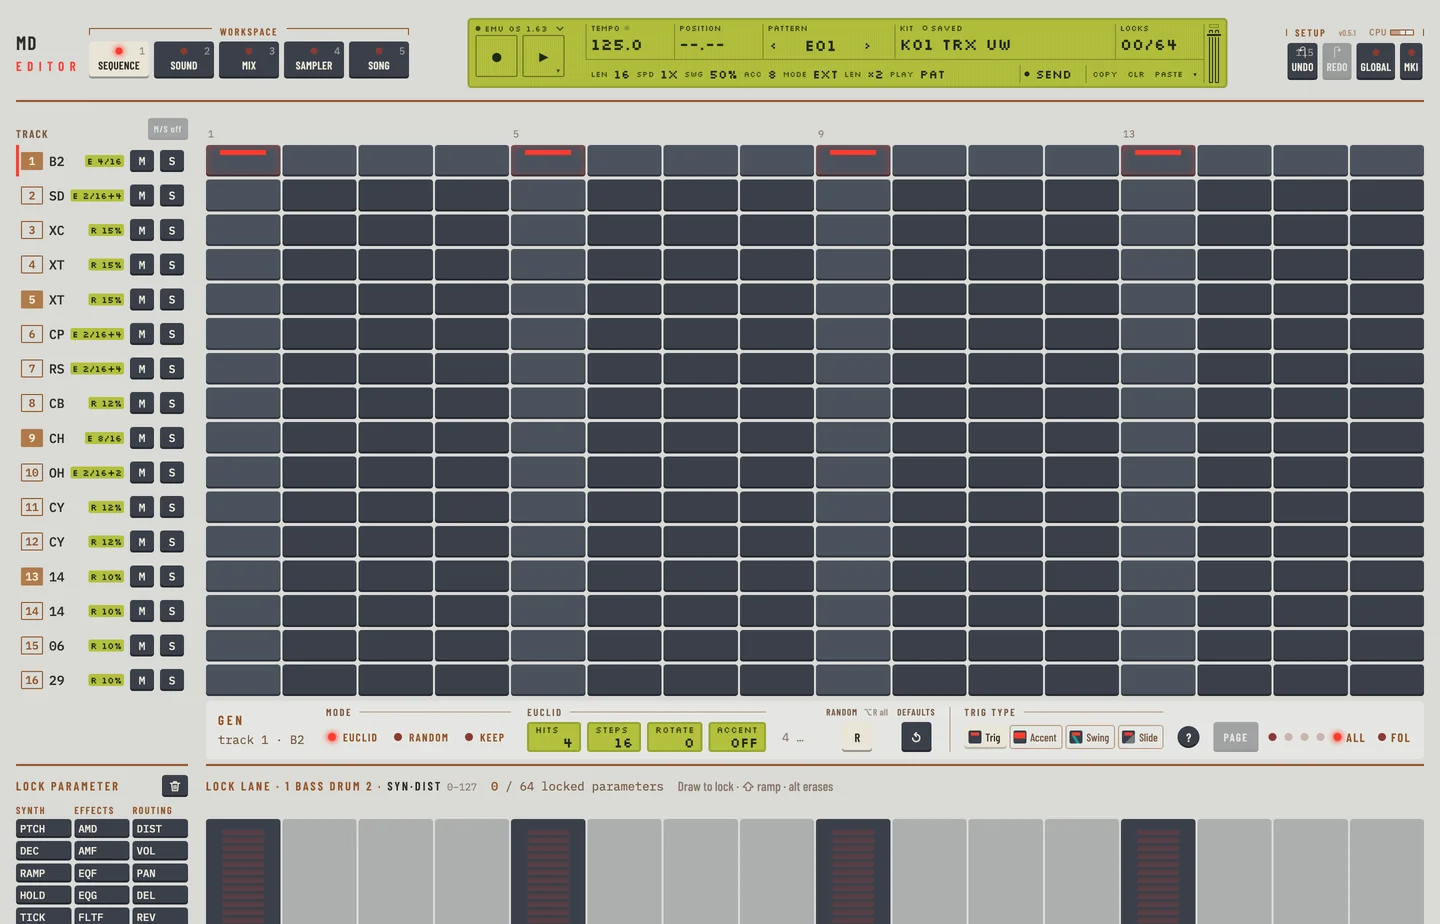
- Click the Pattern tab.
- Click the pattern on the LCD and choose a pattern with no trigs.
- Pick a track on the rail.
- Click four steps on that track. Each becomes a trig.
- Press [SPACE]. The position moves through the pattern and the track sounds.
- Press [⌥] [DELETE]. The pattern is cleared.
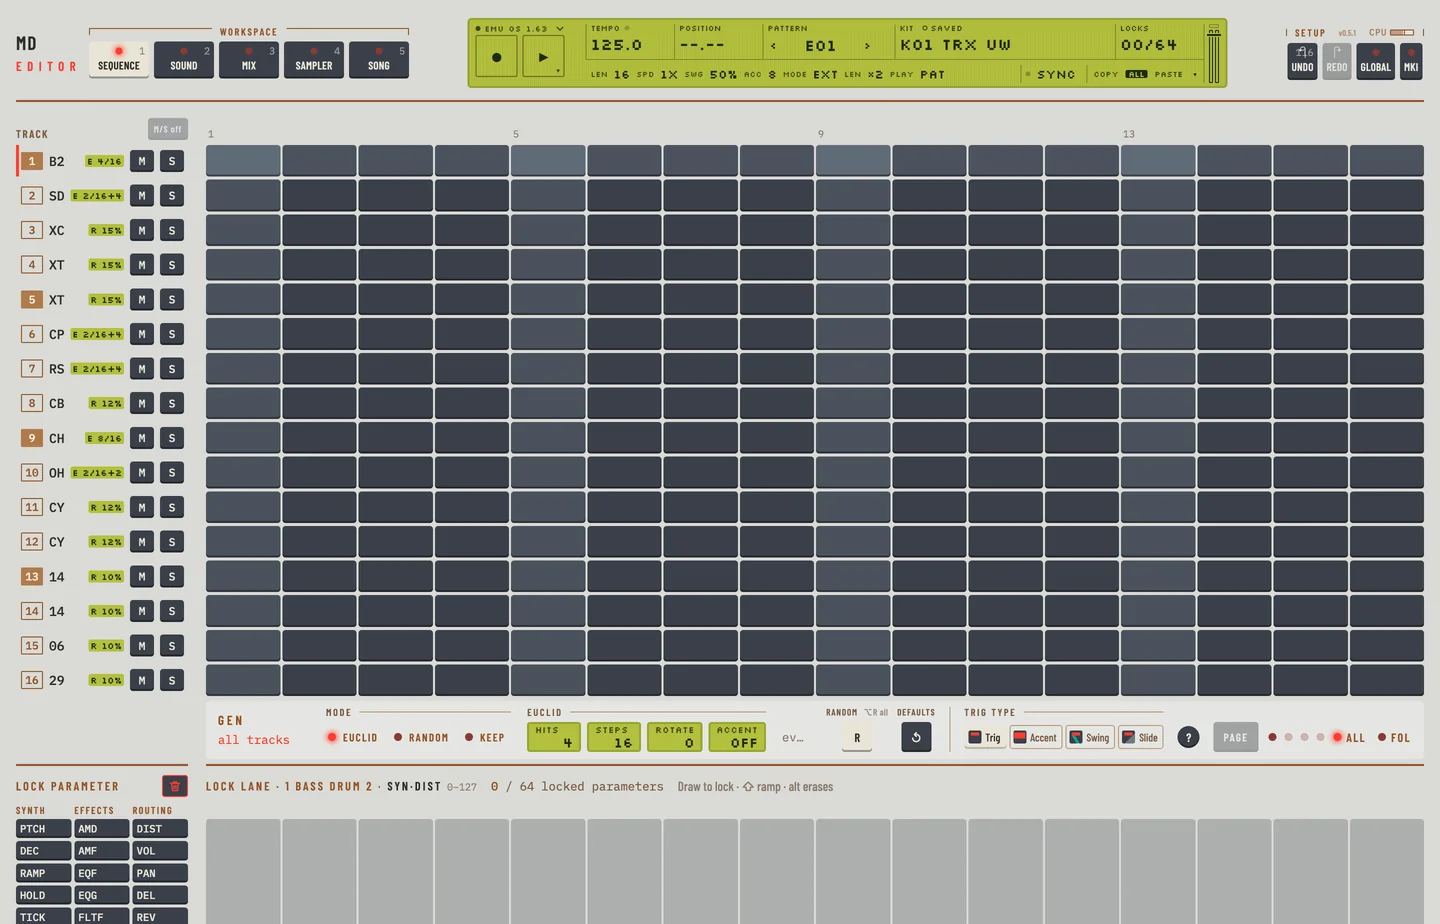
- Press [SPACE] again. The position moves and nothing sounds.
- Press [⌘] [Z] once. The four trigs are back, and they play again.
GEN ROLLS A RHYTHM #
The machine has no such function: you set every hit by hand. The GEN bar on the Pattern workspace rolls a rhythm for the selected track from a few settings. Random rolls a new one, Defaults sets the generator the track's sound suits, and Hits says how many hits it holds. The key [R] rolls too. A whole roll is one undo step.
MUTATE CHANGES A SOUND #
The machine has no such function. MUTATE in the GEN bar nudges the sound of the tracks at random. The scope chips choose what moves, and the amount says how far. A mutation is one undo step.
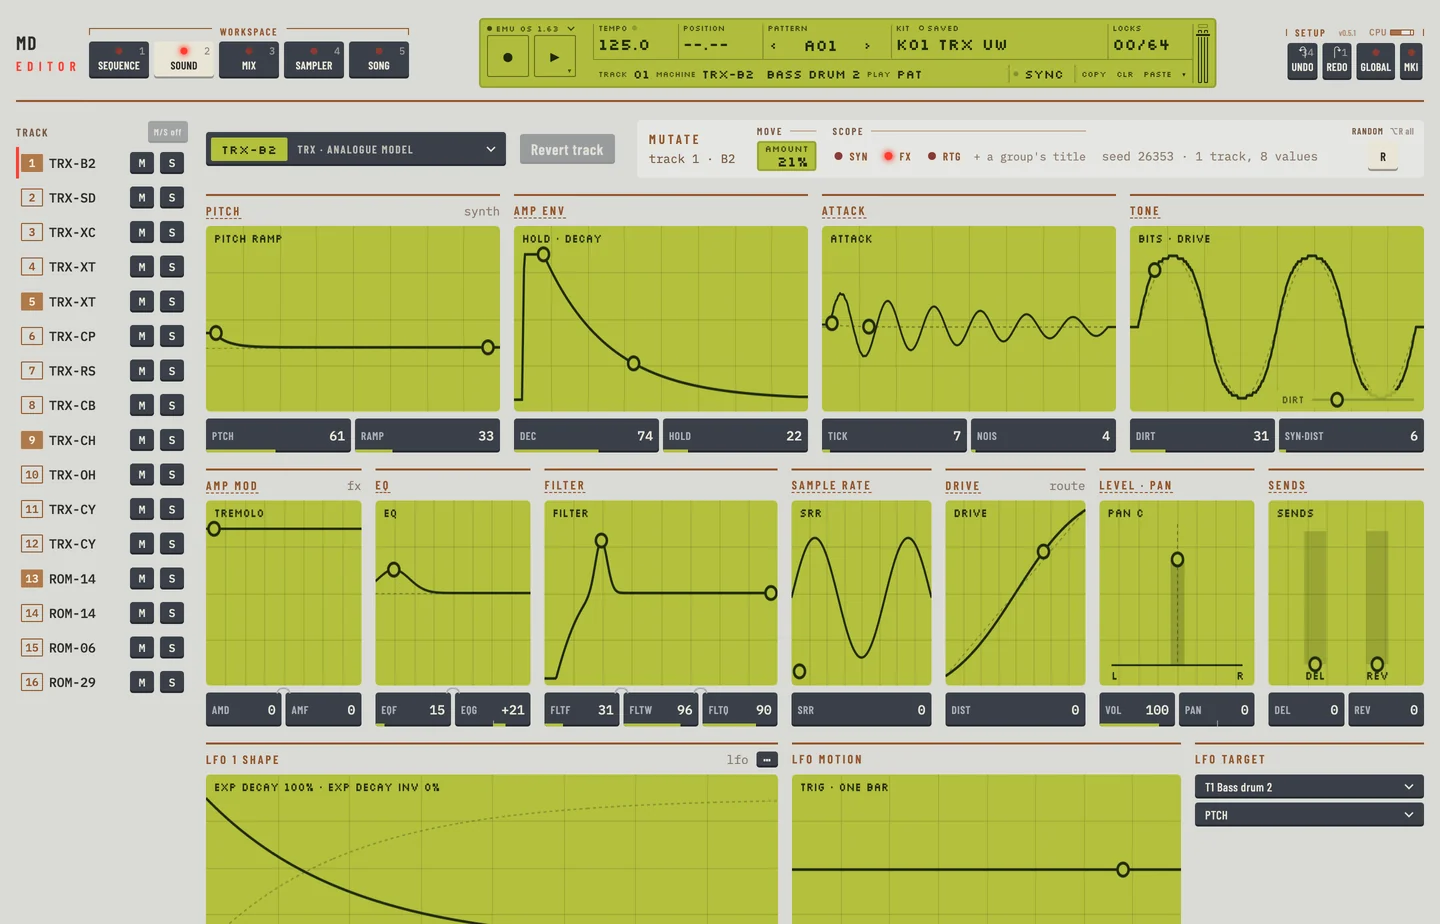
- Click the Kit tab and pick a track on the rail.
- In MUTATE, switch the FX chip on and the SYN chip off. Only the effects move.
- Raise the amount by one step.
- Click Random. The effect values of the track change and the synth values stay.
- Press [⌘] [Z]. The sound is as it was.
To mutate and roll together, pick a drum track on the Pattern workspace and click Random in the GEN bar until the rhythm changes. Then click the Kit tab and Random in MUTATE. Click UNDO once: the sound is back. Click it again: the rhythm is back.
CLEAR #
When you play with a sound, Clear puts the selected track back as the kit's slot stores it. It restores the machine, every value, the level, the LFO and the two relations of that track. The other tracks, the master effects and the kit name stay as they are. The kit library's Reload loads the whole kit again. Clear does one track.
- Click the Kit tab and pick a track on the rail.
- Turn a few knobs. Clear turns on.
- Click Clear. The values are the stored ones, and the key is off again.
- Press [⌘] + [Z]. Your edits are back, and the key is on.
Clear is off while the track is as stored. Saving the kit makes the saved sound the stored one.
SOLO #
Solo plays one track alone. The mutes you had come back when you let go.
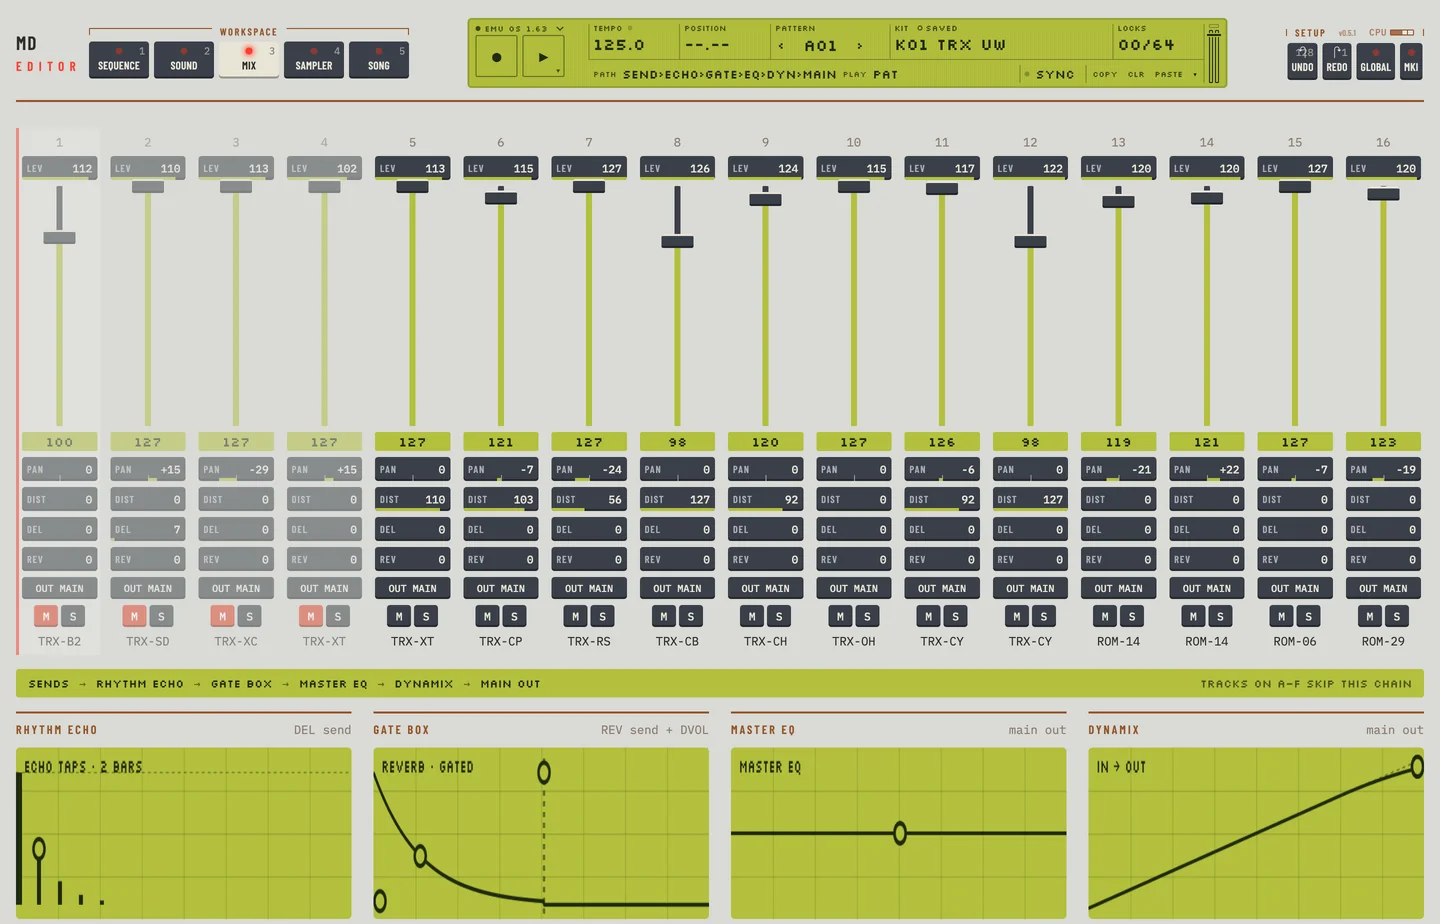
- Click the Mix tab.
- Drag across the M keys of four tracks. All four are muted.
- Click S on another track. That track plays alone.
- Click S again. The solo ends, and the four mutes are still set.
The solo is saved with the project, in the DAW and in the standalone editor. Open the project again and the solo is on, the other tracks are muted, and the mutes you had before the solo come back when you end it.
UNDO AND REDO #
The machine cannot take an edit back. In the editor every edit can be taken back and done again, across kits, patterns and songs.
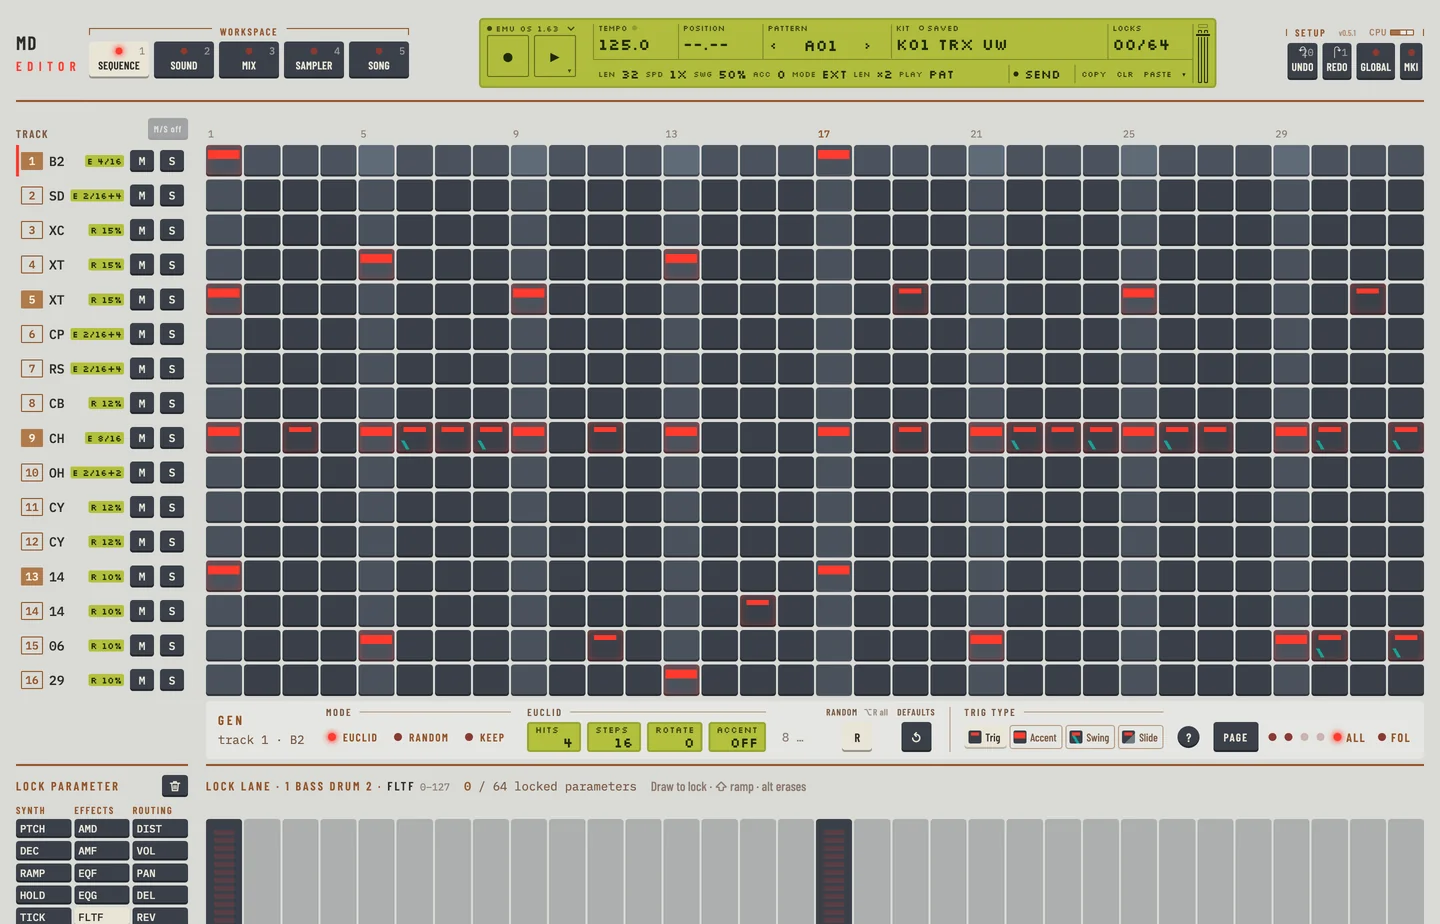
- Click an empty step on the Pattern workspace. It becomes a trig.
- Press [⌘] + [Z]. The trig goes.
- Press [⌘] + [⇧] + [Z]. The trig is back.
- Click UNDO in the top bar to take it back again, and REDO to put it back.
A drag, a paint or a run of rotates is one step. Each typed value is one step. A SysEx import and the Empty reset are one step each: Undo writes back the kits, patterns and songs they overwrote. A global is not put back (chapters 10 and 12).
TYPED VALUES #
Type a value into a knob instead of turning it.
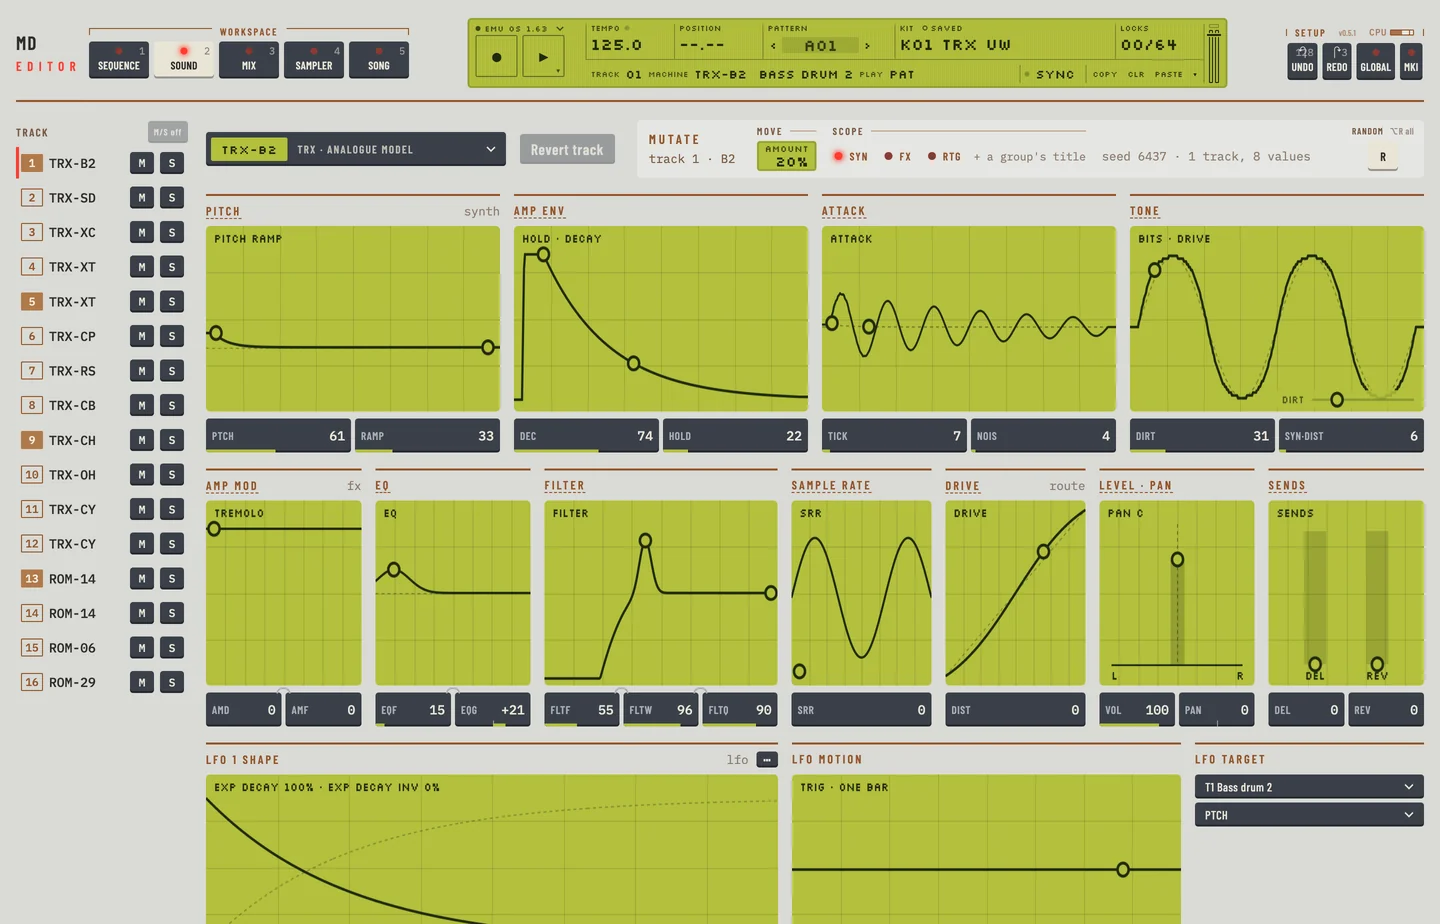
- Click the Kit tab and pick a track on the rail.
- Click a value box with [⌘] held, or focus it and press [ENTER]. A field opens over the box with the value it shows.
- Type a value and press [ENTER]. The box shows it, and the machine has it.
- A value out of range, such as 128, is refused. The field stays open and nothing is sent.
- Press [ESC] to close the field. The value is as it was.
With a value focused, the up and down arrow keys step it. Each typed value is one undo step.
SELECT, COPY AND PASTE STEPS #
Select steps with the mouse, then copy, paste and clear them, on one track or on several. [⌘] click a step to select it, [⌘] drag to select a block. Use Copy, Paste and Clr in the top bar, or [⌘] + [C] and [⌘] + [V] on the keyboard. See "NOTE COPY" in chapter 8.
- Click the Pattern tab and pick a track on the rail.
- [⌘] click a step with a trig. It is selected.
- Press [⌘] + [C], or click Copy in the top bar.
- [⌘] click an empty step of the same track.
- Press [⌘] + [V], or click Paste. The trig lands on the selected step.
- [⌘] drag from step 1 of a track to step 4 of the next. The block is selected.
- Press [⌘] + [D]. The block appears again on steps 5 to 8.
- Click Clr. The selected block is cleared and nothing else.
- Press [ESC]. The selection goes.
- Press [⌘] + [Z] three times. Both tracks are as they were.
To paste into several tracks, copy a track and click the headers of two other tracks with [⇧] held. Press [⌘] + [V]: both tracks get the steps, and one [⌘] + [Z] takes both back.
COPY, PASTE AND CLEAR WHAT #
A copy, a paste or a clear can take only part of what a step holds. The what menu on Copy, Paste and Clear chooses: trigs, locks, the sound, or the whole track. The keys [⌘] + [⇧] + [C], [⌘] + [⇧] + [V] and [⌘] + [⇧] + [BACKSPACE] open it from the keyboard.
DROP A FILE ON THE WINDOW #
Drop a SysEx file on the editor to open it in the import preview. On the Machinedrum you can drop a WAV or AIFF sample on the Sampler too. Drag and drop works on macOS only. See "GENERAL SYSEX RECEIVE" in chapter 10 and "SPECIFIC PLACE SAMPLE RECEIVE" in chapter 11.
To open a SysEx file:
- Drag the .syx file onto the editor window. The Import SysEx panel opens with the preview of the file.
- Click Cancel. The panel closes and nothing is sent.
To load a sample:
- Click the Sampler tab.
- Click an empty ROM slot.
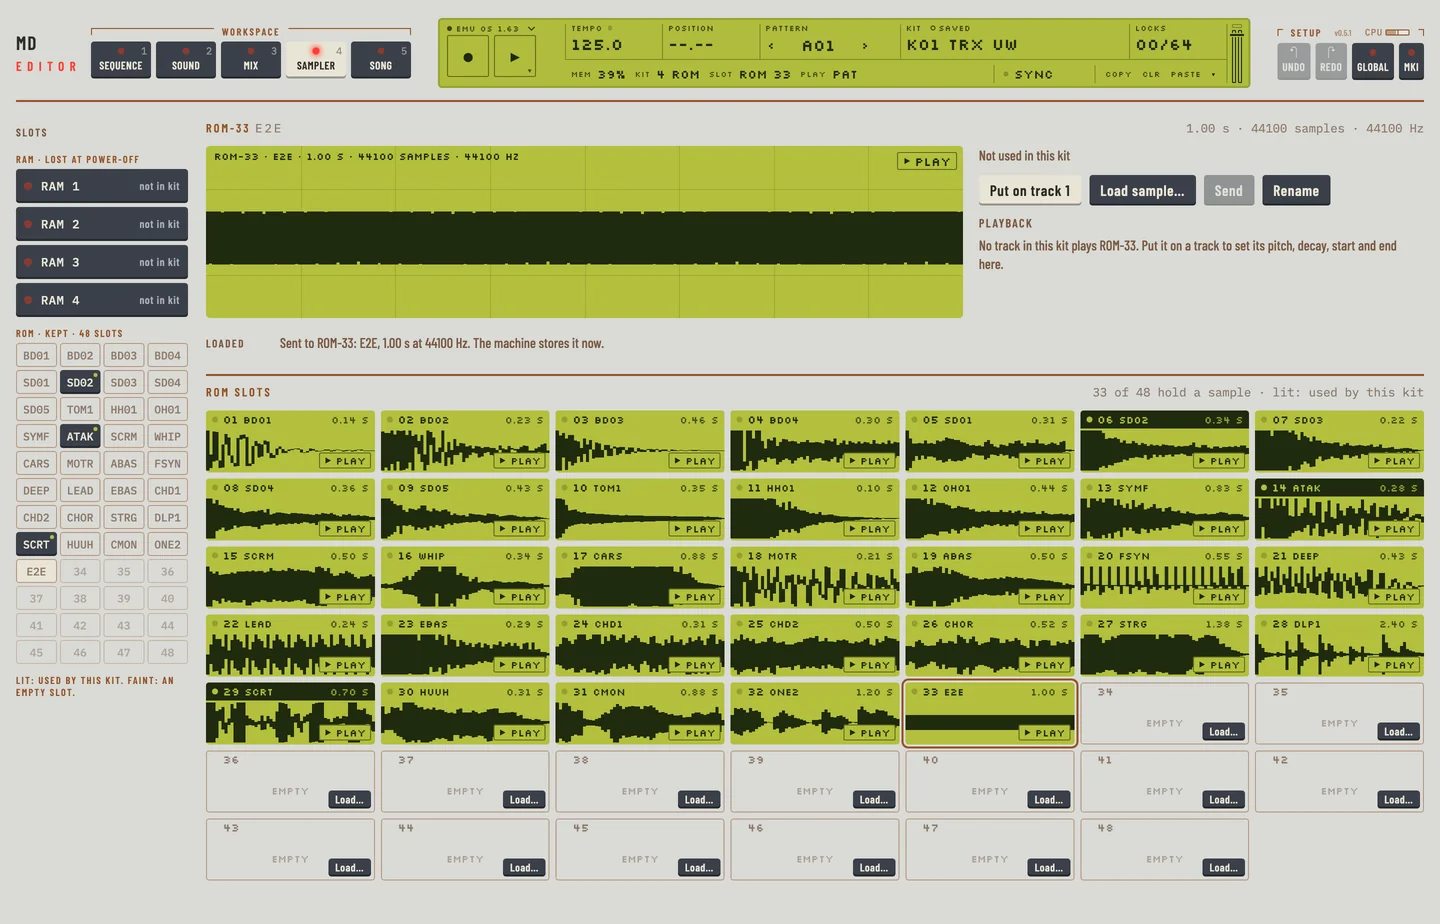
- Drag the WAV file onto the waveform of the slot. The editor sends it, and the slot holds the sample.
SYSEX IMPORT WITH A PREVIEW #
Choose IMPORT SYSEX… in the engine menu to look inside a SysEx file before you send it. You tick the kinds, choose where each goes and read the report. The steps are in "GENERAL SYSEX RECEIVE" in chapter 10. The tick Read back and compare at the foot of the panel decides whether the import reads the slots back after it sends them.
MIDI NOTE LIGHTS #
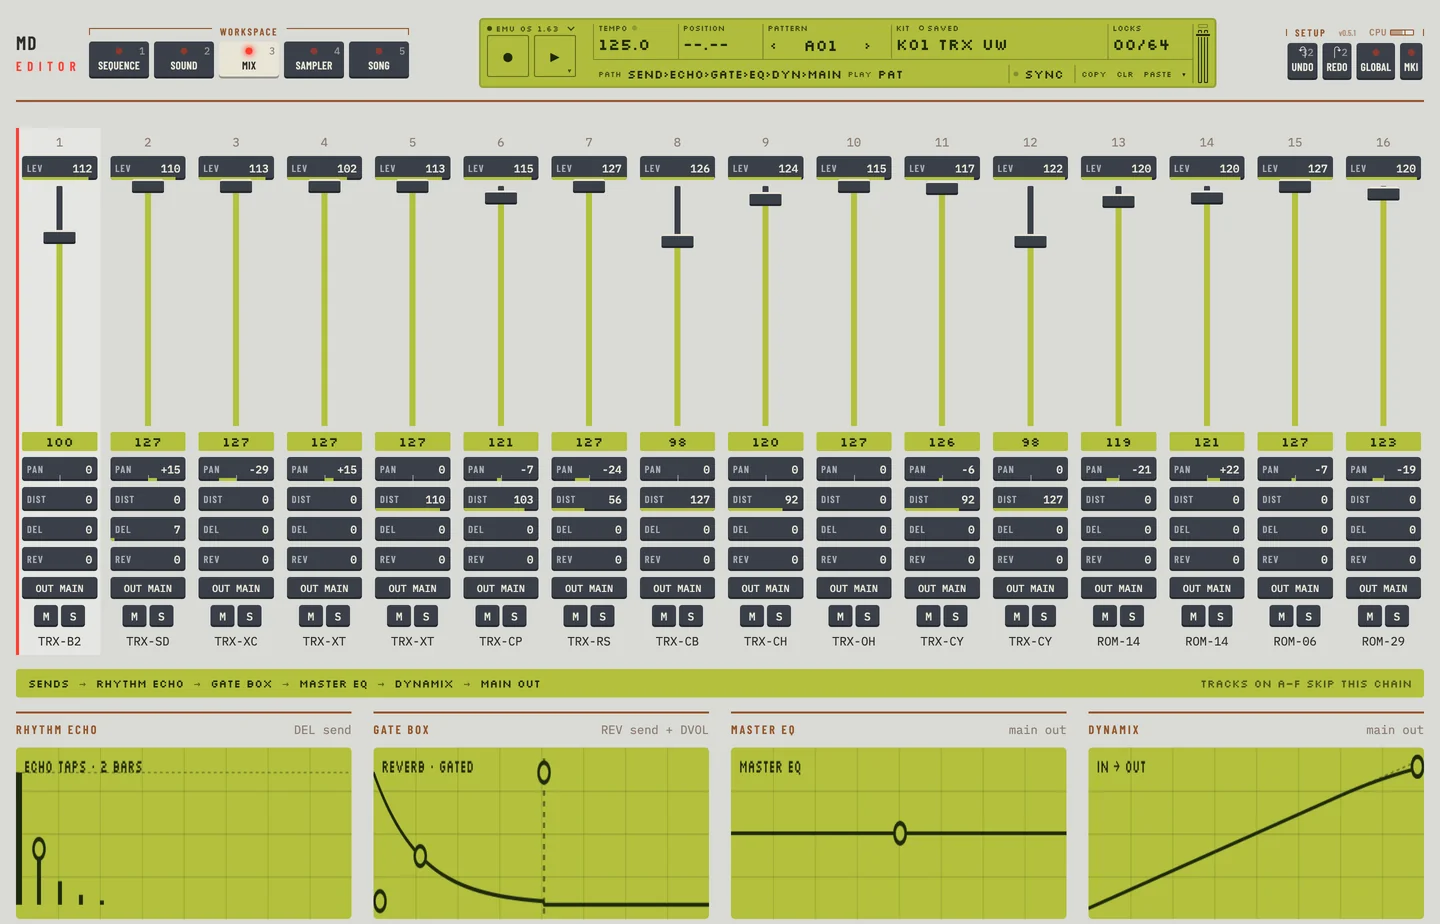
The track you play from a MIDI keyboard lights on the track rail and in the mixer.
- Click the Kit tab.
- Play the note of track 3 from a MIDI keyboard on a channel other than the base channel. No track lights.
- Play it on the base channel. The number of track 3 on the rail lights for a moment, then goes out.
- Click the Mix tab and play track 3 again. Its light on the strip lights and no other does.
The notes that play each track are set in "MAP EDITOR" in chapter 10.
THE SELECTED TRACK FOLLOWS THE LAST TRACK PLAYED #
The machine has no such function. With it on, the track you select changes to the last track you played from a MIDI keyboard. It is off until you turn it on, and the project keeps the choice.
- Open the engine menu and choose FOLLOW PLAYED TRACK: OFF. It reads FOLLOW PLAYED TRACK: ON.
- Play the note of track 5 from a MIDI keyboard on the base channel. Track 5 is selected.
- Play the note of another track on a channel outside the four base channels. The selection stays where it was.
- Choose the entry again to turn it off.
The notes that play each track are set in "MAP EDITOR" in chapter 10. The keys of the computer keyboard and the audition of a sample never move the selection. Following replaces a selection of several tracks with the one track played. While a question is open, or LEARN waits for its note, the selection stays where it is.
MIDI LEARN: A CONTROLLER KNOB MOVES A VALUE #
The machine has no such function. A knob or fader on a MIDI controller can move any sound parameter of any track. The mappings belong to the project. They are saved with it and come back when you open it.
- Click the Control key in the Setup group, right of Learn, or press [6]. Click it again to leave. The matrix lists the eight knob rows, every learned CC and the app modulators against the 16 tracks.
- Click LEARN in the top bar, or press [L].
- Click any value on the page, for example DEC on the Kit page. The value shows the learn mark.
- Turn a knob on your controller both ways. The line in the inspector on the Control page counts the values seen: 0 of 2, then 1 of 2.
- The second value completes it. A message names the CC, its channel and the target. The Control page opens the row of that CC with the new mapping.
- Press [ESC] to leave LEARN.
A button is learned the same way: press it and release it. It sends its highest value when pressed and its lowest when released. Inv turns that round. Notes are not learned. The notes that play each track are set in "MAP EDITOR" in chapter 10.
Values that belong to no track
Every value the page lets you edit can be learned. That includes the four master effects on the Mix page (Rhythm Echo, Gate Box, Master EQ and Dynamix, eight values each), the tempo, in the Pattern tab the SWG and ACC values of the playing pattern and, on the Kit tab, the LFO page of the selected track: the two shapes SHP1 and SHP2, UPDTE and the LFO's target, a track and one of its parameters. Click one in LEARN, as you would a sound value. On the Control page they have a column of their own, FX, at the right of the matrix. To add one without learning, choose Global values in the first list under Add, then the value in the second.
A learned CC moves the value as a click on the page does: the machine, the page and Undo agree. A turn of a knob is one undo step. The CC spreads over the value's own range, so a knob covers 30 to 300 on the tempo, 50 to 80 on the swing and 0 to 15 on the accent. A relative knob steps by one.
A choice is learned the same way: the CC spreads over the entries of the list. A knob turned through its travel steps an LFO through its six shapes, or through FREE, TRIG and HOLD. The LFO's speed, depth and shape mix are sound values of the track and are learned as before.
You cannot learn names, or a machine, a mute group or an output.
Add a mapping without learning
Select a row of the matrix. Under Add choose a track and a parameter, then click Add target. The same row can move several targets. A knob row listens on any channel. A CC learned from a controller listens on the channel it came on, and its row says which. The stepper on a knob row changes the CC that knob sends. Its targets follow in the same edit.
Knob 1 to 8 in a DAW
The plug-in has eight host parameters, Knob 1 to Knob 8, after the tracks' parameters. Each is one knob row. Map one to a Rack macro or a control surface such as Push 2, or draw its automation: it moves the row's targets as the knob's CC would. A CC on a knob row moves the host parameter too, so the DAW can learn it from a turn and record it. The value of a knob is not saved with the project. Its targets are.
When a mapping hides the machine's own CC
The machine answers many CCs on the four channels from its base channel. A mapping on the same channel and CC wins: the machine no longer hears that CC. The inspector says so under the mapping, for example: Overrides the machine's CC 21 on channel 1: T1 DEC. Remove the mapping and the machine's CC works again. A mapping on a channel the machine does not use hides nothing.
The count and what was left out
The line under the matrix header counts the mappings against the most a project holds, 128. At 128 Add target is off until you remove one. When a project opens with mappings that could not be kept, for example a track that no longer exists, a message says how many, and the Control page lists each reason under the matrix header.
With the HW MIDI engine
With the HW MIDI engine the plug-in's MIDI in is the machine's own MIDI out, so there is nothing to learn from. The Control page says so under the matrix header, LEARN stays off, and the mappings are kept for when you choose the emulator again.
THE CPU METER AND THE SPEED-UPS #
The machine has no such function. A meter after the version in the top bar shows how much of the audio time the emulation takes. Click the meter for its details: the average, the worst block, the machine's speed and the speed-ups. The speed-ups are switched in the Developer menu.
- Look at the meter after the version in the top bar. It reads a share of the audio time.
- Press [SPACE]. While the machine plays, the meter moves.
- Click the meter. Its details open under it: the average, the worst block, the machine's speed, the rate and block size, and the speed-ups.
- The details follow the meter while they are open. Press [ESC] to close them.
- Open Developer and choose Speed-ups. The tick turns, and the machine runs with the speed-ups off. Choose it again to turn them on.
- In the details of the meter, Speed-ups (each)… lists every lever. Switch one off and on again.
THE OUTPUT METER AND VOLUME #
Two bars and a volume line sit at the right end of the LCD. The bars show the left and right peaks of the output. The line sets the volume of the editor.
- Drag the meter down. The volume falls, and the readout under the LCD says so while it changes. The readout goes a moment after.
- Scroll up one notch to raise it by 1 dB.
- Drag it to the foot to turn the output off.
- Double-click the meter to go back to 0 dB.
- Press [SPACE]. The bars follow the sound.
THE KEYBOARD VIEW #
The keyboard view draws the computer keyboard with the words of each key and a search.
- Press [?], or click ? in the top bar. The keyboard view opens.
- Click the [⌥] / [FN] layer to see the keys of that layer.
- Click a key on the drawn keyboard. Its job is written in words.
- Type "undo" in the search. The key [⌘] [Z] is marked and the list keeps the undo keys.
- Press [ESC] to close it.
THE COMPUTER KEYBOARD PLAYS #
The two rows of letter keys play the selected track, on any workspace.
- Pick a track on the rail.
- Press [A]. The track plays.
TAP TEMPO #
Tap a key to the beat to set the tempo.
- Press [B] or [T] five times in time. Or press [⇧] + [B], which taps on every workspace.
- The tempo field takes the tempo you tapped. Taps half a second apart read about 119 beats per minute.
See "TAP TEMPO" in chapter 8.
PATTERN QUEUE AND CHOOSER #
Pick any of the 128 patterns from the chooser. A pattern chosen while the machine plays waits for the end of the pattern that plays.
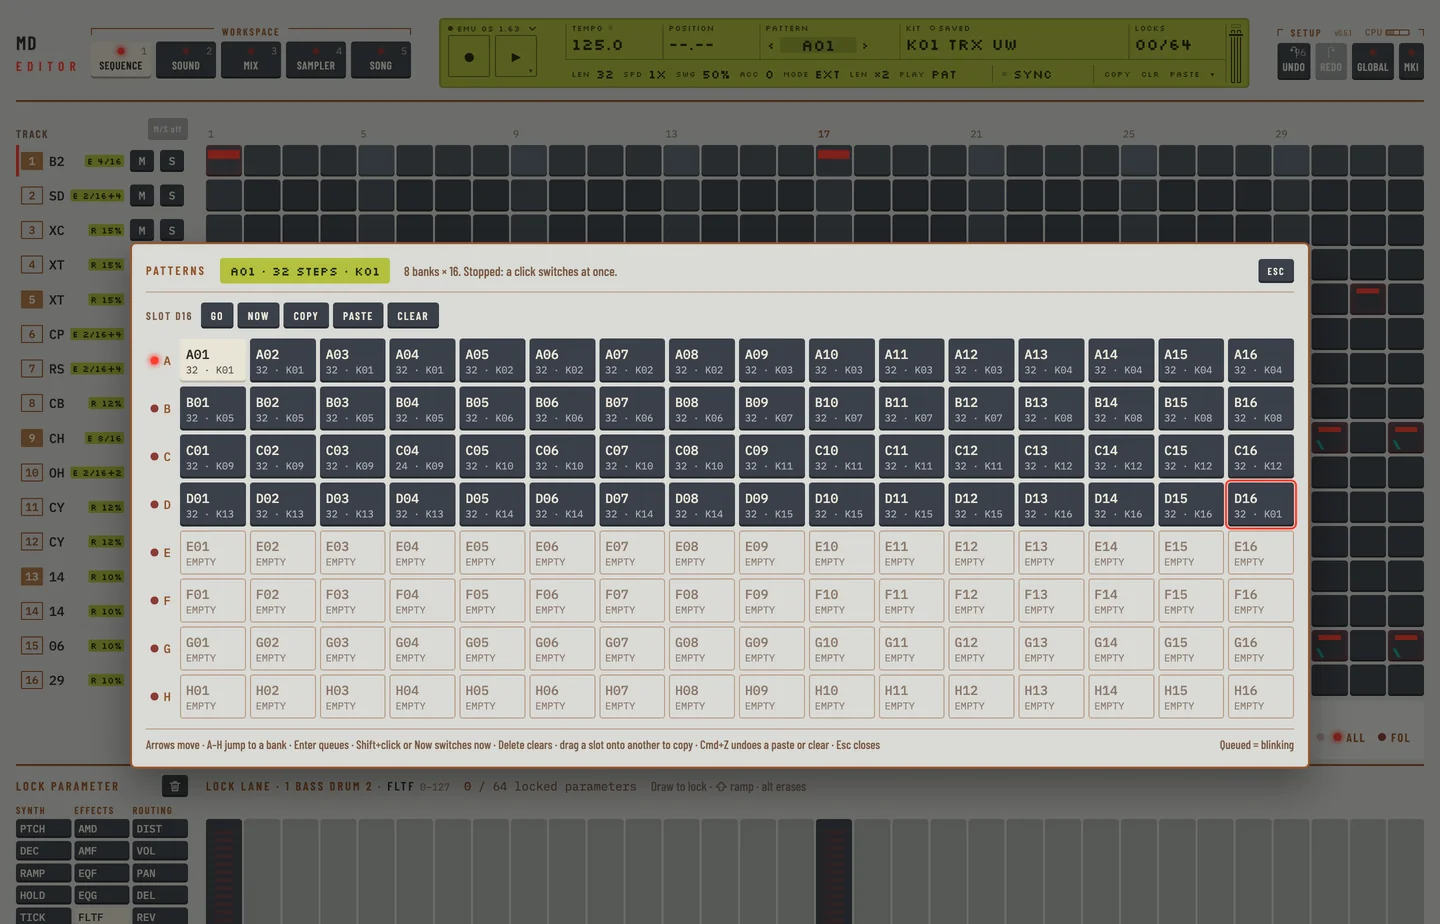
- Click the pattern on the LCD. The chooser shows 8 banks of 16. A slot with no trigs says EMPTY. Every other slot gives its length and kit.
- Press a bank letter, or click the key of a bank. The selection moves to that bank.
- Click a pattern. With the machine stopped, it switches at once.
- Press [SPACE]. While it plays, click › on the LCD. The next pattern is queued, and it starts at the end of the one that plays.
- Move to a pattern with trigs and click Copy. Move to another and click Clear. Its tile says EMPTY. Click Paste. The slot has the steps and the kit link of the copy.
- Press [⌘] + [Z] twice to bring the slot back. Press [ESC] to close the chooser.
KIT AND SONG SLOTS #
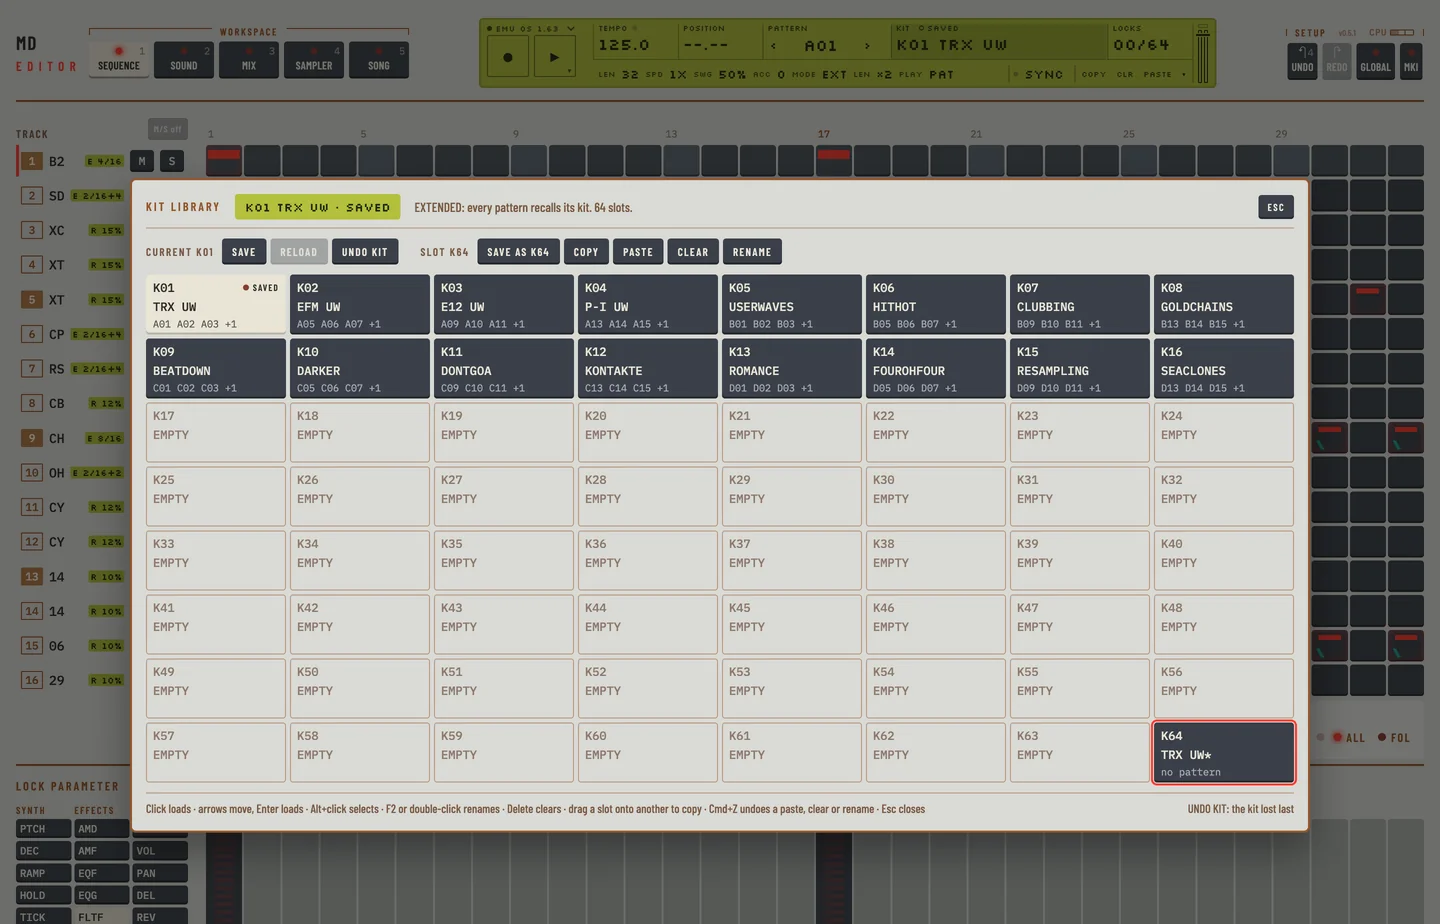
The kit library and the song slots load, copy, paste, rename and clear a slot. Each is one undo step.
Kit slots
- Click KIT on the LCD. The kit library opens.
- Click a slot with [⌥] held. It is selected and not loaded.
- Click Copy. [⌥] click another slot and click Paste. Answer Overwrite when the editor asks.
- Press [⌘] + [Z]. The slot is back.
- To rename, click Rename, type a name, press [ENTER] and answer the question.
- To clear, select a slot and press [DELETE]. It is cleared as the machine clears it. [⌘] + [Z] brings it back.
Song slots
- Click the Song tab. Click an empty song slot. It is selected, and the machine's song stays.
- Click Load to make the machine play that slot's song.
- Press [F2], type a name and press [ENTER]. The slot is named.
- Click Copy, select another slot and click Paste. The song is there, with no question.
- Drag a slot onto an empty one to copy it.
- Select a slot and click Save to…, type a name and press [ENTER]. The machine's song is saved there.
- Click Clear. The editor asks first. Answer Clear song. The slot is empty and quiet.
- Press [⌘] + [Z]. The song is back. Press [⌘] + [⇧] + [Z] to empty it again.